
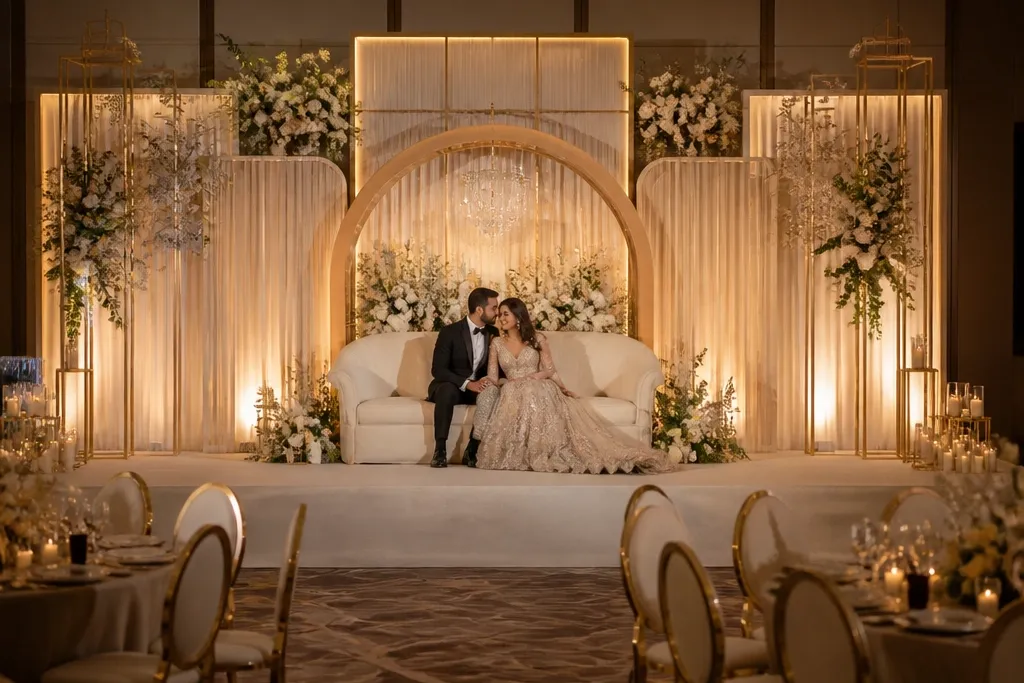
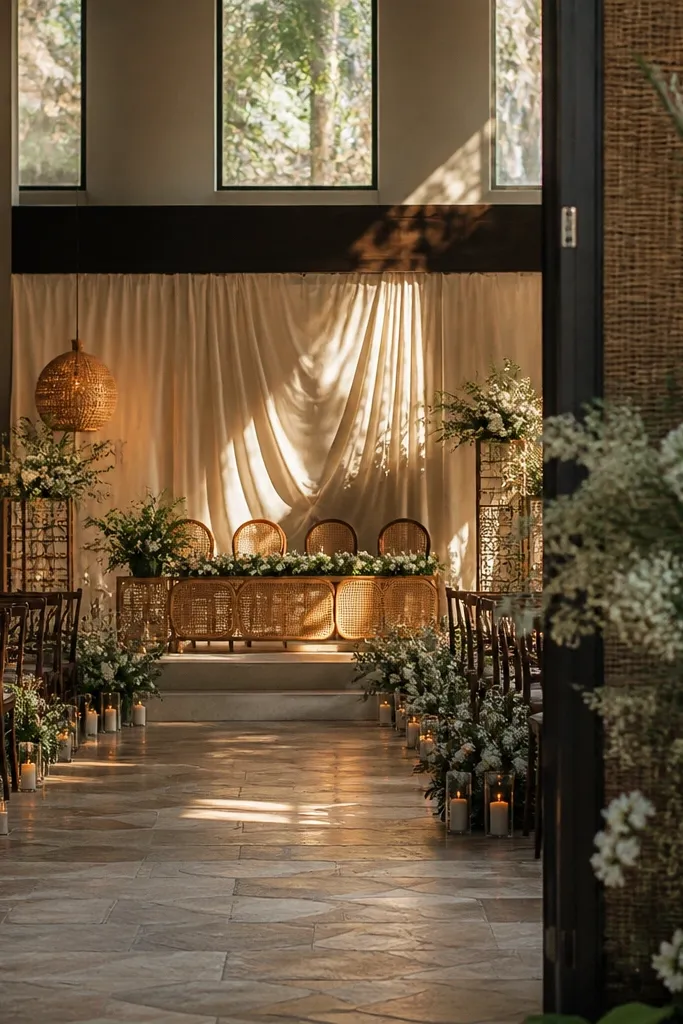
1. Linen Draped Arch with Brass Candle Clusters
This is the stage look that photographs like “effortless luxury” without going full traditional. The linen drape creates broad, flattering curves that hide hardware and uneven walls. Brass candle clusters add warm highlights that show up clearly in evening photos, especially when you place them slightly forward of the arch. Pair it with muted greenery — eucalyptus or olive — so the cream stays the hero. This works best for winter and fall receptions, and it’s especially good in venues with plain backdrops that need shaping.
Start by renting or building a simple arch frame in white or natural wood, then wrap it with cream linen panels that overlap by 2-4 inches. Add 3-5 brass candle holders across the front of the arch, spacing them evenly so the light creates a gentle arc. Finally, tuck greenery into the drape at three points — left, center, and right — so the stage looks full without turning into a flat wall. Keep candle placement at least a few inches from fabric for safety and use LED candles if your venue restricts open flame. Budget for linen rental or purchase plus 3-5 candle holders, and plan 1-2 hours for setup.
Quick tipUse LED candles with a warm 2700K tone so the glow looks real on camera.
Skip thisAvoid thin, see-through linen — it looks wrinkly and cheap once lights hit it.
2. Rattan Panel Frame with Silk Ribbon Backdrop
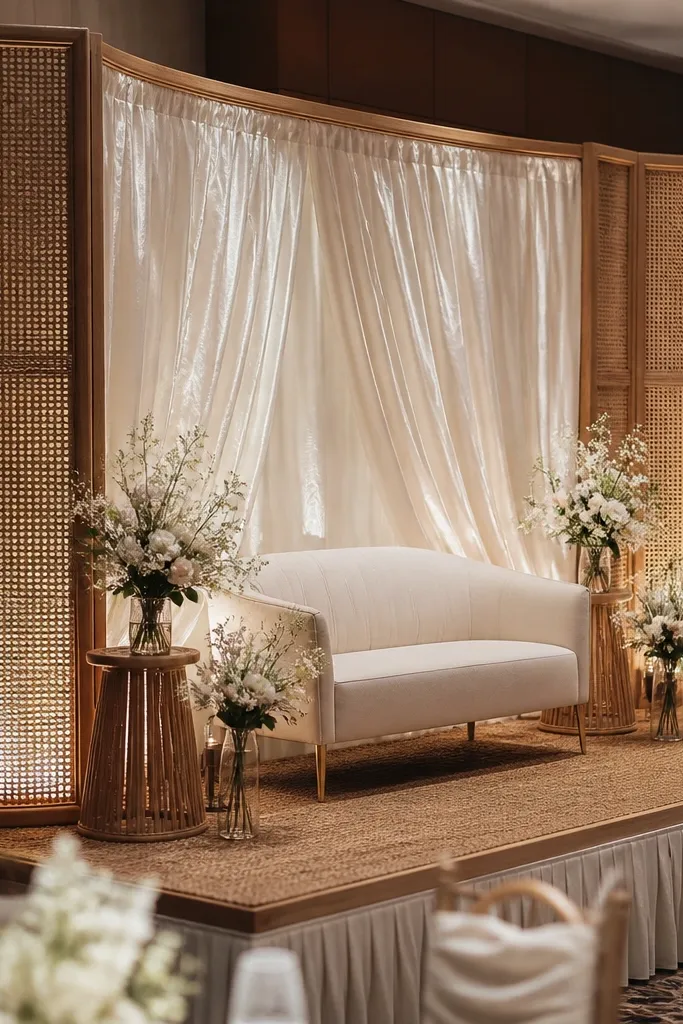
Rattan panels are a hidden gem because they already have texture and structure, so you don’t need a dense floral wall. The woven pattern reads warm and handmade in photos, and the stage instantly looks “designed” even with minimal flowers. Silk ribbon gives movement — it catches light and creates soft streaks that look great in slow motion videos and flash photos. This is perfect for spring, garden-style weddings, and beach-adjacent venues where you want airy without looking bare. It also works if your stage is small because the frame defines the couple without taking up floor space.
First, place two upright rattan panels on either side of your stage center, then connect them with a top bar or removable ties so the shape stays stable. Next, hang ivory silk ribbon vertically behind the couple — use 8-12 strands, each 6-8 feet long, and vary lengths by 6-12 inches for a natural drape. Then add a single floral accent cluster at the center where the couple will stand. For travel logistics, roll ribbons and wrap panels in moving blankets; it’s easy to transport. Plan 1-1.5 hours for setup and keep ribbon strands taut so they don’t tangle.
Quick tipStagger ribbon lengths so the ends don’t line up — that’s what makes it look intentional.
Skip thisSkip heavy floral overlays on rattan — it turns the textured panel into a messy wall.
3. Charcoal Velvet Curtain Wall with Warm Uplights
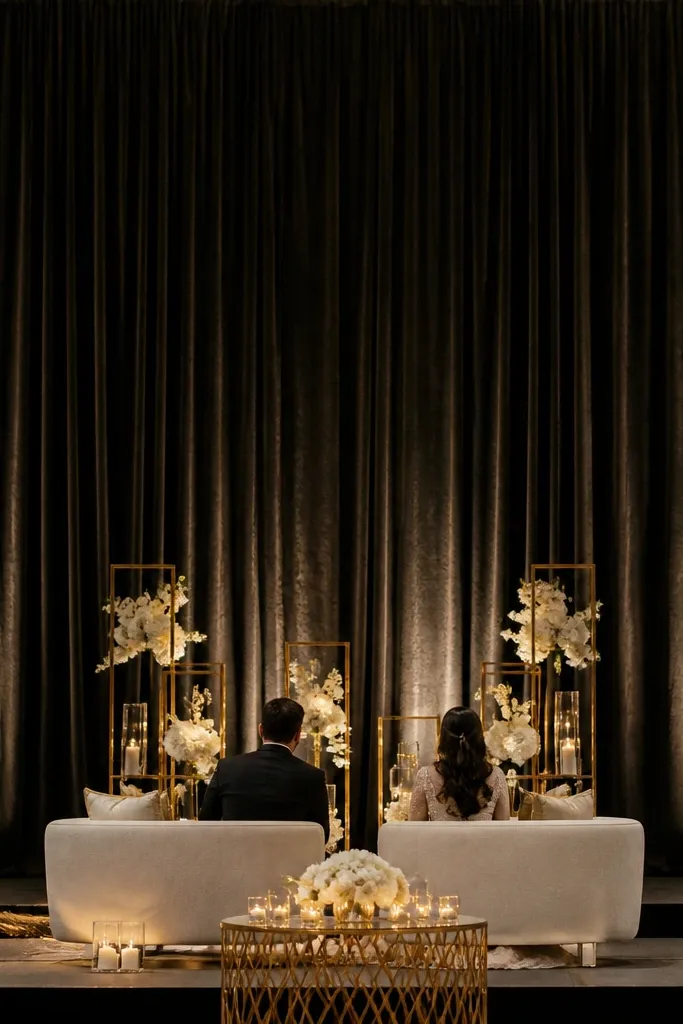
If your venue is bright and busy, charcoal velvet fixes it fast. Velvet absorbs light, so the couple and center decor pop instead of blending into the room. Warm uplights placed low and angled upward create a gradient that looks expensive in photos. This style is a strong match for modern weddings, evening ceremonies, and venues with high ceilings. It also hides imperfections in the wall behind the stage because the curtain falls in deep folds.
Start by measuring the stage width and ceiling height, then rent a full-width curtain kit with a track or heavy tension rods. Hang charcoal velvet in a single continuous run across the back wall, then gather lightly at the center so the folds frame the couple. Place 4-6 uplights on the floor at the base of the stage, angled upward at 15-25 degrees for a soft wash. Use 2700K bulbs for a warm look, and test a quick photo from the guest perspective before locking everything in. Setup usually takes 2-3 hours because curtain mounting takes time.
Bring a tape measure and confirm your curtain height against the couple’s standing height so the folds sit at shoulder level.
Don’t use cool white lighting — it makes velvet look gray and flat.
4. White Window Frame Backdrop with Green Vines
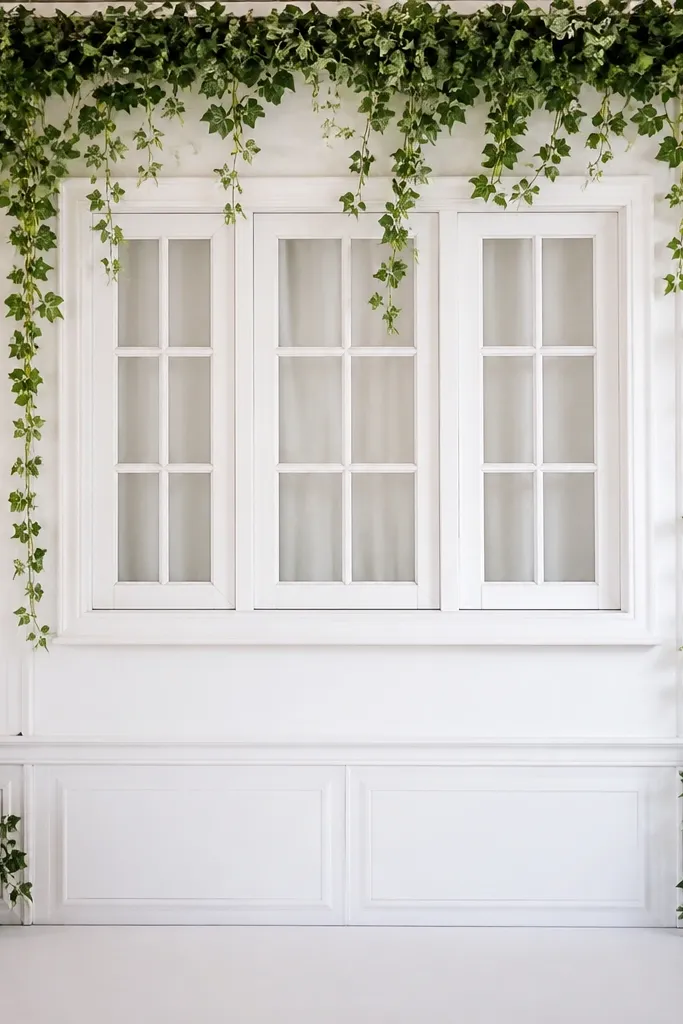
A window frame is a hidden gem because it instantly creates a scene within your wedding — like a built-in photo border. The white frame gives crisp edges that stand out in both natural light and flash. Trailing vines soften the geometry and keep it from feeling too architectural or stiff. This looks especially good at daytime receptions with sun coming from the sides. It’s also great for venues that already have a strong wall texture, because the frame adds order and the vines add softness.
First, rent a tall white window frame (about 8-10 feet wide and 8-9 feet tall) and place it centered behind the couple’s chair line. Then weave light vine garlands through the frame openings, letting them drape down 18-30 inches on both sides. Add one small floral cluster at the top center where the frame “arches” visually. Finally, secure vines with zip ties to hidden spots on the frame so nothing shifts during setup. Budget for frame rental and 2-3 vine garlands; plan about 60-90 minutes.
Use vines with long, flexible stems so they drape cleanly instead of flopping.
Avoid thick, bushy florals inside the frame — they block the window shape.
5. Oversized Macramé Wall Hanging with Garden Lighting
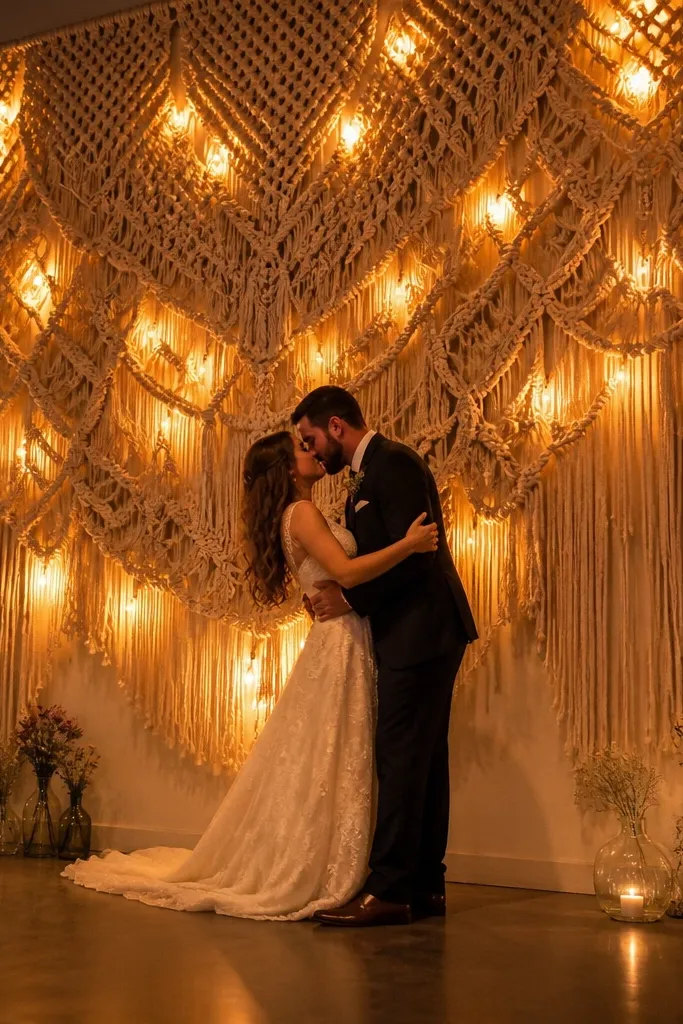
Macramé reads warm, artsy, and photogenic because it has lots of negative space. That negative space matters: it prevents the stage from looking crowded and lets your couple stand out. Pair it with small garden string lights (warm white or amber) tucked behind the macramé so the knots glow from within. This is a great match for boho weddings, rehearsal dinners, and indoor venues with plain walls. It also works in summer because the look is light and airy even when you add candles elsewhere.
Start by anchoring a macramé wall hanging to a stand or wall bracket at the center height of the couple’s faces (usually 6-7 feet). Then place string lights behind the macramé, using zip ties to keep wiring hidden — aim for a gentle halo, not a full, bright wash. Add 2-3 low lanterns on the stage floor to balance the glow. For costs, macramé hangings are usually rental-friendly; string lights are cheap, so this stays budget-conscious. Plan 1-2 hours for setup including cable management.
Quick tipChoose warm white or amber lights — pure white looks harsh against beige macramé.
Skip thisSkip multicolor lights unless you’re going for a festival vibe — they kill the wedding tone.
6. Pampas Grass Plumes with Matte White Planter Troughs
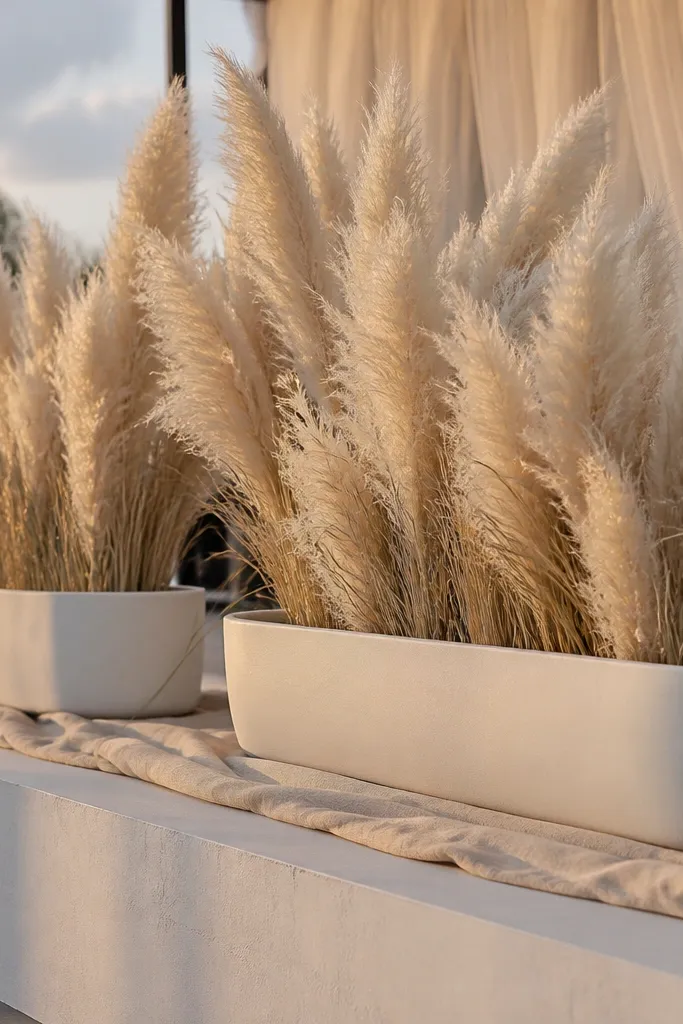
Pampas grass is one of the best hidden gems wedding stage decor options because it adds height without needing a huge floral budget. The plumes create a soft, feathery silhouette that looks great in both wide shots and close portraits. Matte white planter troughs make it feel styled instead of wild. Keep the palette tight — cream, ivory, and a touch of taupe — and the stage looks cohesive. This works year-round, but it’s especially photogenic in fall and winter receptions where you want warm neutrals.
Start by placing two matte white planter troughs on either side of the stage center, leaving a gap for the couple. Insert 3-5 pampas stems into each trough, trimming stems so the highest plume lands around 7-8 feet on taller stages. Add a couple of smaller plumes near the center for symmetry. Finally, secure stems with floral foam or removable weights inside the trough so they don’t shift. Expect 60-90 minutes for staging and transport; it’s easy to pack because stems are light.
Quick tipSpray stems with a light anti-static mist if your venue is dusty — it reduces flyaway fibers on camera.
Skip thisDon’t mix in bright dyed colors — it reads costume-y in photos.
7. Mirror Mosaic Arch with Clear Acrylic Sign Holder
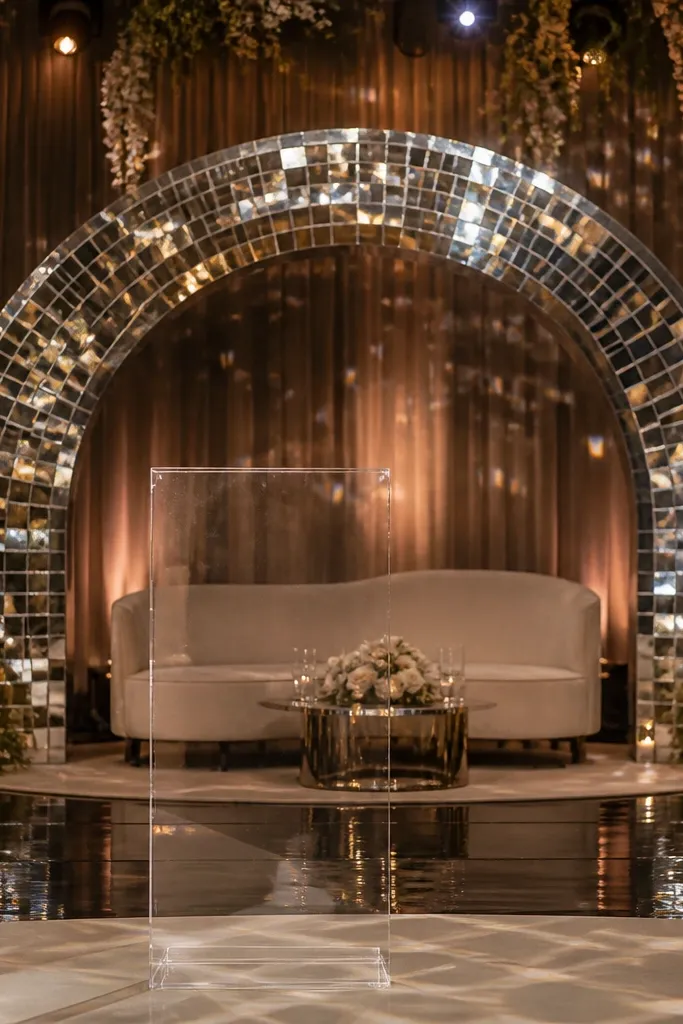
A mirror mosaic arch is the hidden gem for receptions where you want maximum sparkle without heavy florals. The mirror pieces catch spotlights and flash, giving the stage a high-end glow. Use a clear acrylic sign holder in front so the couple can still be the visual anchor while your text stays readable in photos. Keep greenery minimal — a few olive sprigs — so the mirrors stay the star. This looks stunning at indoor venues with overhead lighting and works best in evening receptions.
First, rent a mirror mosaic arch or a mirror tile backdrop panel and secure it to a stable base. Place the clear acrylic sign holder centered so it sits at chest height when the couple stands behind it. Add a thin line of greenery on each side of the arch, then tuck small white blooms only at the base corners. For setup, plan 2 hours because mirror pieces need careful handling and leveling. Budget depends on rental availability; plan extra time for any last-minute alignment.
Quick tipDo a test photo with flash — if the mirrors blow out, shift the arch angle slightly off-center.
Skip thisAvoid placing mirror too close to bright overhead fixtures — it can create glare spots behind the couple.
8. Stone-Style Column Rentals with Trailing Orchid Vines
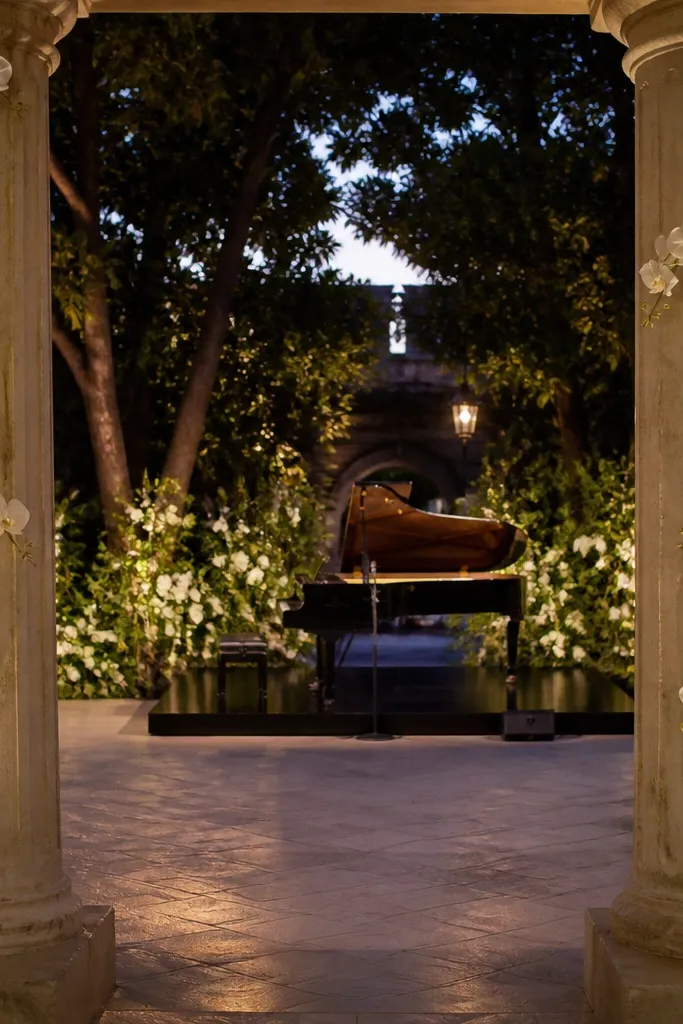
Two columns change a stage instantly because they give you a classic framing shape without building an arch. Stone-style columns read expensive on camera, especially when you add orchids that have clean, high-contrast petals. Trailing orchid vines soften the columns so it doesn’t feel like a showroom display. This is great for formal weddings, winter events, and venues with a stage that needs symmetry. It also helps if you’re short on time because columns create structure fast.
Start by renting two stone-style columns about 7-9 feet tall, then place them evenly spaced so the couple stands centered between them. Next, add trailing orchid vines from top to mid-height on each column, letting the ends hover around shoulder level. Use small orchid clusters at the base corners so the columns look grounded. Finally, secure vines with hidden ties so nothing droops unevenly. Plan 90-120 minutes for setup and transport; columns are heavy, so plan help for loading.
Quick tipStick to white or pale blush orchids — bold colors can overpower stone in flash photos.
Skip thisSkip thick greenery wraps around the columns — it hides the stone texture.
9. Floating Candle Platforms with Low Floral Halo
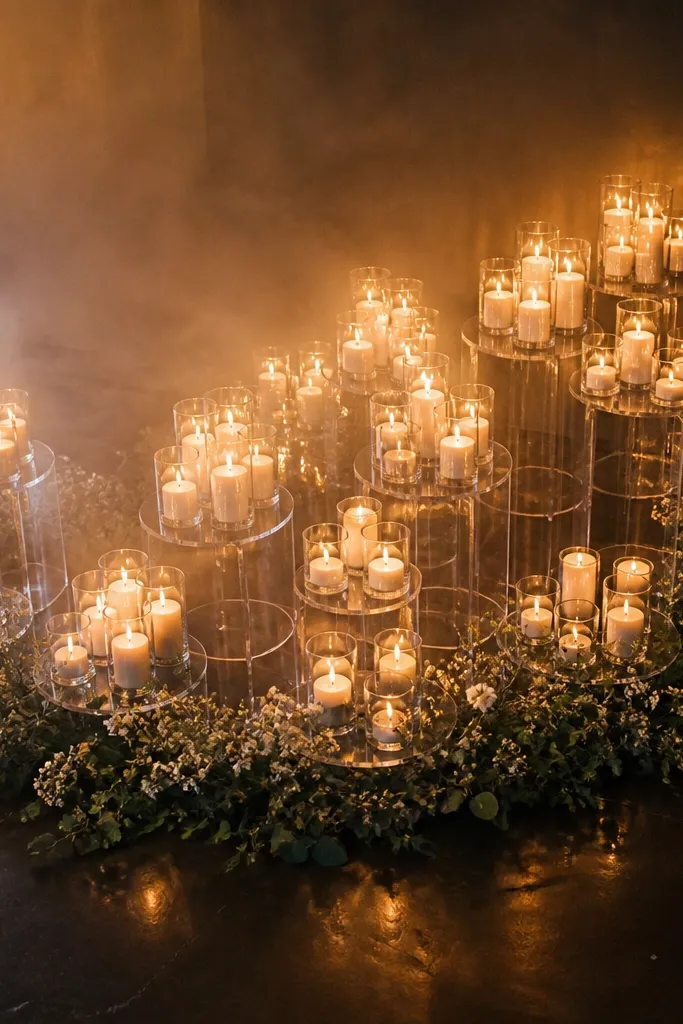
This look is made for stages where the back wall is plain but the floor space is workable. Low floral halos keep the couple unobstructed while candles add height and romance. The key is using floating-style candle platforms or tiered clear bases so the candles don’t look like random table settings. It’s especially photogenic when the reception has a dimmer vibe and warm lighting. This works in any season, but it shines in evening receptions.
Start by setting up two low platforms centered behind where the couple will stand, leaving a clear line so faces stay visible. Build a low halo of greenery and small blooms around the base of the platforms, keeping it under 18 inches tall. Place 6-10 candle holders on the platforms, spaced evenly, then add one bigger candle cluster at center for focal control. Use LED candles if you’re in a venue with flame restrictions. Expect 60-90 minutes and keep candles secured so they don’t slide on polished floors.
Use glass hurricane shades if wind or airflow is an issue — they look clean in photos.
Avoid tall candles — they block the couple and create awkward sightlines.
10. Terracotta Lantern Ladder with Hanging Greenery Swags
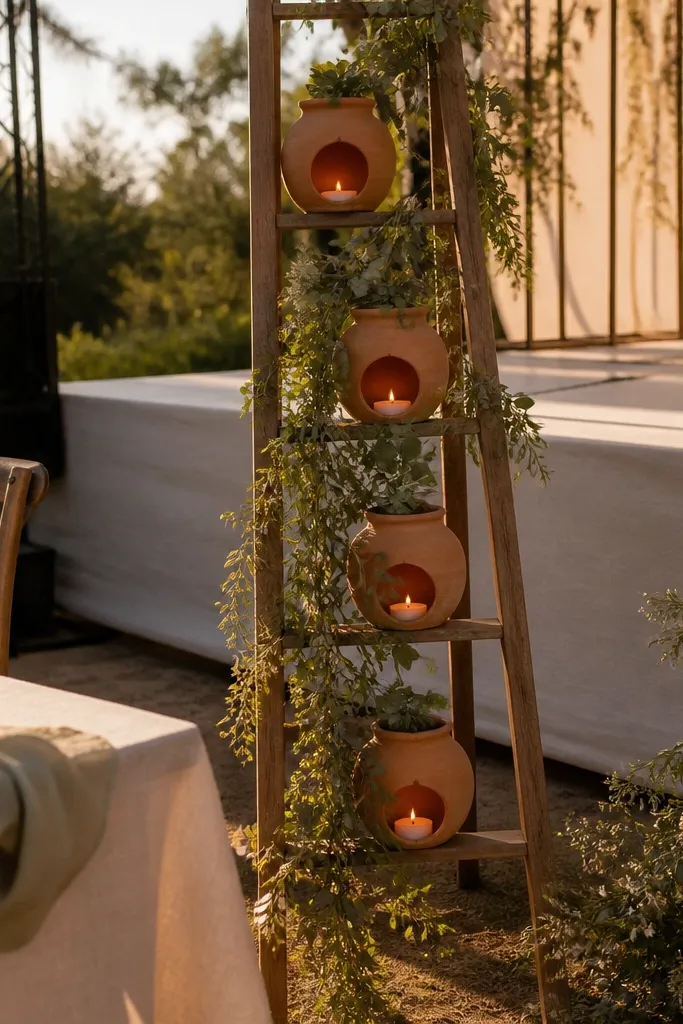
Terracotta lanterns are a hidden gem because they look warm and textured even in daylight, not just at night. A lantern ladder gives you vertical movement that reads well in wide shots. Hanging greenery swags soften the lantern line so it feels romantic instead of industrial. This style fits late summer, fall, and rustic-modern weddings. It also photographs beautifully in venues with warm wood tones.
Start by creating a ladder-like arrangement using lantern stands or tiered bases — aim for 3-5 levels with the tallest lantern near center. Hang greenery swags from the top supports so the leaves arc outward on both sides. Place lanterns so they’re slightly forward of the swag line, which helps separate layers in photos. Finally, tie everything down with removable ties so the ladder doesn’t shift. Setup takes 1-2 hours; lanterns pack well, but you need careful leveling.
Use LED lanterns with flicker settings set to low — too much flicker reads gimmicky on camera.
Skip bright neon lantern colors — terracotta should stay earthy.
11. Oversized Floral Fan Backdrop in One Color Family
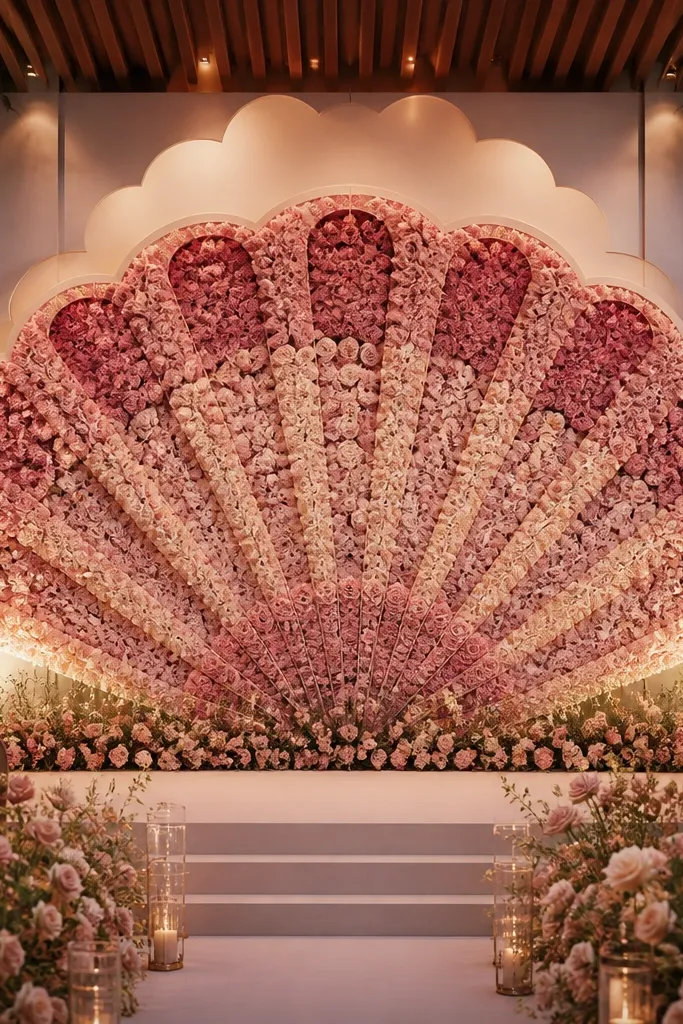
A floral fan backdrop is a smart way to get maximum impact without covering the entire wall. The fan shape pulls attention toward the center and creates a natural “spotlight” behind the couple. Keeping everything in one color family makes the stage look cohesive and premium, even if the flowers are budget-friendly. Choose blush, dusty rose, or soft peach for a flattering skin-tone effect in photos. This works best for spring and early summer receptions, especially when your venue has a strong stage centerline.
Start by building a fan frame from lightweight PVC or a rental panel, about 8-10 feet wide and 7-8 feet tall. Attach flower foam or netting to the frame so you can place blooms securely. Then create the fan with 2-3 layers of flowers — larger blooms at the center, smaller ones toward the edges — so it has depth. Finish with a thin greenery border only along the outer edge so the fan shape stays readable. Plan 3-4 hours for assembly if you’re doing it yourself; buy pre-made flower clusters to save time.
Use one dominant flower (like peonies or garden roses lookalikes) plus filler greenery — too many flower types look chaotic.
Avoid multi-color rainbows — the fan loses its clean focal effect.
12. White Balloon Garland with Clear Acrylic Name Sign
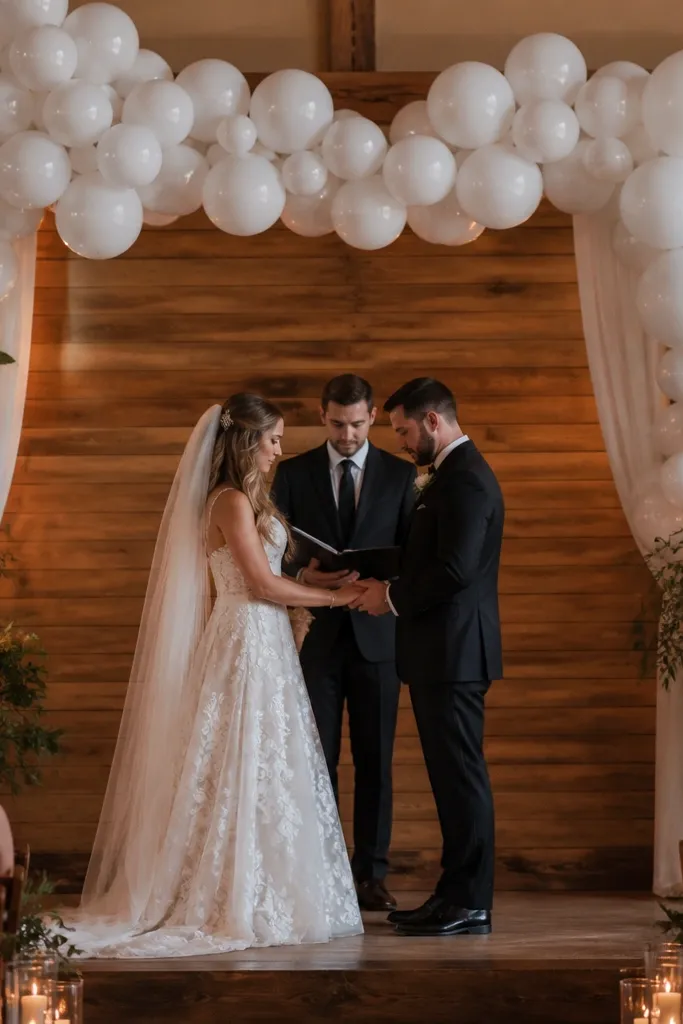
Balloon garlands are a hidden gem because they’re fast, photogenic, and they fill a stage gap better than most people expect. White balloons with a mix of matte and gloss finishes create dimension, and they frame the couple without blocking sightlines. A clear acrylic name sign adds a clean, modern focal point that still looks good in close portraits. This is great for venues where you need something installed quickly or where stage decor rules limit large constructions. It’s also perfect for budget-conscious couples who still want “wow” photos.
Start by choosing a balloon garland kit in white with both matte and gloss balloons, then decide your width based on stage size — usually 8-12 feet wide. Build the garland on the floor first, then lift and secure it behind the couple using a weighted base or wall ties. Add the clear acrylic sign centered at chest height with two small standoffs so it doesn’t wobble. Finish by tucking a small greenery strip at the bottom edge to hide balloon strings. Setup is about 60-90 minutes; plan for an extra person to handle lifting.
Quick tipUse helium only if you can secure it quickly — otherwise opt for balloon weights so it holds shape.
Skip thisSkip metallic gold balloon mixes if your venue lighting is cool — they can look yellowish.
13. Tall Pampas + Smoke-Gray Draped Side Columns
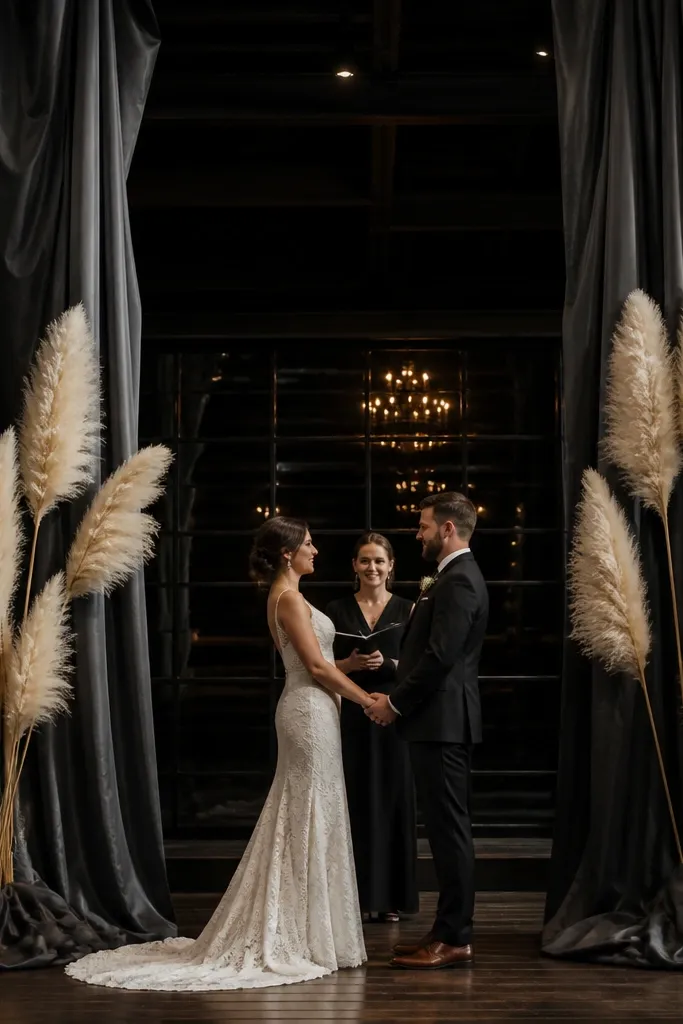
This is a polished take on pampas that looks intentional instead of boho-random. The trick is using draped side columns in smoke gray or charcoal to create a frame, then placing pampas plumes at slightly different heights for a sculpted silhouette. Gray fabric absorbs light and makes the cream plumes pop. It’s a great fit for modern weddings, indoor receptions, and ceremonies that want a moody photo vibe without going dark overall. It also works well when your stage has side walls you can anchor fabric to.
Start by anchoring two vertical drapes at the sides of the stage, each about 6-8 feet tall and 3-4 feet wide, in smoke gray fabric. Place tall pampas in matching planters on each side, trimming so the highest plume lines up near the centerline of the couple. Add one smaller plume cluster toward the front for a layered look. Finally, use removable ties or clips to keep fabric smooth and avoid wrinkles near the center. Setup takes about 90 minutes; the heavy lifting is just arranging stems and smoothing fabric.
Quick tipSteam the fabric before setup — wrinkles show up fast in flash photos.
Skip thisAvoid placing pampas too close together — you need spacing for the sculpted silhouette.
14. Gilded Picture Frame Backdrop with Minimal Greenery
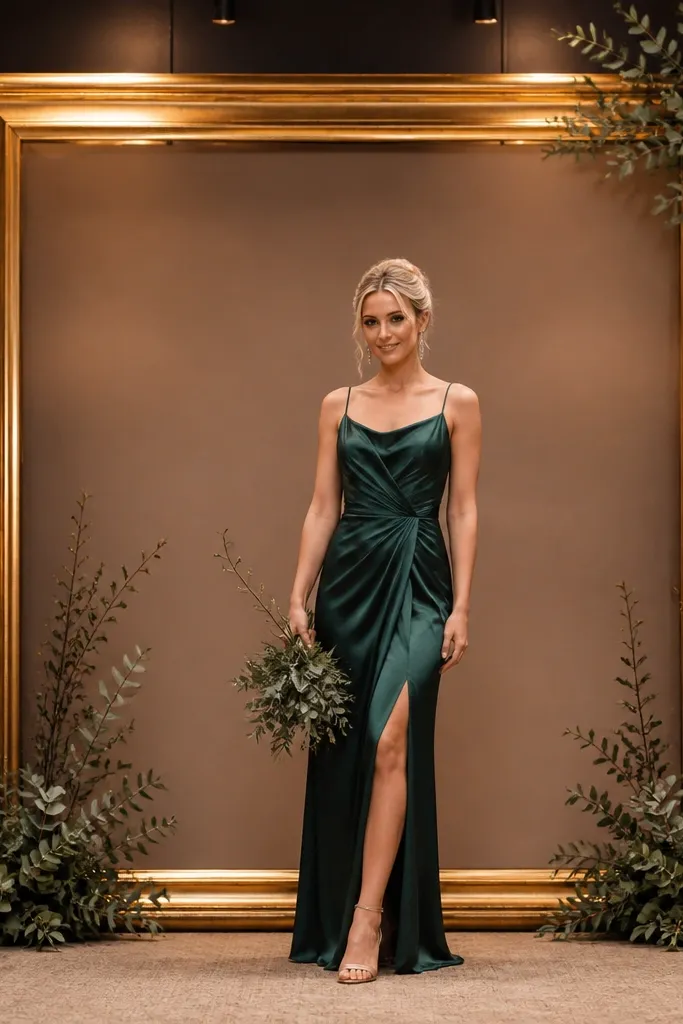
A gilded picture frame is a hidden gem because it’s basically a ready-made stage border. When you place the couple inside the frame shape, photos look composed and styled even if you use only a few greenery sprigs. The gold tone catches light and gives warmth without needing a full floral wall. This works best for classic and modern-classic weddings, especially indoors with controlled lighting. It’s also a smart move for smaller stages because the frame does the heavy visual work.
Start by renting a large ornate frame, typically 7-9 feet tall, and position it centered behind the couple. Add greenery at three points — top center, left bottom corner, right bottom corner — so the frame stays readable. For a photogenic touch, tuck a small cluster of white flowers at the center bottom where the frame meets the couple’s waist level in photos. Finally, secure the frame with sandbags or weighted bases so it doesn’t drift. Setup is 60-90 minutes and planning centers on stability and centering.
Quick tipIf your venue lighting is cool, choose antique gold instead of bright yellow gold.
Skip thisDon’t fill the entire frame edge with flowers — you lose the clean border effect.
15. Sequin Table Runner Look with Candlelight Centerline
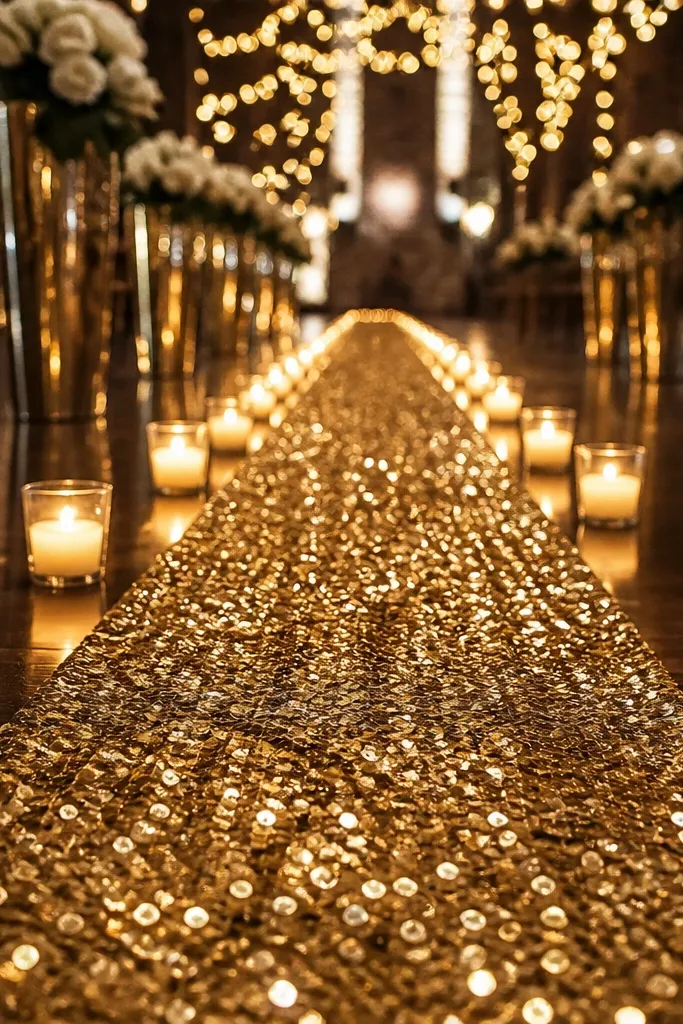
A sequin runner on the stage floor is one of the best hidden gems wedding stage decor moves because it adds sparkle where the camera sees it most. It also makes the stage feel dressed even if the back wall is plain. Pair it with a candlelight centerline — a row of small candles or LED votives — and the runner turns into a glowing path behind the couple. Choose champagne, not bright silver, for flattering skin tone and warm wedding photos. This works for winter, holiday-themed weddings, and evening receptions.
Start by measuring your stage width and choosing a runner that covers the area where the couple stands and walks behind — usually 6-10 feet wide depending on stage. Lay the runner flat and smooth, then tack the edges with discrete tape or clips so it doesn’t shift. Place 9-15 LED votives along the centerline, spaced about 6-8 inches apart. Add greenery only at the base corners so it doesn’t fight the sparkle. Setup usually takes 45-75 minutes; the main time is smoothing and securing the runner.
Quick tipDo a quick test photo from the guest side — sequin glare can look harsh if the venue lighting is too direct.
Skip thisAvoid full silver sequins in cool venues — it turns the stage icy.
16. Tropical Palm Frond Fan with White Orchid Tops
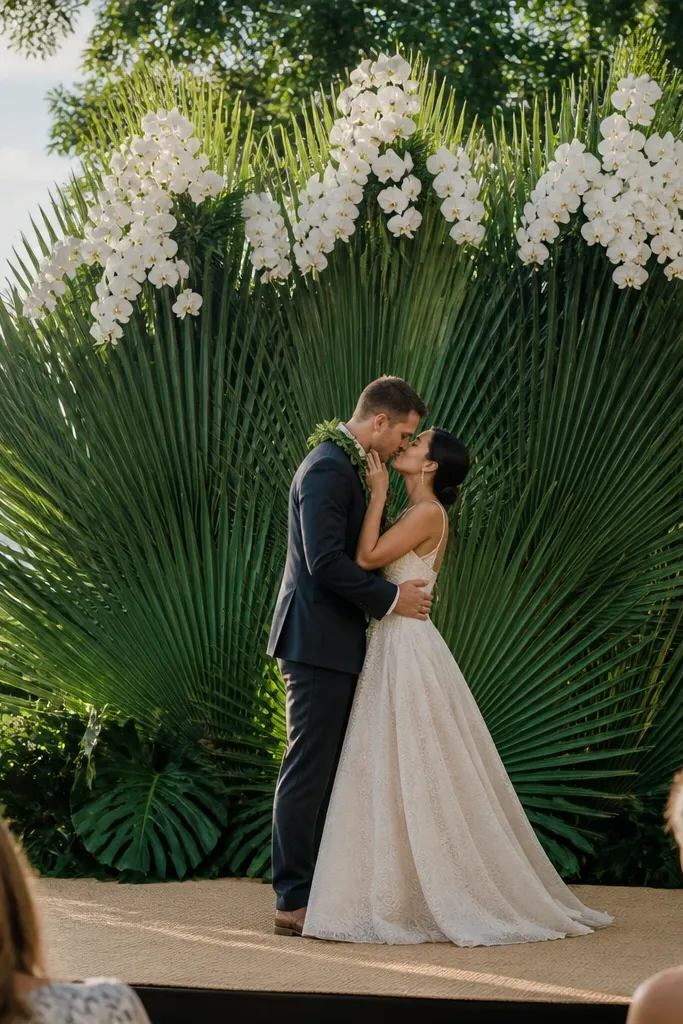
Palm fronds are a hidden gem for wedding stage decor because they create instant scale. The fan shape gives you drama, and white orchid tops keep it wedding-appropriate and clean. This style looks amazing in humid outdoor venues or indoor spaces with lots of natural light. It also works for couples who want a tropical vibe without going full beach party. The contrast of tropical texture and crisp white flowers reads intentional in photos.
Start by arranging palm fronds in a wide fan behind the couple, using a lightweight frame or netting to hold the stems. Aim for 10-14 fronds so the fan looks full from 10 feet away. Then place white orchid clusters at the top edge of the fan, spacing them evenly so the top reads structured. Add a minimal greenery border at the base for grounding. Setup takes 2-3 hours if you’re arranging fresh fronds; plan for transport and trimming. Costs depend on whether you source fresh or faux fronds.
Use fronds with sturdy midribs so they hold shape; flimsy fronds make the fan collapse in photos.
Skip colorful tropical flowers — they compete with the frond texture and look messy.
17. Hanging Paper Lantern Cluster with Clear Ceiling Hooks
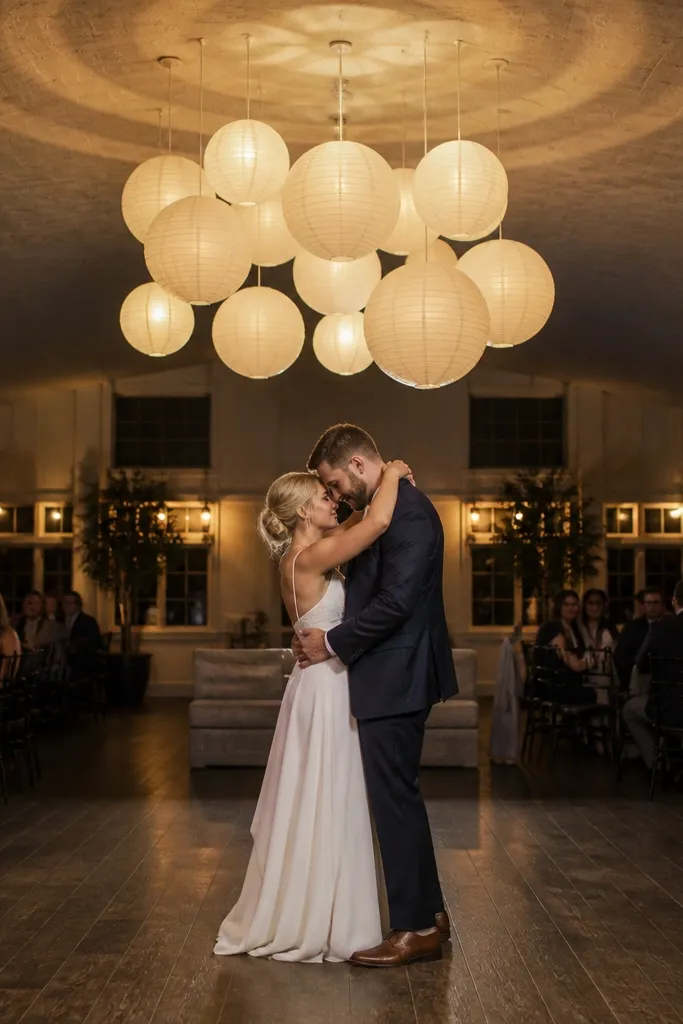
Hanging lanterns are a hidden gem because they add height without building a wall backdrop. When they’re centered above the couple, they frame the head and shoulders and make photos look layered. White paper lanterns stay elegant even in casual venues, and you can control brightness with warm interior lights or LED inserts. This works for spring and summer receptions, and it’s especially good when you want a clean stage but your venue doesn’t allow large set pieces. It also looks great in video because lanterns catch movement.
Start by confirming ceiling height and whether the venue allows hanging decor. Then install clear ceiling hooks or a lightweight truss line above the stage center, keeping lanterns about 3-5 feet above the couple’s heads. Hang 7-12 lanterns in a cluster, mixing 2-3 sizes for depth. Add a small greenery garland below the lantern cluster only along the top edge of the stage, so the ceiling element stays the hero. Setup takes 1-2 hours and requires careful spacing and safety checks.
Quick tipUse warm LED inserts inside lanterns so they glow softly instead of turning into flat paper.
Skip thisAvoid hanging lanterns too low — they block faces in photos.
18. Neutral Flower Box Columns with Small-Scale Blooms
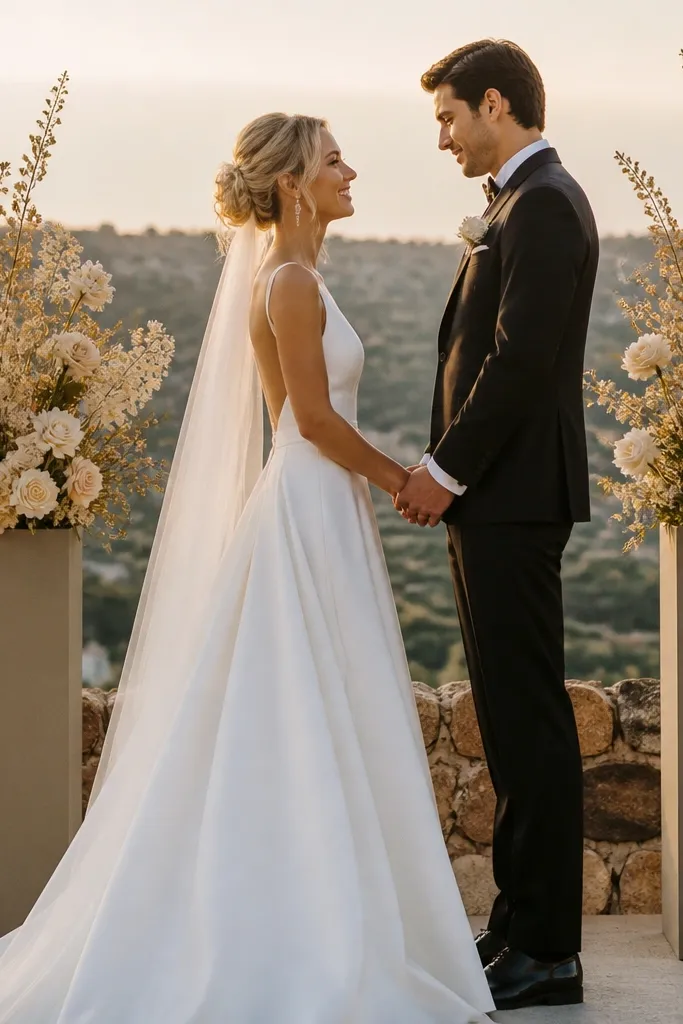
Flower box columns are a hidden gem because they look styled from the front and from the side. They create strong vertical framing while using less floral mass than a full backdrop. Small-scale blooms look refined and don’t overpower the couple, and the neutral boxes keep the palette cohesive. This style is ideal for venues with a stage that’s visible from multiple angles, like banquet halls with side seating. It’s also good if you want a clean, modern look without arches.
Start by placing two rectangular flower box columns at the stage edges, about 2-3 feet wide each, with a height of 4-6 feet. Fill them with foam or removable liners, then add small blooms in a tight palette — cream, blush, and light taupe. Keep the top layer slightly rounded so it reads as a sculpted column. Add a small trailing greenery strip down one side of each column to soften the edges. Setup is 90 minutes; costs are manageable because you’re using less bloom volume than a wall.
Quick tipChoose boxes with straight edges if you want a modern look; rounded boxes read more romantic.
Skip thisAvoid overstuffing — if blooms reach the front edge too aggressively, they look messy in photos.
19. White Feathered Backdrop Panels with Warm Spotlights
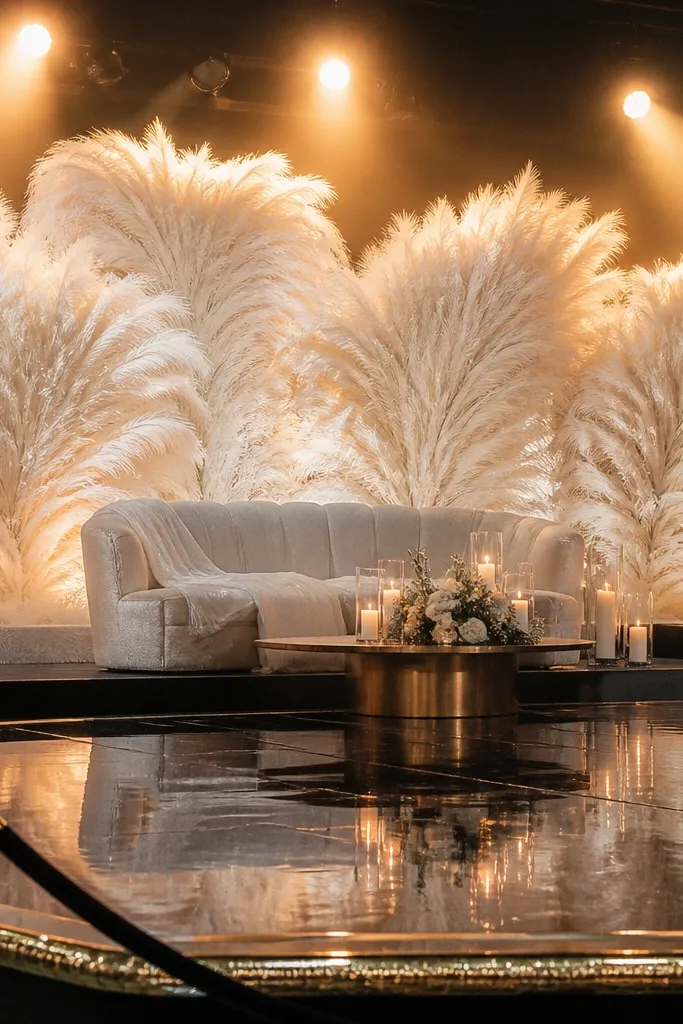
Feathered backdrop panels are a hidden gem because they add softness and texture that looks lush in flash. White feathered material catches light in a flattering way and gives the stage a dreamy, high-fashion feel. Warm spotlights keep the feathers glowing instead of looking flat or gray. This style is best for winter and indoor evening receptions where you want a clean, luminous look behind the couple. It also photographs beautifully because the texture creates depth without extra props.
Start by renting or buying feathered panels sized to cover your stage width, usually 6-10 feet wide. Attach panels to a frame or stand behind the couple, centered at face height so the couple stands against the brightest portion. Place two warm spotlights low and angled upward to create a gentle glow across the panels. Add one small floral accent at the center bottom so the stage feels finished. Setup takes about 2 hours because panel alignment matters.
Quick tipUse warm spotlights at 2700K to keep feathers creamy, not gray.
Skip thisSkip cool-white LED bars — they make feather textures look thin.
20. Cedar Arch with Cream Dried Flowers and Olive Spray
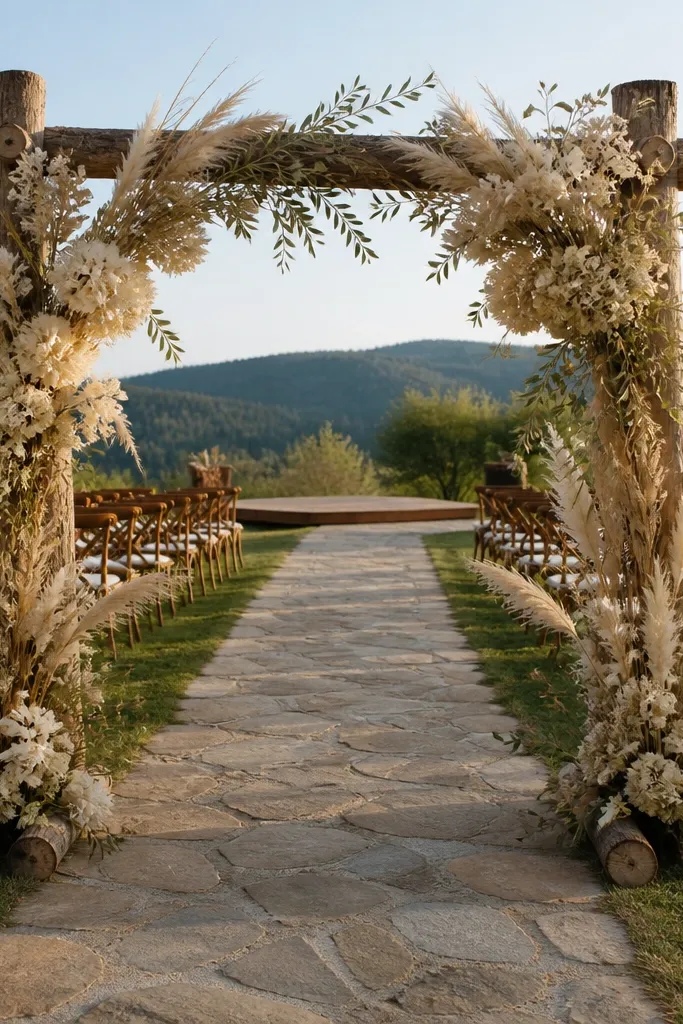
A cedar arch is a hidden gem because it smells like the outdoors and looks intentional even with dried flowers. Cream dried flowers — like bunny tails, dried hydrangea, or pampas-like textures — add soft volume without the fragile upkeep of fresh blooms. Olive spray brings a clean green note and keeps the palette from turning beige-only. This works brilliantly for fall weddings and rustic-modern receptions, especially if your venue has wood beams or natural textures. It also holds up well for multi-hour receptions because dried materials don’t wilt on camera.
Start by renting a cedar arch frame or building one with lightweight wood segments, then secure it centered behind the couple. Attach dried flower clusters to the arch using zip ties and floral wire, building volume at the top and sides. Add olive spray at the base corners and along the inner curve so the arch reads full from the front. Finally, keep the dried pieces slightly airy — don’t pack everything tightly — so the texture stays light. Setup takes 2-3 hours depending on how many clusters you use.
Use a mix of long and short dried stems so the arch has rhythm, not uniform height.
Avoid using only one dried bloom type — it looks flat and repetitive.
21. Black Iron Candelabra with Clear Glass Votives
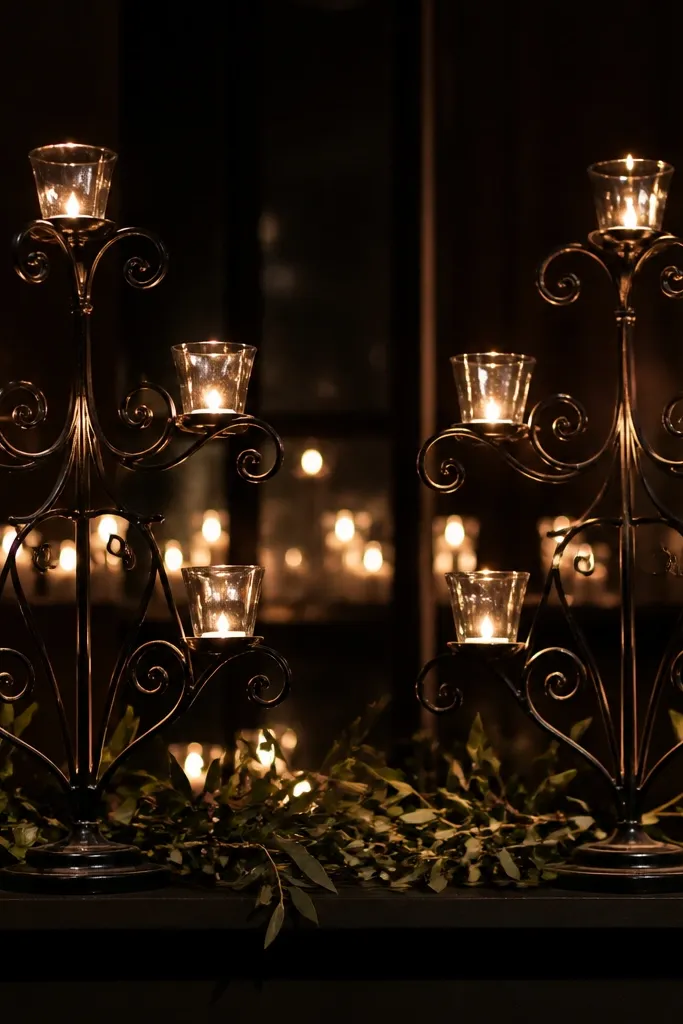
Black iron candelabra are a hidden gem because they add height and drama without looking bulky. Clear glass votives catch candlelight and create crisp reflections that look good in both dim rooms and evening photos. Pair them with a minimal greenery garland so the metal lines stay clean. This style works for moody modern weddings, winter receptions, and venues with dark flooring where contrast helps. It’s also a great choice if you want a stage that looks good even when the ceremony is over and everyone shifts to dinner.
Start by placing two black iron candelabra at stage corners, angled slightly inward toward the center to frame the couple. Then fill each candelabra with clear glass votives or LED equivalents, using 6-10 per stand depending on size. Add a narrow greenery garland along the front edge between the candelabra so the stage feels connected. Finally, set up a low base of candles or votives on the floor centerline to balance the height difference. Setup takes about 60-90 minutes and needs careful spacing for sightlines.
Quick tipChoose glass votives with thick walls; thin ones look cheap once the light hits.
Skip thisDon’t add big flower clusters — the iron already brings the structure.
22. Tulle Curtain Cascade with Pearl Bead Edge
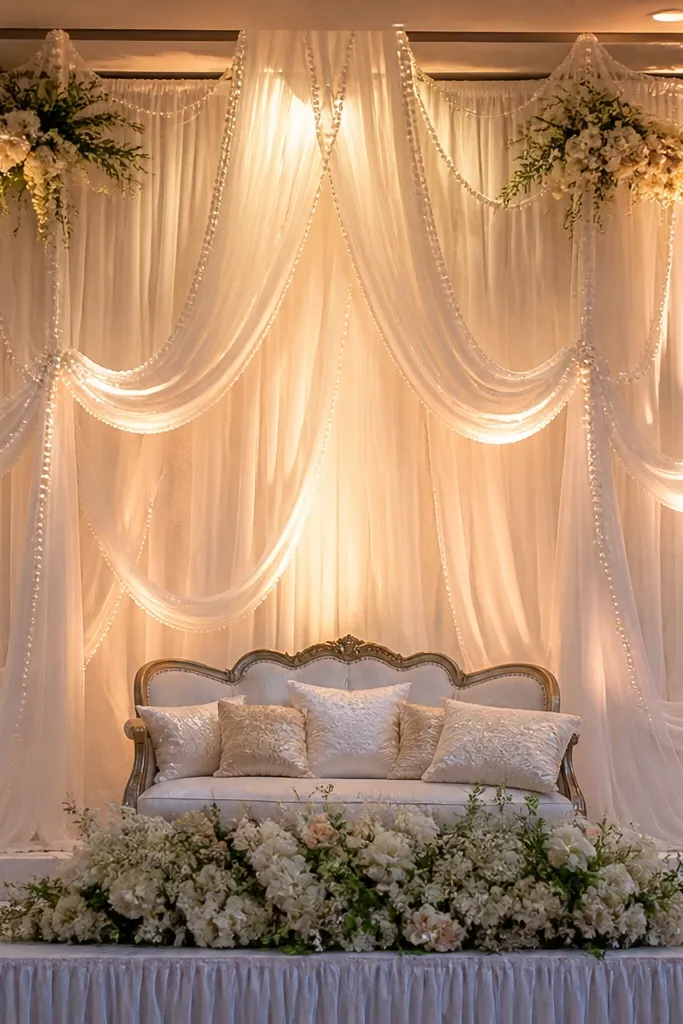
Tulle curtain cascades are a hidden gem because they create a soft, romantic veil effect that looks flattering on camera. The pearl bead edge keeps it elegant without going full glitter. This stage decor is perfect for indoor weddings with warm uplighting or candlelight, where the tulle catches light and falls in gentle layers. It also works if you want a dreamy backdrop but your venue is strict about open flames and large props. The cascade makes the couple look framed and glowing.
Start by hanging a sheer tulle curtain panel behind the couple using a track or tension rods, with the center highest and sides slightly lower. Add pearl bead trim only along the bottom edge or outer border of the cascade so it reads as a finish, not a costume. Layer 2-3 tulle widths so the fabric looks like it has volume, not one flat sheet. Finally, place small floral accents at the center where the tulle meets your stage base. Setup is about 2 hours because you need smooth, wrinkle-free panels.
Steam the tulle right before setup; wrinkles show up as dark lines in flash.
Avoid chunky bead trims across the whole surface — it creates glare.
23. Woven Willow Screen with Backlit Florals
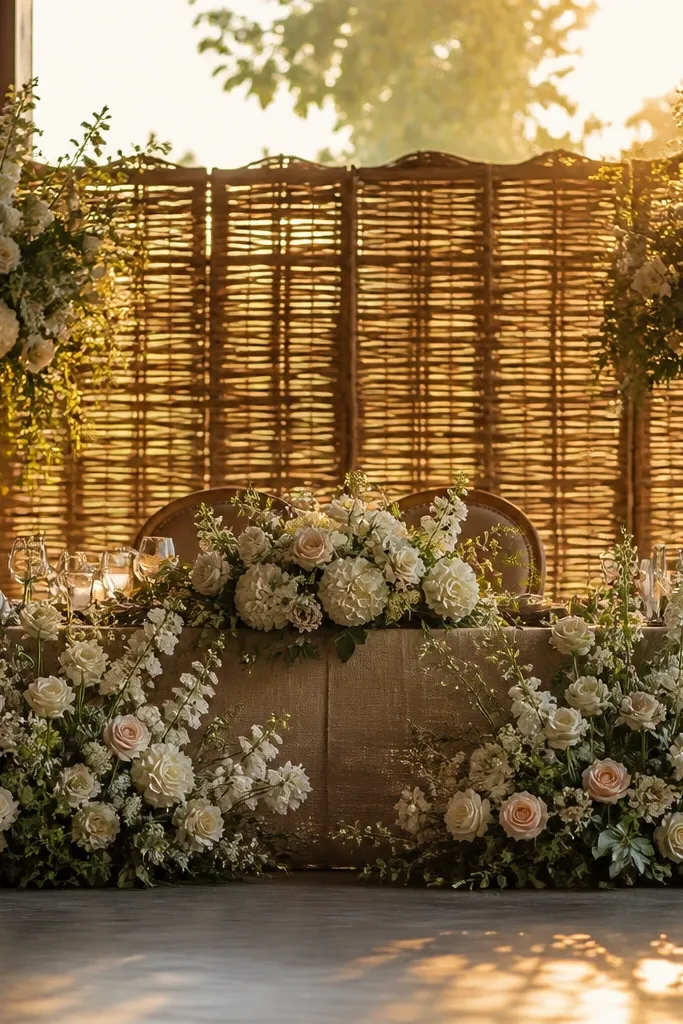
A woven willow screen is a hidden gem because it adds texture like a natural drawing. Backlighting turns the screen into a warm glow, and your florals look more dimensional because the light comes from behind. This makes the stage look styled even with fewer flowers, which cuts cost. It’s ideal for rustic weddings, fall receptions, and indoor spaces that need warmth. The backlit look is especially photogenic at night when the background would otherwise go dark.
Start by renting a woven willow screen sized to cover your stage width, then place it centered behind the couple. Add LED string lights or a small warm backlight behind the screen so light passes through the weave. Next, place clusters of faux or fresh florals on the front — keep them concentrated in the center and edges, not spread evenly. Use zip ties to secure florals so they don’t sag. Setup usually takes 90-120 minutes including lighting placement and testing.
Use 2700K LEDs and dim them if you can; bright backlights wash out details.
Avoid placing bright white flowers across the entire screen — too much brightness flattens everything.
24. Terrarium-Style Clear Boxes with Floating Greenery
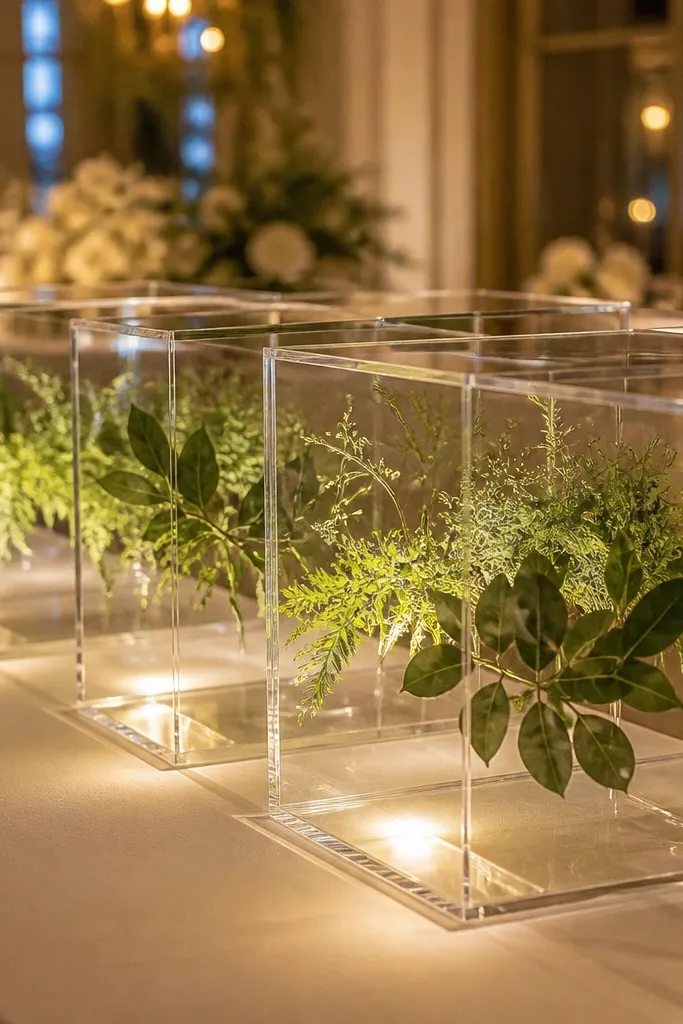
Clear terrarium-style boxes are a hidden gem because they look modern, clean, and expensive without being complicated. Floating greenery inside the boxes gives depth and a “contained nature” vibe. Add soft LED lights underneath or behind the boxes and the greenery looks like it’s glowing, which is a great photo effect. This is perfect for modern garden weddings, indoor receptions, and couples who want something different from the usual arch-and-floral-wall setup. It also works well in smaller stages because the decor is compact.
Start by placing 3-5 clear boxes in a straight line behind the couple or in a gentle arc, depending on stage width. Add removable foam or weights inside each box so greenery stays upright. Then arrange floating greenery sprays — like ruscus or eucalyptus sprigs — so they rise slightly above the box rim. Finally, add warm LED tea lights or strip lights behind the boxes for glow, and keep wires hidden under stage trim. Setup takes about 60-75 minutes and is easy to transport.
Use matte greenery, not glossy — matte reads softer in photos.
Skip overly wet greenery in clear boxes — condensation fogs the view.
25. Pearl-Trim Chiffon Ceiling Canopy Over the Dance Floor
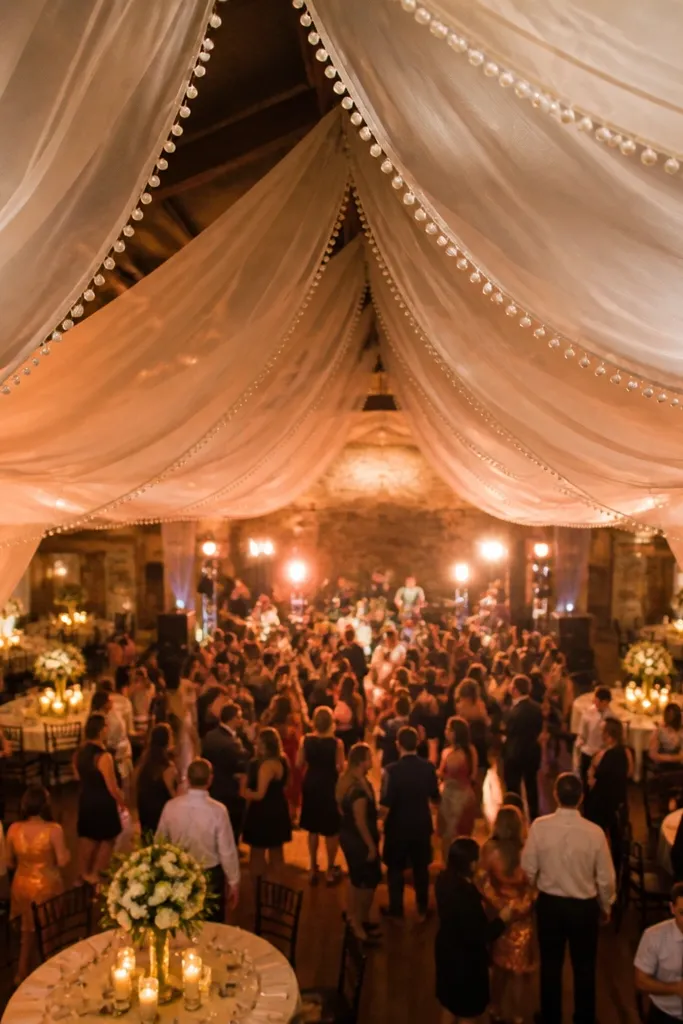
A ceiling canopy makes the reception stage feel bigger without building a heavy structure. This one uses airy chiffon panels gathered in soft arcs, then finished with pearl trim so the light catches it like jewelry. It looks gorgeous in photos because it frames the stage from above and gives you that dreamy, floating ceiling effect. It suits spring and early summer receptions, especially outdoors or in venues with high ceilings. If your stage decor feels “flat” in photos, this is the fix. It also works well for intimate weddings because the canopy adds drama without needing a massive floral wall.
1) Choose chiffon in ivory or soft champagne and have it cut into long panels (about 6 to 10 feet wide each, depending on your ceiling span). Add pearl trim along the lower edge of each panel, then gather the tops into pinch pleats that hang from clear monofilament or ceiling tracks. 2) Plan coverage so the canopy sits directly over the dance floor and visually pulls attention toward the stage; aim for a 3 to 5 foot drop at the lowest point for a flattering look. 3) Travel logistics: most venues require a site walkthrough to confirm ceiling height and attachment points; schedule it 2 to 6 weeks after booking. 4) Rough cost is usually $600 to $1,800 for fabric, trim, and labor depending on panel count and whether the venue provides rigging hardware; budget 2 to 3 hours for install and 30 minutes for a quick final alignment. Book the stage drape team early because chiffon and pearl trim get booked out around peak wedding weekends.
Quick tipBring a floor plan or simple tape-measure sketch of the dance floor and stage so the drape team can calculate panel widths before you arrive.
Skip thisDon’t hang the canopy too low — if it drops below about waist height, it blocks sightlines and looks messy in movement photos.



