
1. Cream Satin Draped Backdrop With Matte Black Frame
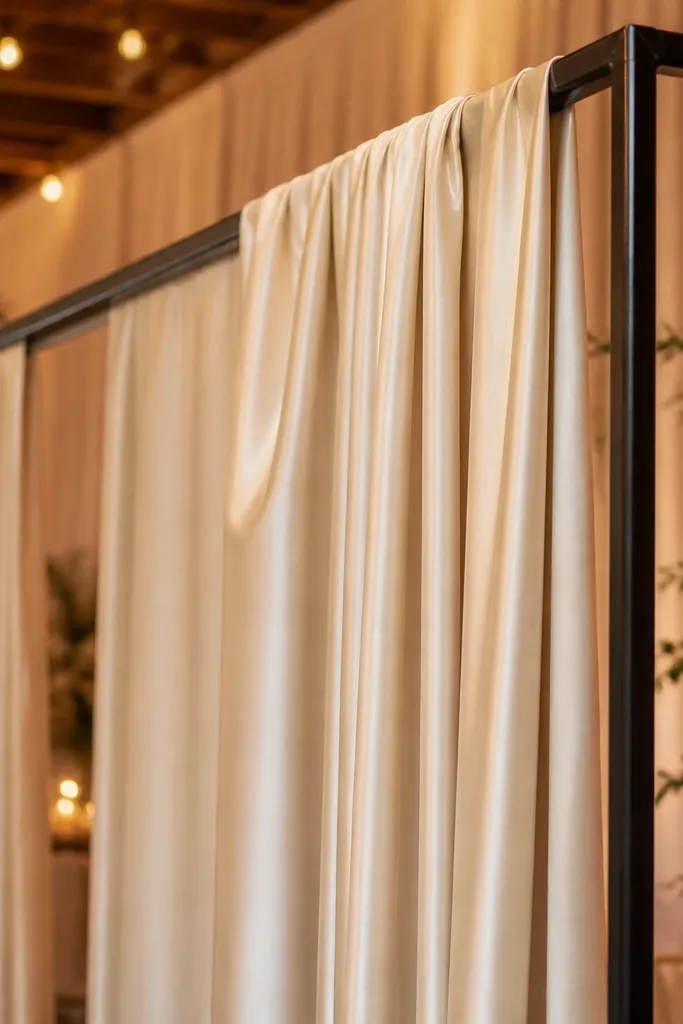
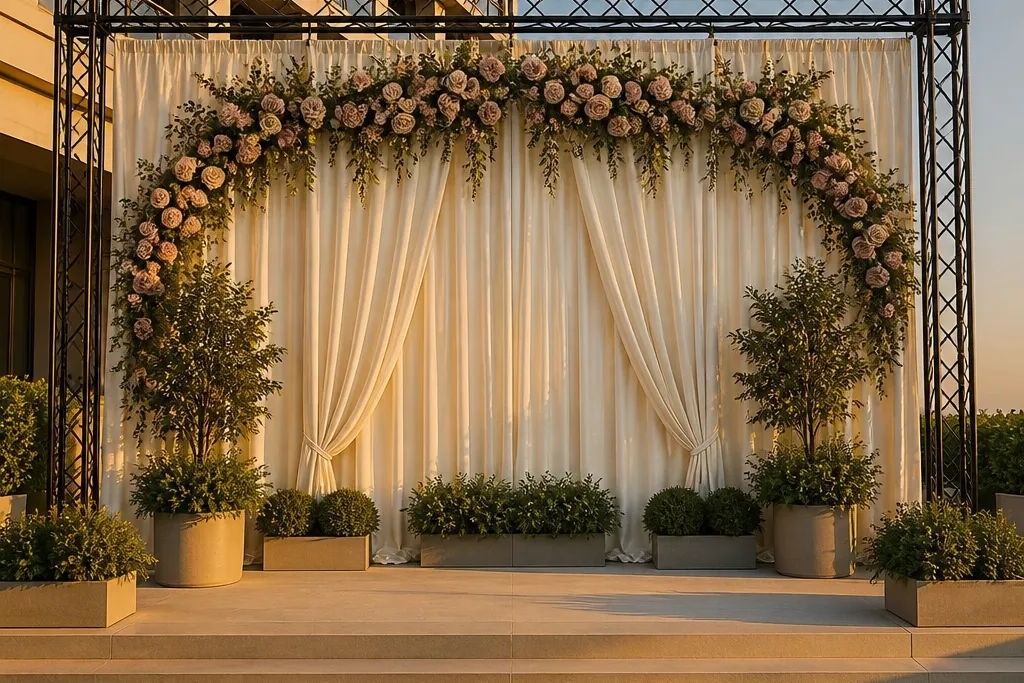
This setup looks expensive because satin catches light in a smooth, controlled way. The matte black frame gives crisp edges on camera, so the backdrop doesn’t blur into the room. It works best for evening weddings and venues with warm lighting, because the cream fabric stays flattering instead of turning gray. Style it for clean, modern couples who want romance without heavy florals. Use it when your stage is simple — the fabric does the work and the black frame keeps it graphic.
Quick tipUse fabric weights (sandbags or curtain weights) at the bottom corners so the drape doesn’t float and look wrinkled in photos.
Start by renting or building a matte black metal backdrop frame sized to your stage width. Hang cream satin panels with visible drape length of 18-24 inches so it forms soft folds, then secure with hidden clips or zip ties behind the frame. Next, add warm string lights along the inner edge of the frame, then finish with a single floral cluster at center height (about 6-7 feet from the floor depending on your venue). Finally, confirm photos from the guest seating angle so the folds read evenly across the whole backdrop.
Skip thisSkip heavy, busy florals on this backdrop — satin already does the visual work.
2. Blush Rose + Sage Greenery Corner Garland (Asymmetrical Stage)
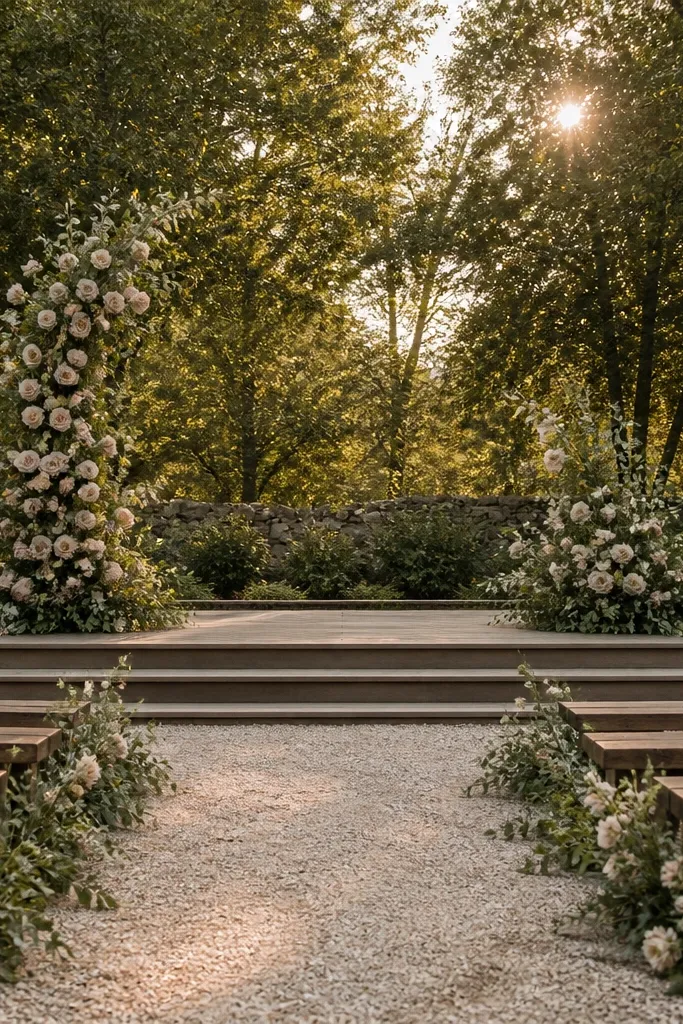
Asymmetry looks modern and intentional when it’s done with spacing. Corner garlands create depth without crowding the center, so the couple’s position stays the focal point. Blush roses paired with sage greenery photograph softly and flatter a wide range of skin tones and dress colors. This design fits outdoor receptions, garden venues, and airy ballrooms where you don’t want a wall of flowers. It’s also forgiving for 3 day wedding stage decor because garlands are easy to adjust on day 2.
Start by marking two center points where you want the garlands to “start” about 24-30 inches from each corner. Build the garlands off the stage using faux or fresh greenery with blush rose heads, then attach with removable zip ties or florist wire to a light tension line. Next, aim for a staggered height difference of 8-12 inches between the two corners so the composition feels alive. Finish by adding one small rose cluster at the center edge of the backdrop so the story connects to the main photo spot.
Keep empty space in the middle — let the couple stand in the cleanest part of the stage.
Don’t pack the garlands tight to the floor; low density looks messy, not romantic.
3. White Floral Foamless Arch With Greenery Halo
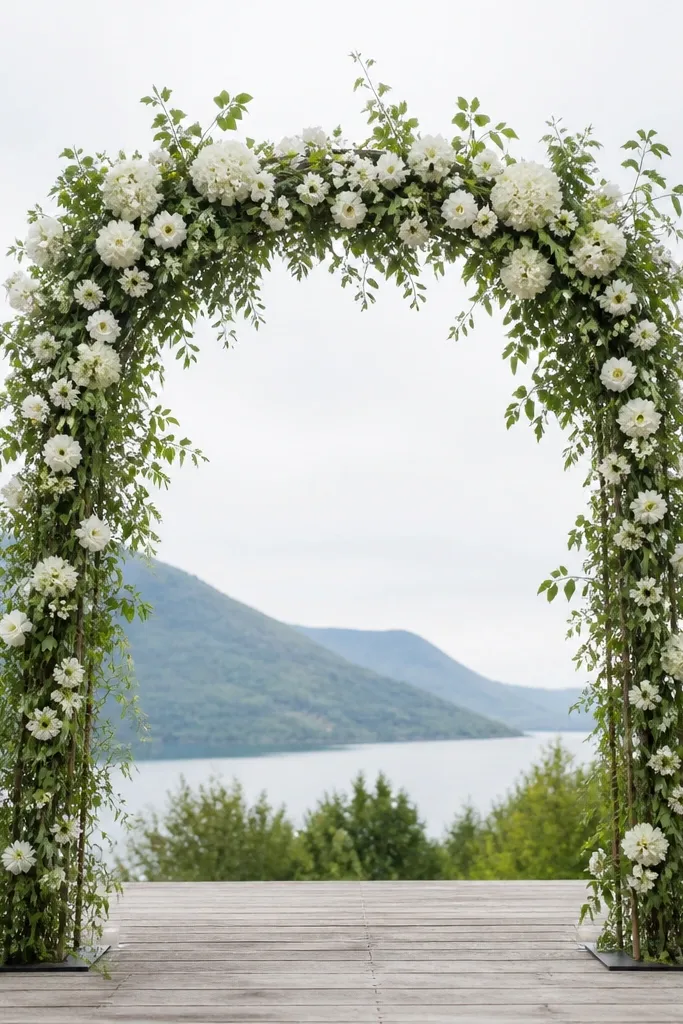
A foamless arch reads airy and fresh because the structure relies on stems and drape, not a heavy block. The greenery halo makes the arch look fuller from the sides, which matters for guest photos and off-angle shots. Choose white blooms like gardenias, hydrangea-style heads, or roses for a timeless look that works in daylight and at night with warm lights. This suits ceremonies where the stage arch is part of both vows and photos. It’s a strong pick for 3 day wedding stage decor because the arch is a single focal object you can place and dress efficiently.
Start by selecting an arch frame height that puts the top edge at least 7-8 inches above the couple’s standing head height for photos. Attach greenery in a continuous loop around the inner and outer edge, then add white blooms in clusters of 3-5 heads spaced every 10-14 inches. Next, secure with floral wire to the frame and add a small ribbon tie at the center to catch light. Finally, place the arch on a marked centerline and test camera sightlines before you finish the last bloom cluster.
Use matte white or cream ribbon, not shiny — glossy ribbon can create glare on stage photos.
Avoid foam blocks that shed — they look good up close but can crumble onto the stage.
4. Long-Runner Greenery Bed With Floating Candle Lanterns
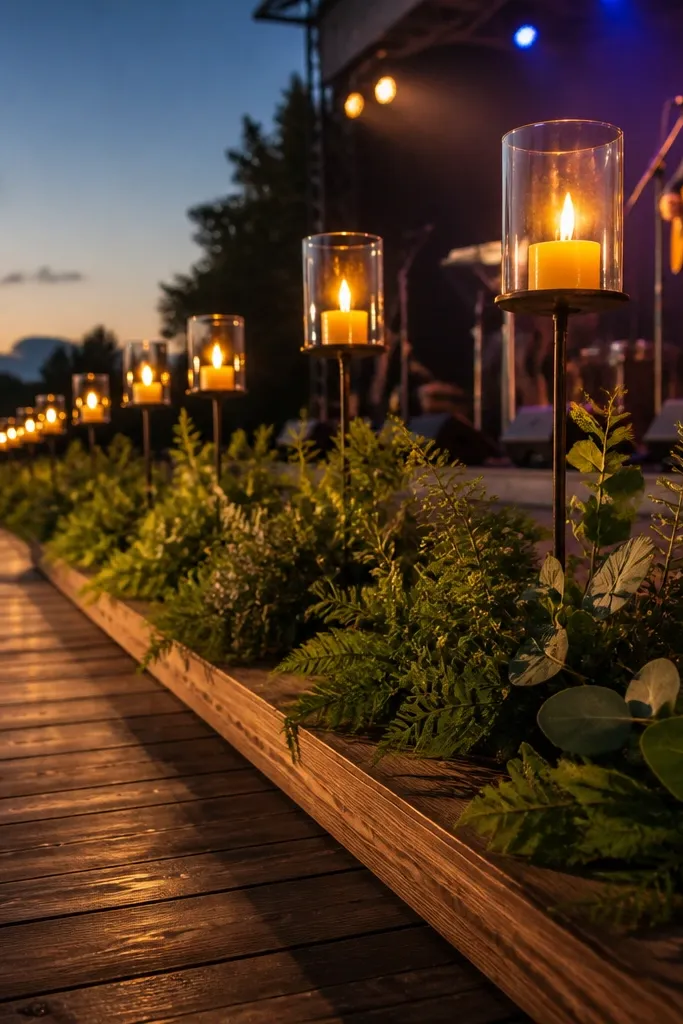
This is a “stage floor” design that photographs like a styled set. A greenery runner creates a base layer that looks full even if you don’t use massive florals. Lanterns and candles add sparkle and motion in low light, turning a simple stage into something cinematic. It’s ideal for evening weddings and for couples who want romance without an overwhelming backdrop. This works especially well when your stage has a platform or a built-in lectern because the candles can frame the couple’s lower body in photos.
Start by laying a continuous faux greenery runner along the stage center, leaving 6-8 inches of margin to the platform edges. Then place lanterns in a line — spacing about 18-24 inches between each — and keep the center lantern slightly taller or wider for hierarchy. Next, use flameless candles if your venue restricts open flame, and aim for warm white light. Finally, step back and check that the lantern line aligns with where the couple will stand, not where vendors stand.
Add a thin layer of moss or dark green fabric under the greenery to hide seams and edges.
Skip tall lanterns on the centerline if your couple will stand close together — it blocks faces in wide shots.
5. Matte White Balloon Garland Wall With Soft Cream Florals
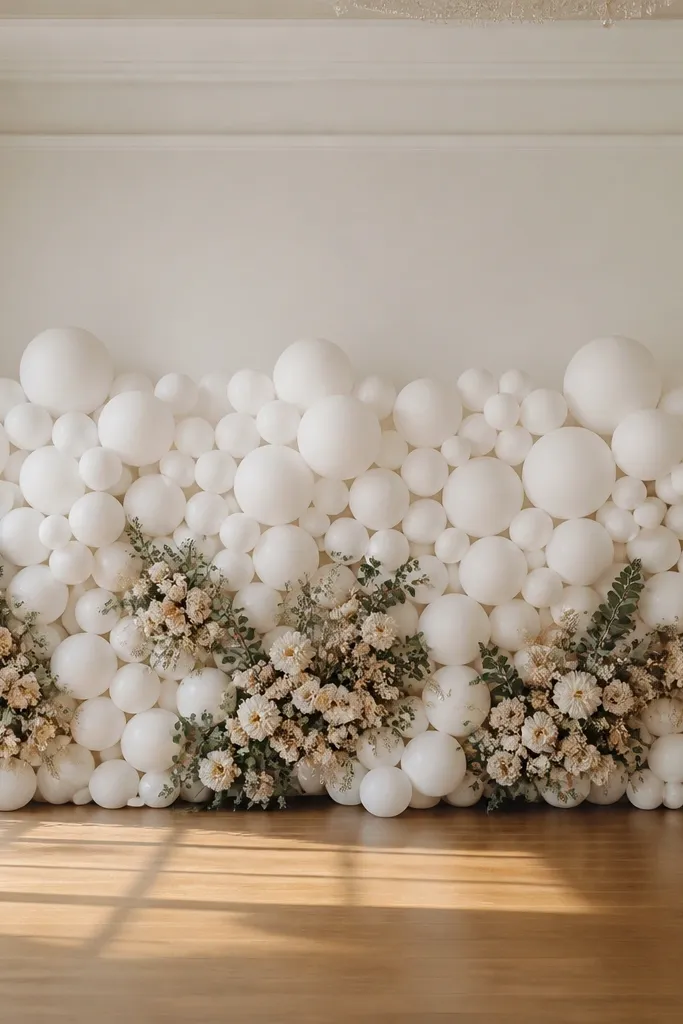
Balloon walls photograph clean and smooth because the matte finish reduces glare. Pairing matte white balloons with cream florals gives a soft, high-end look that still feels light and modern. This is great when you need a big backdrop quickly for 3 day wedding stage decor. It also hides uneven wall textures behind the stage. Choose this for minimalist couples or for venues that already have architectural features you don’t want to cover completely.
Start by planning the backdrop width so the garland reaches at least 6-10 inches beyond the couple’s shoulder span on each side. Build the garland on the floor using matte white balloons and insert a few cream floral picks every 12-18 inches. Next, secure the garland to a frame or wall anchor points, then add one larger floral cluster at center for a clear focal point. Finally, test one photo with the venue’s lights on — matte balloons still reflect, but less, and you can adjust brightness with lighting.
Use balloon sizes mixed from 12-inch to 18-inch to avoid a flat, one-size look in photos.
Don’t use glossy balloons — they throw highlights that make faces look uneven on camera.
6. Terracotta + Ecru Fabric Fringe Valance Over Stage
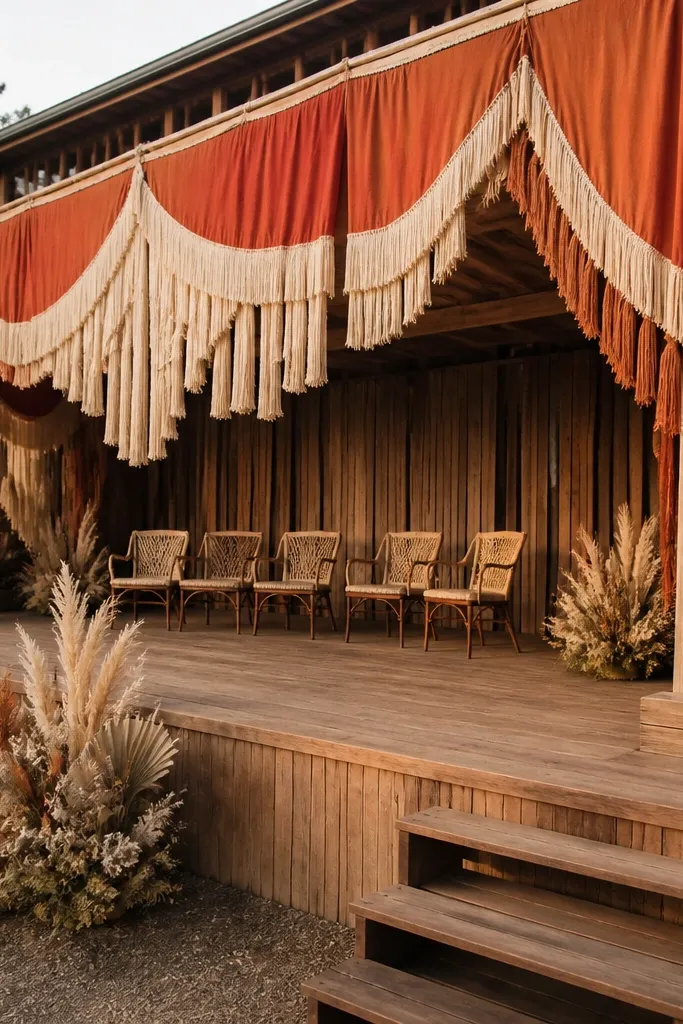
A fringe valance adds movement and texture without needing a full floral wall. Terracotta and ecru look warm and flattering in golden hour light, and the fabric motion reads beautifully in video. This setup works for rustic-modern weddings, desert palettes, and venues with lots of natural wood. It’s also a smart 3 day wedding stage decor plan because you can hang it fast and keep the rest of the stage simple. Let the valance do the wow, then add smaller florals for balance.
Start by measuring the stage width and buying enough fringe strips to cover 85-90% of that span with slight overlap. Hang the valance from a curtain rod or truss using grommets or zip-ties through loops, keeping fringe ends 16-20 inches above the couple’s heads. Next, add 2-3 small terracotta floral clusters at the base of the valance — one center and two offset. Finally, coordinate table or lectern styling in ecru linen so the palette stays consistent across the frame.
Use a warm white uplight aimed upward from the floor so the fringe casts soft shadows instead of looking flat.
Skip high-contrast neon fabrics; they overpower terracotta and look harsh in photos.
7. Gold Candelabra + White Hydrangea Column Clusters
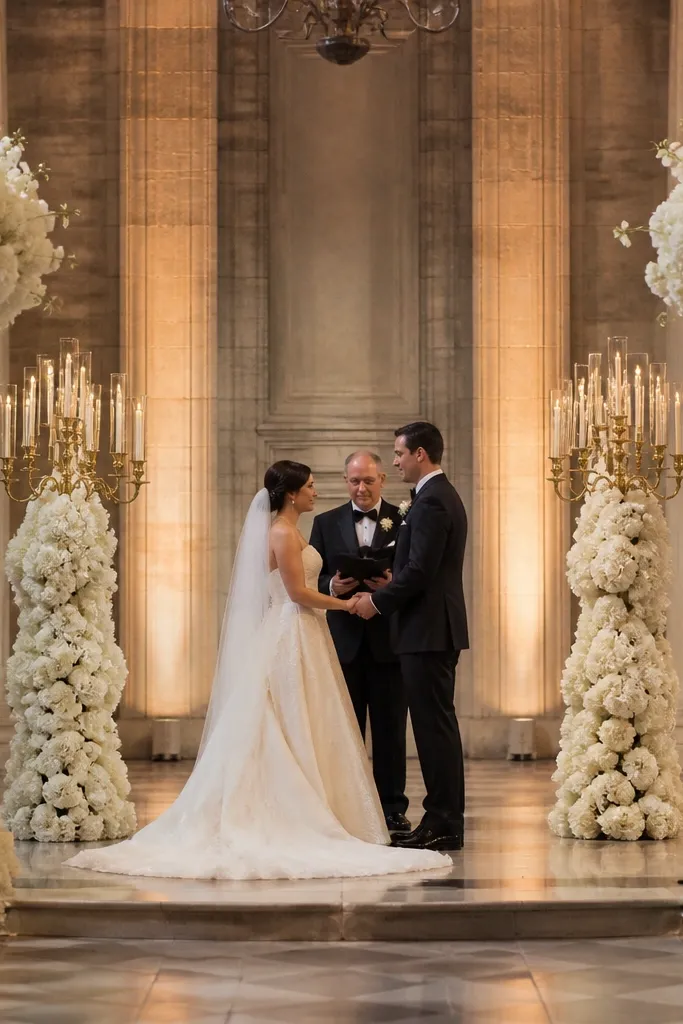
This design reads classic and elevated because it uses vertical repetition. Hydrangea-style white blooms give volume, and gold candelabras add a refined glow when lights hit them. It’s a strong choice for formal venues with tall ceilings and for couples who want a traditional ceremony look. The symmetry also helps if you’re doing a centered photo with a wide lens. For 3 day wedding stage decor, the columns are easy to place and don’t require building a huge backdrop wall.
Quick tipKeep the candelabra height consistent on both sides so the stage looks balanced in wide shots.
Start by placing two column zones at the stage edges, each centered where you want the couple’s shoulders to frame. Add hydrangea clusters in 2 layers — base clusters at about 3.5-4 feet high and a top layer at 5-6 feet — then secure stems with florist wire to the support. Next, position gold candelabras slightly forward so they catch light and don’t blend into the backdrop. Finish with a single ribbon wrap in gold or ivory around each cluster for cohesion.
Skip thisDon’t use mixed white tones without a reason — warm whites and cool whites can look mismatched under venue lighting.
8. Sage Green Fabric Panels With Dried Pampas Feathers
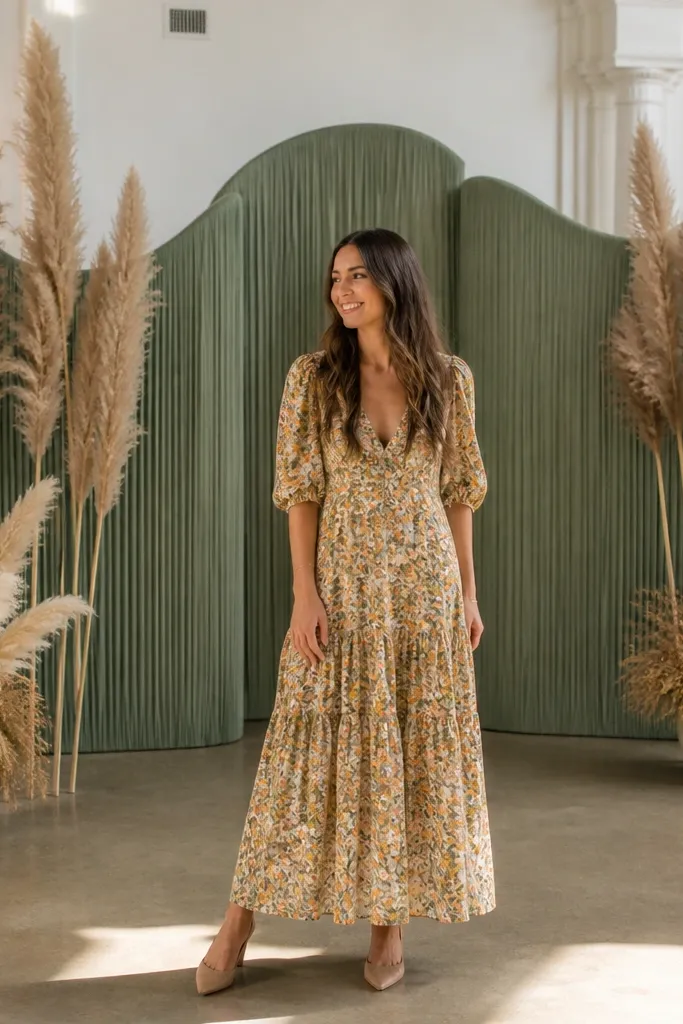
Sage fabric panels create a calm background, and pampas feathers add height and softness without looking heavy. This combo photographs like modern boho — airy, not messy. It suits daytime ceremonies and venues with natural textures like stone, wood, or neutral walls. The key is keeping pampas clusters spaced so they frame the couple instead of filling the whole stage. For 3 day wedding stage decor, dried elements are low-stress because they don’t wilt and are easy to transport and place.
Quick tipChoose pampas plumes with a consistent cream-to-tan tone so the stage looks intentional, not random.
Start by hanging sage fabric panels from a top beam so they drape down 8-12 inches above your stage floor. Then place pampas plumes in 3-4 bundles per side, with the tallest bundle centered on each side and slightly angled inward. Next, add small cream sprigs or mini dried grasses around the base so the bundles don’t look like they’re floating. Finally, secure everything by tying fabric panels to the frame and using sandbags or weighted bases for the pampas clusters.
Skip thisSkip heavy bright colors with pampas; the stage will look busy and lose the soft silhouette.
9. Monochrome Black Backdrop With White Orchid Sprays
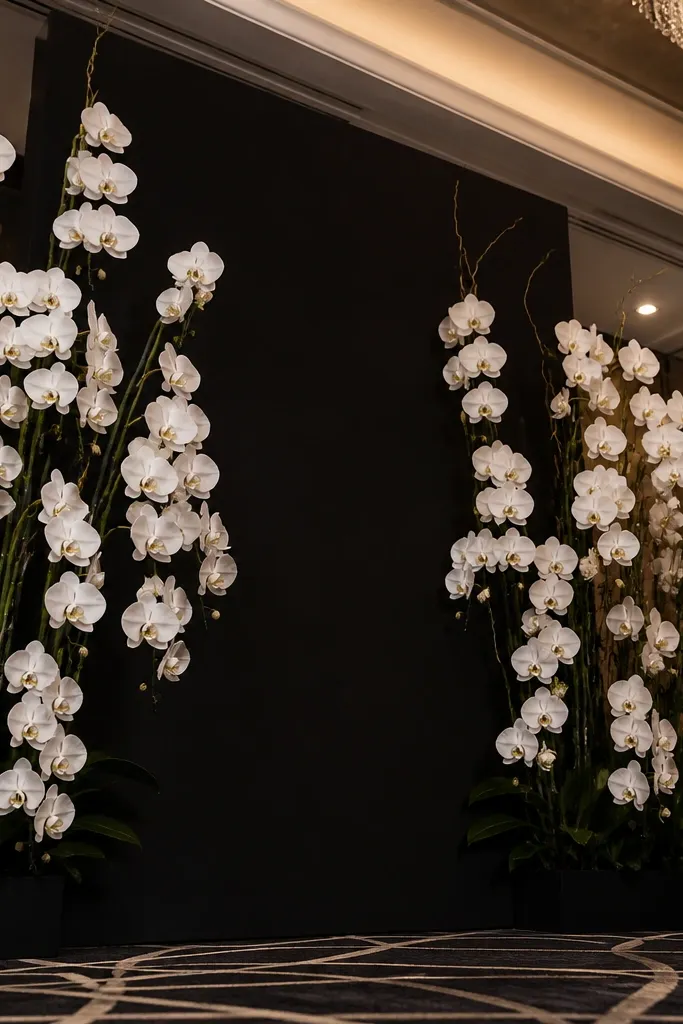
A monochrome black backdrop makes white orchids pop hard on camera. It’s dramatic without being chaotic because orchids have a clean, vertical shape. This works best for indoor venues with controlled lighting so the black stays matte instead of turning shiny. It’s also a great option for couples who want a sleek, modern look for both ceremony and reception photos. For 3 day wedding stage decor, you can build the backdrop with fabric or panels and then add a few high-impact orchid sprays rather than dozens of blooms.
Start by covering the backdrop area with matte black fabric or a black panel system, keeping seams tight and straight. Then attach orchid sprays in vertical lines — 3 sprays per side plus 2-3 in the center — spacing them 14-18 inches apart. Next, add small greenery at the base of each spray to hide attachment points. Finish by lighting the backdrop from behind or from low angles so orchids cast soft highlights and the black stays deep.
Use warm white uplights; cool lighting makes black look gray and orchids look washed.
Avoid glossy black materials that reflect spotlights and flatten contrast.
10. Peach + Blush Flower Wall Panels With Vertical Grid
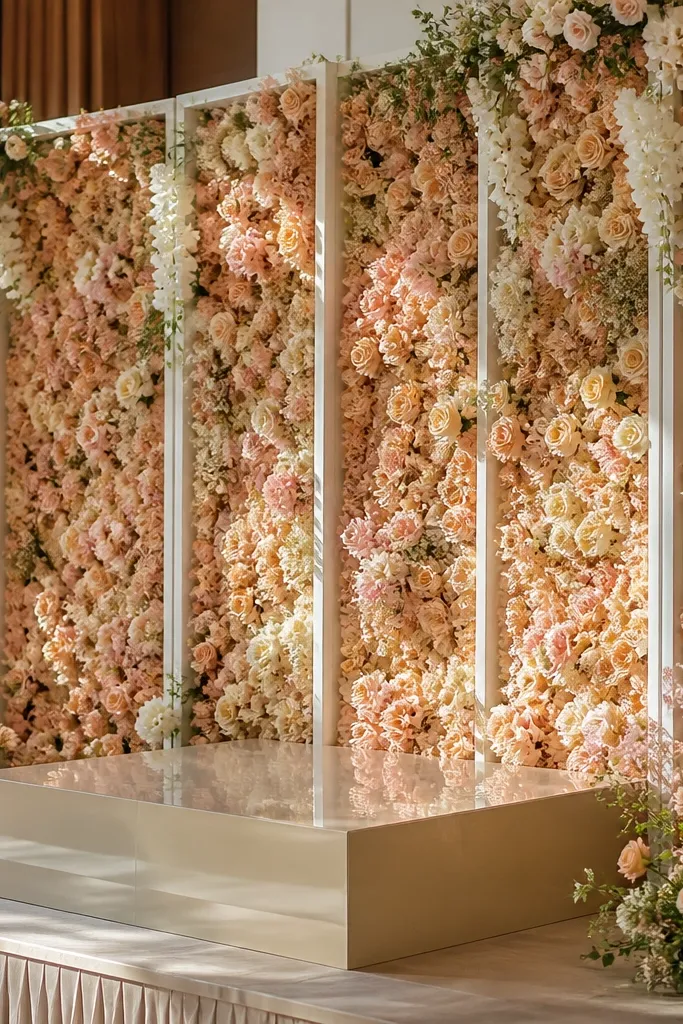
Flower wall panels are the fastest route to a full backdrop that still looks styled. A vertical grid makes the wall feel designed instead of like a random blanket of flowers. Peach and blush together read warm and romantic, and they photograph well in both daylight and indoor lighting. This suits ceremonies where you want a big photo background behind the couple, not just side accents. For 3 day wedding stage decor, panels let you assemble quickly on day 2 and touch up on day 3.
Start by choosing pre-made or build-your-own panels with a consistent grid spacing, sized to cover your backdrop width in 2-4 sections. Attach panels to a frame, then fill any visible gaps with small sprigs that match your palette. Next, keep the strongest clusters at eye level and slightly reduce density near the floor so the couple’s dresses stay visible. Finally, add a narrow top trim of greenery or ribbon to hide the panel edges where the light hits.
Photograph the wall from the same seating height as guests — if it looks balanced there, it will look good in full album shots.
Don’t make the bottom edge too dense; it can swallow the couple’s lower outfits in photos.
11. Caramel Linen Backdrop With Oversized Dried Wheat Bundles
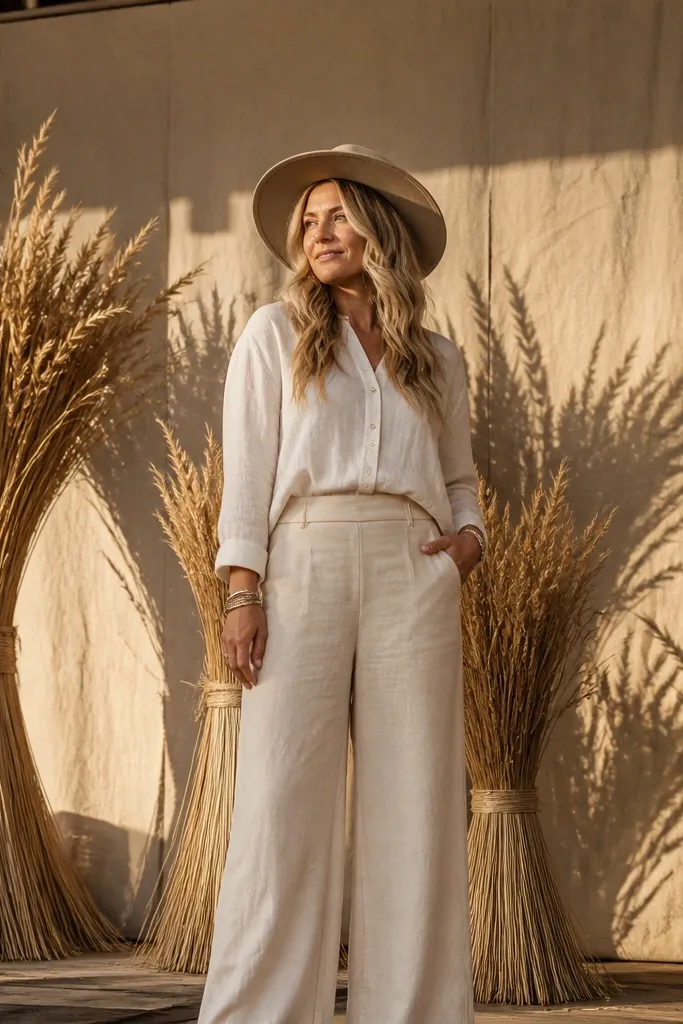
Caramel linen gives a warm, textured backdrop that looks great in sunlight and candlelight. Oversized dried wheat bundles add height and a natural silhouette that feels intentional, not random. This is perfect for fall weddings, harvest themes, and venues with rustic architecture. It also works for couples who want “soft ceremony” vibes without building a full floral wall. For 3 day wedding stage decor, dried wheat is durable and easy to position, and linen is simple to drape.
Start by hanging caramel linen panels in long widths so you get natural folds, then keep the center slightly fuller than the sides. Position wheat bundles on both sides and one center bundle, aiming for the tallest bundle to reach about 7-8 feet total depending on your stage height. Next, tie bundles with neutral twine and secure bases with weighted stands or sandbags. Finally, add one small cluster of neutral wildflower-style accents around the base so the wheat looks anchored.
Mist linen lightly with fabric-safe spray so it hangs crisp and avoids dusty texture in close photos.
Avoid bright white wheat if your palette is caramel — it clashes under warm lighting and looks artificial.
12. White Rose + Eucalyptus Table-Edge Stage Styling
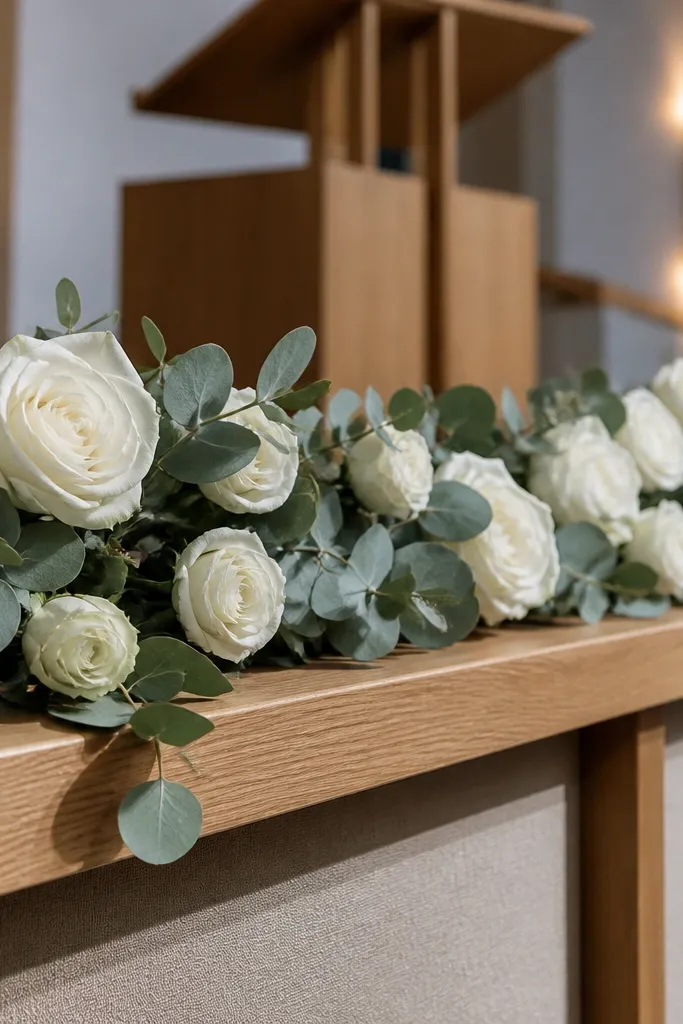
This is a stage look that pays off in close-ups because it frames the platform edge where hands and bouquets sit. White roses with eucalyptus create a clean, classic line and look polished even when the camera crops in. It’s ideal for stages with a visible platform table, head table, or lectern base. This design avoids building a giant backdrop and instead makes the stage feel finished. For 3 day wedding stage decor, it’s practical because you can place pre-arranged garlands along the edge quickly.
Start by measuring the full platform edge length and buying or building garlands that cover it with 2-3 inches of overlap. Attach garlands with removable zip ties through a hidden fabric strip or stage lip, keeping the top edge slightly higher than the bottom so it reads full. Next, add white rose heads at intervals of 18-24 inches so the line has rhythm. Finally, finish with a small eucalyptus wreath or mini garland at the lectern base to connect the whole stage.
Use rose heads with sturdy stems so they stay facing forward; drooping heads look tired in photos.
Skip random single blooms — the line needs spacing or it looks patchy.
13. Matte Gold Mirror Tile Backdrop With Hanging Florals
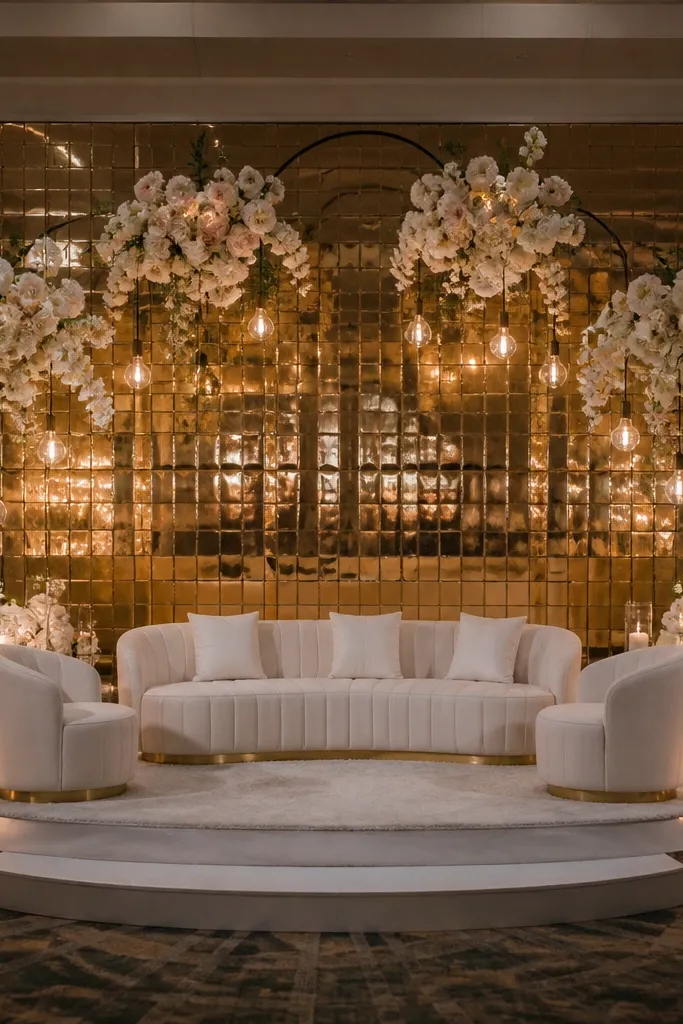
Mirror-like backdrops multiply light and make your stage look bigger. Matte gold tiles add warmth without the harsh glare of shiny mirrors, and hanging florals create a layered 3D effect. This is a standout choice for indoor receptions where you want photos to pop and catch sparkle. It suits couples doing a dramatic ceremony entrance or a head table moment. For 3 day wedding stage decor, hanging florals are easy to adjust by height, so you can correct for uneven ceiling heights.
Start by installing a tile panel system or rental backdrop that covers the center and extends at least 12 inches beyond the couple’s shoulders. Attach hanging floral stems using fishing line or clear wire at 3-5 points per side, keeping clusters at different heights for depth. Next, choose one main bloom color (white, blush, or deep burgundy) and keep leaves minimal so the gold stays the star. Finally, test a quick photo with room lights and stage lights on — if the gold is too reflective, swap to matte bulbs or reduce intensity.
Keep the hanging clusters smaller than you think; oversized blooms can look heavy and cluttered against gold.
Avoid fully glossy mirror panels — they can blow out highlights in wedding photos.
14. Olive Branch + White Ribbon Cascade From Truss
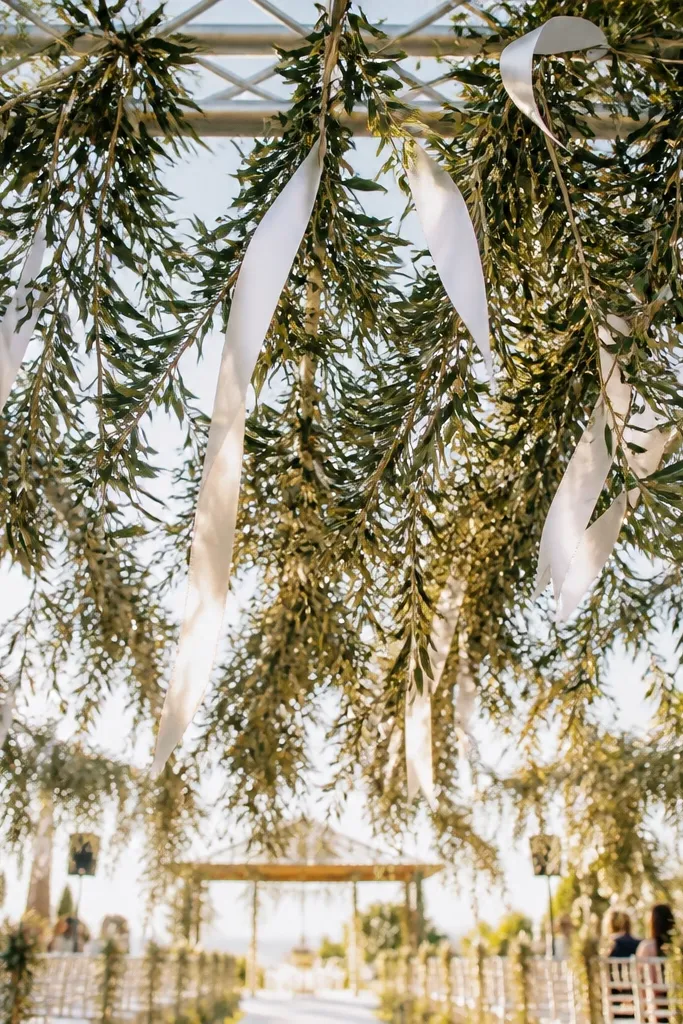
A ribbon cascade brings softness and motion without building a full backdrop wall. Olive branches keep the look grounded and grounded, while white ribbon adds contrast that reads clearly in photos. This suits outdoor ceremonies, Mediterranean-inspired weddings, and venues with a truss or overhead structure. It also looks great in video because the ribbon moves in a light breeze. For 3 day wedding stage decor, this setup is forgiving because you can adjust ribbon lengths after you hang it.
Start by attaching a row of greenery along the truss and securing with zip ties at 12-16 inch intervals. Then add white ribbon strips in varying lengths — 24-36 inches — and space them every 10-12 inches. Next, place olive branch clusters at the top corners and one center cluster so the cascade has hierarchy. Finally, check that ribbons don’t fall into the couple’s standing area and trim lengths on day 2 after you see the wind or airflow.
Use ribbon that holds a crease and doesn’t fray easily, so it stays crisp in close photos.
Skip slippery satin ribbons; they tangle and look chaotic by the second hour.
15. Sculptural Rattan Screen With Hanging Macramé + Greenery
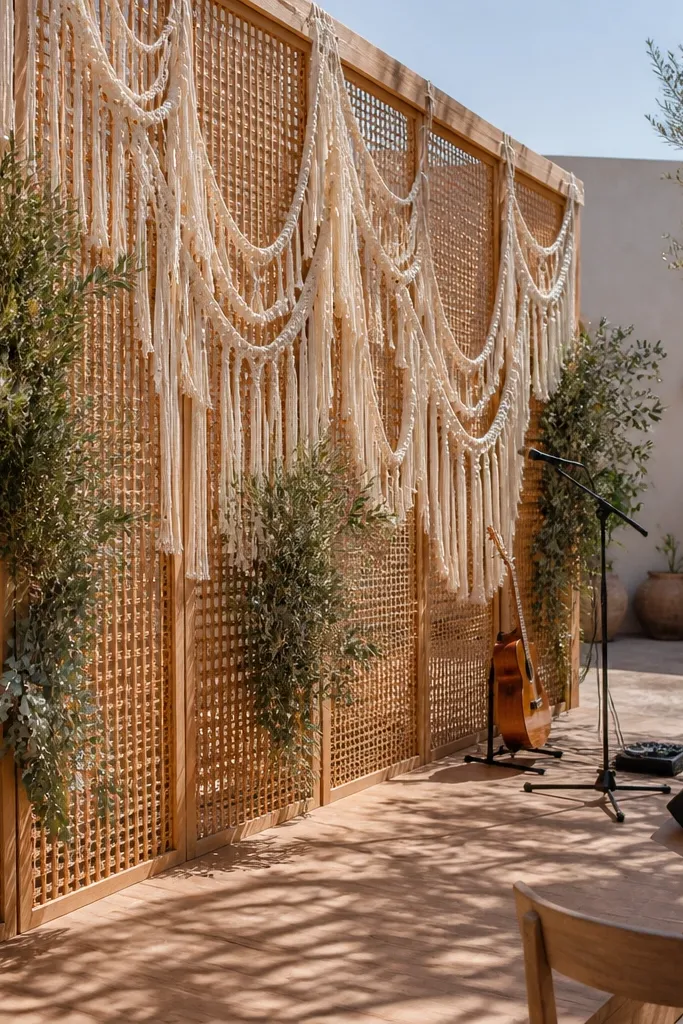
Rattan screens add texture and structure that fabric backdrops can’t match. Macramé brings a handmade, airy look, and small greenery clusters keep it fresh instead of boho-dusty. This setup works for outdoor receptions, airy indoor spaces, and desert-modern weddings. It also photographs well at different angles because the rattan has depth. For 3 day wedding stage decor, it’s efficient: you place the screen, hang the macramé, then add light greenery accents.
Quick tipChoose macramé in natural beige, not bright white, so it blends with rattan under warm stage lighting.
Start by selecting a rattan screen width that covers the center photo area, then place it on the stage centerline with a stable base. Hang macramé from the top support points so pieces sit around 2-3 feet above the couple’s eye line. Next, add greenery clusters to the screen in 3 zones — top center and both sides — using removable ties so you can adjust quickly. Finally, add one small floral cluster at the bottom edge to hide the screen base and make it look intentional.
Skip thisDon’t overfill the screen with flowers — too many elements flatten the texture.
16. Deep Burgundy Velvet Drape With Blush Peony-Style Heads
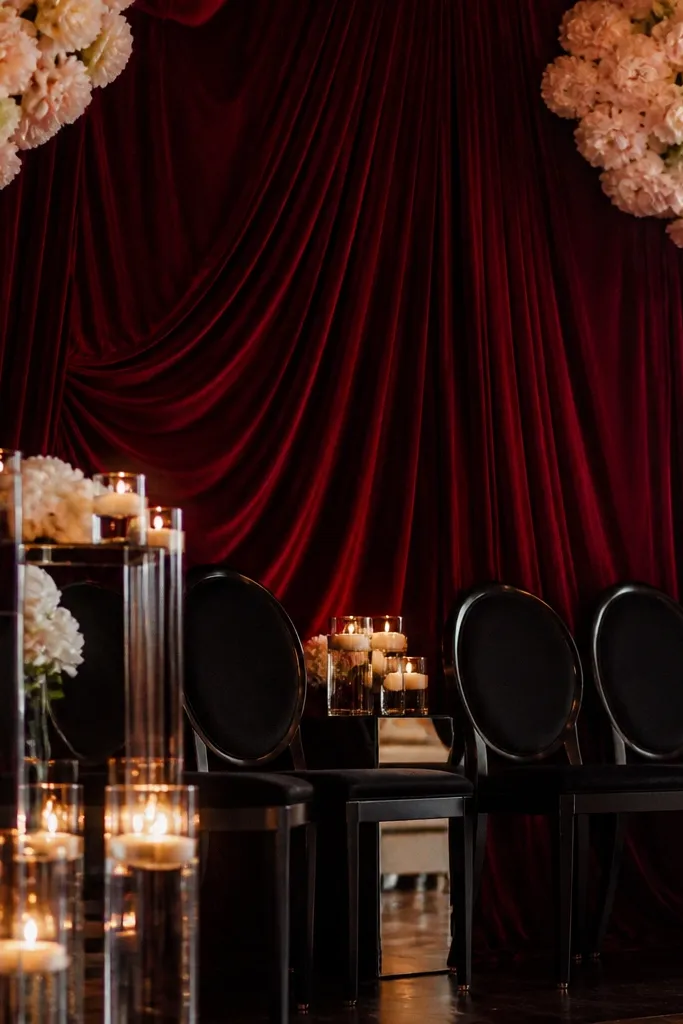
Velvet drape looks rich in person and reads luxurious on camera because it absorbs light instead of reflecting it. Burgundy gives drama, while blush peony-style blooms keep it romantic and soft. This is a strong choice for fall and winter weddings, and for venues that look good with moody lighting. The velvet also helps hide minor stage imperfections, which matters when your build is rushed. For 3 day wedding stage decor, velvet panels are quick to hang and don’t require huge floral quantities.
Start by hanging burgundy velvet panels with a center seam alignment so the drape looks symmetrical from the camera side. Then place blush blooms in a central cluster and add 2 smaller clusters at the sides at about shoulder height. Next, use dark green or neutral foliage sparingly so the velvet and blush stay the focus. Finally, add warm spotlights aimed at the drape edges to create shape — you want shadows, not flat illumination.
Steam velvet before install; wrinkled velvet reads messy in close-up photos.
Avoid bright silver accents; they can make burgundy look cooler and less flattering.
17. Terracotta + Black Balloon Column Pairs With Center Ribbon Bow
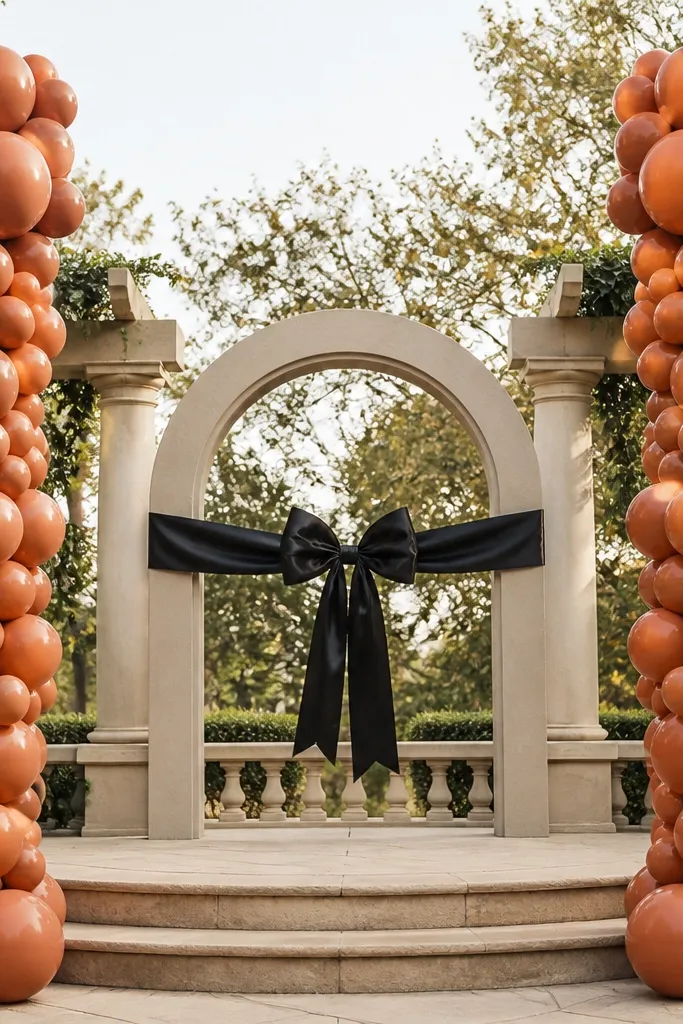
Balloon columns give you a tall, structured look that frames the couple without requiring a wall of decor. Terracotta and black creates a modern contrast that looks great in both daylight and warm indoor lighting. The center ribbon bow ties everything together and gives the stage a clear focal point. This setup works for outdoor ceremonies with open sky behind the stage too, because it adds definition. For 3 day wedding stage decor, balloon columns are easy to assemble and you can adjust height quickly.
Start by building two balloon columns on each side of the stage, using a mix of terracotta balloons and matte black balloons. Keep the top of each column about 10-14 inches below the highest point you want in photos to avoid blocking heads. Next, attach a large ribbon bow at center height, then add small greenery sprigs at the base of each column for a natural finish. Finally, keep the columns anchored with weights and check stability before guests enter.
Use matte balloon finishes to prevent glare and keep skin tones looking natural.
Don’t place the columns too close to the couple; it makes the frame feel cramped in wide shots.
18. White Peony-Style Floral Grid With Soft Green Filler
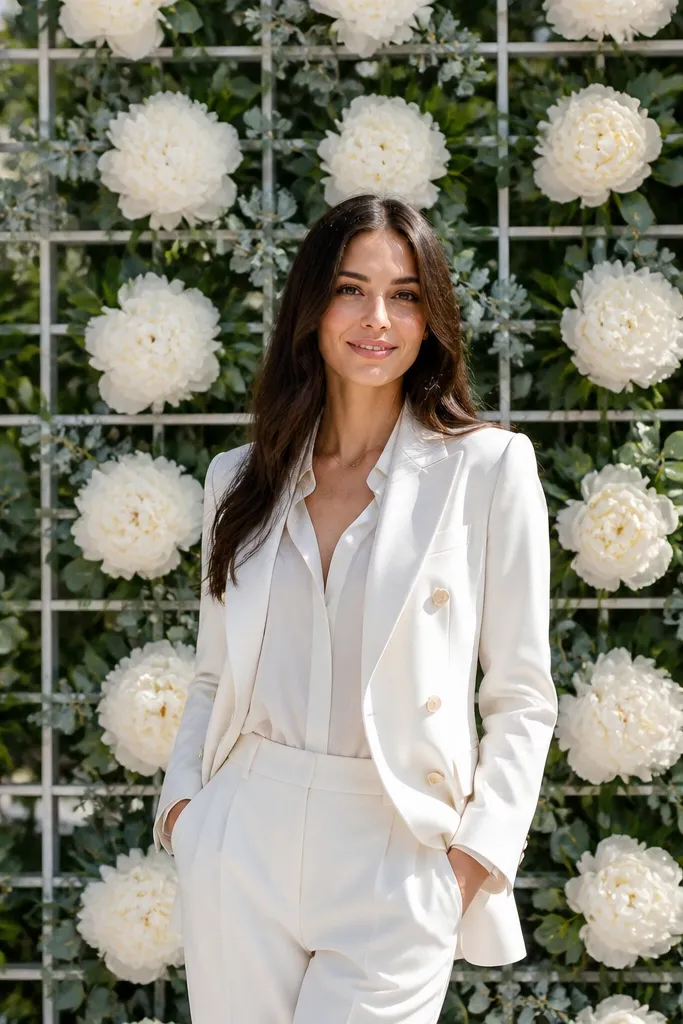
A grid-style floral backdrop reads clean and editorial because each bloom sits in a planned spot. White peony-style heads give a romantic look without needing color mixing, and the soft green filler prevents the wall from feeling empty. This is perfect for couples who want a classic backdrop that works for both ceremony and reception portraits. It’s also good for venues with neutral walls because the grid makes your stage the focus. For 3 day wedding stage decor, grids are efficient because panels or repeated clusters speed up assembly.
Start by creating a simple frame or using pre-made grid panels sized to your stage width. Attach white peony-style heads in a consistent pattern, keeping clusters at eye level and spacing evenly every 10-12 inches. Next, add soft green filler between clusters using smaller sprigs so you don’t get bare gaps. Finally, do a quick “step test” from the front — if any empty squares distract, fill them before lighting goes on.
Keep your filler leaves smaller than your main blooms so the grid stays readable in photos.
Skip random bloom sizes — mixed sizes without spacing looks like a rushed wall.
19. Sage Draped Canopy Over Stage With Hanging Crystal Drops
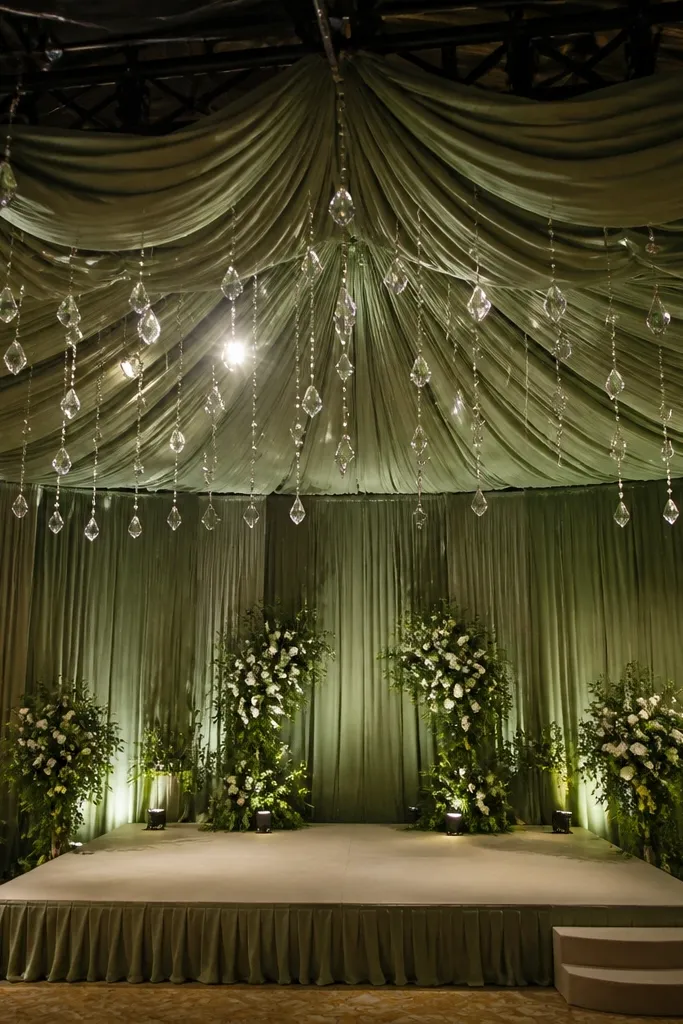
This is the kind of stage decor that makes the whole scene look like a photo set. A sage draped canopy adds softness and coverage, while hanging crystal drops catch light and create tiny highlights in pictures. It’s ideal for indoor receptions, ballroom stages, and ceremonies where you want a “ceiling moment” above the couple. Sage keeps it calm and modern, not overly bridal. For 3 day wedding stage decor, overhead decor is manageable if you pre-plan hanging points and keep the crystals lightweight.
Start by mapping your hanging points across the stage truss or ceiling, spaced about 24-30 inches apart for even coverage. Hang sage fabric canopy panels so they dip 8-12 inches below the top support, then secure the edges with clips or ties. Next, hang crystal drops in clusters at center and both sides, keeping each cluster slightly different in height for depth. Finally, test lighting angles — crystals show best when you aim a warm light toward them, not straight overhead.
Use clear fishing line for hangers — it disappears and keeps the focus on the crystals.
Avoid heavy chandelier-style clusters that swing and blur in video.
20. Matte White + Gold Floral Spray Duo at Stage Corners
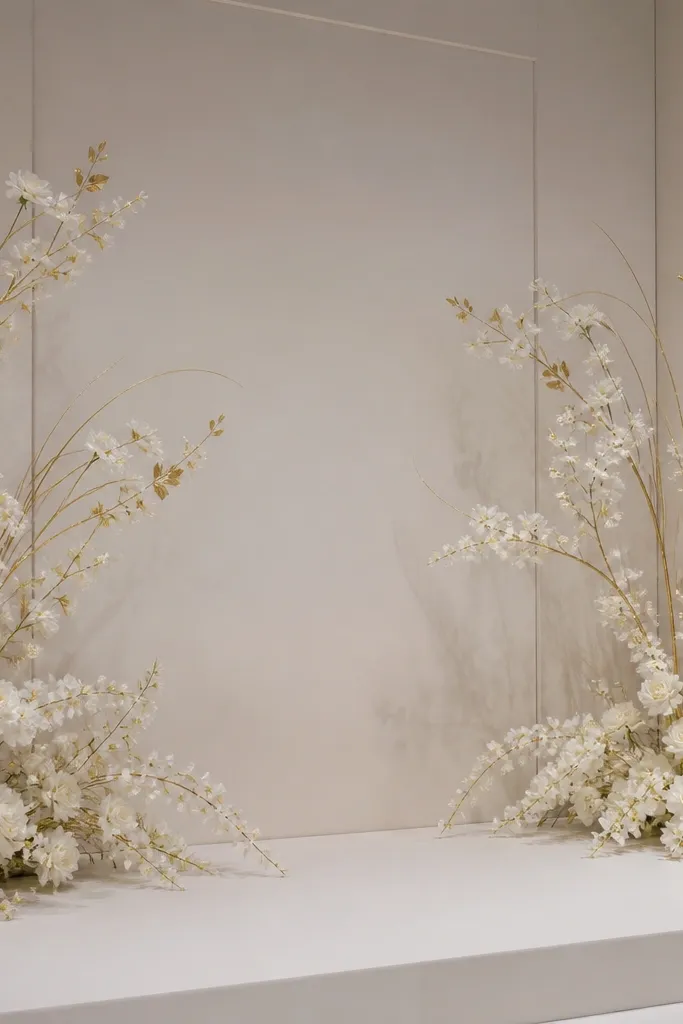
Corner sprays make your stage look complete without forcing you to cover the entire backdrop. Matte white blooms with gold accents create a clean, luxe look that reads from both front and side angles. This works well when your venue already has a nice wall behind the stage but you need to add wedding-level polish. It’s also a smart choice for 3 day wedding stage decor because you can build two consistent corner units and repeat the design. Keep the center area clear so the couple stands out in every shot.
Start by building two corner units using 2-3 floral sprays each, mixing matte white blooms with small gold elements like gold-painted eucalyptus tips or gold ribbon. Attach the units to stage stands or directly to the backdrop frame at 5-6 feet height, then angle them slightly inward. Next, add a small filler base so the corner looks anchored and doesn’t look like it’s floating. Finally, add one small gold ribbon tie at the center of the backdrop to connect both corners.
Angle the sprays inward by a few degrees so the blooms face the camera side, not the wall.
Don’t forget the base — bare stems at the bottom look unfinished in close photos.
21. Sculpted Greenery Backdrop With White Candle Sconces
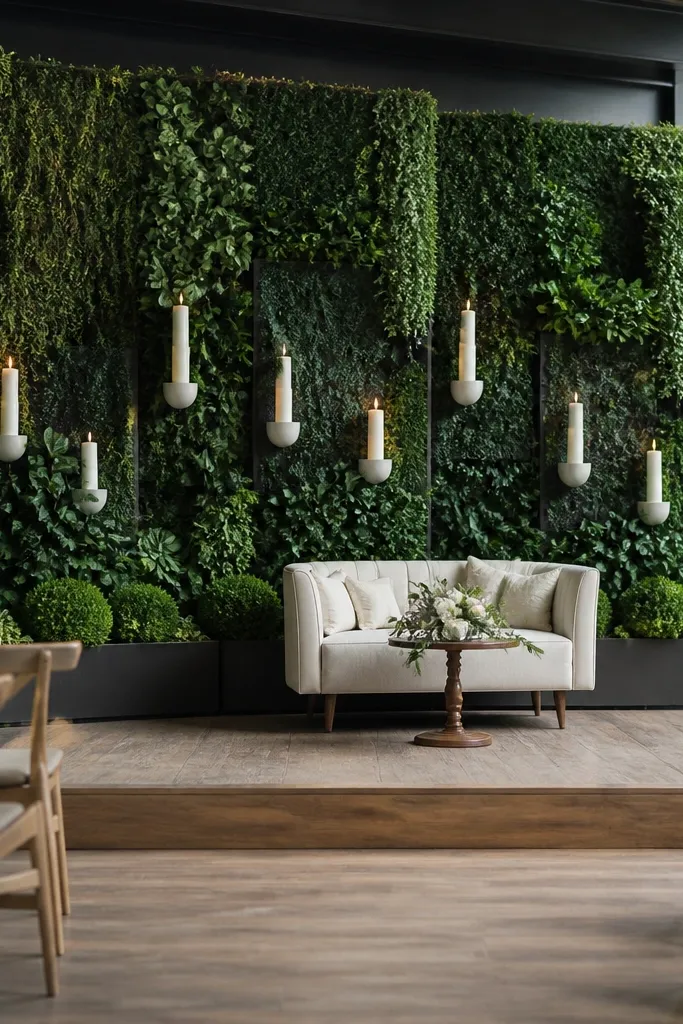
A sculpted greenery backdrop looks full and textured even without lots of flowers, and it photographs like a modern garden wall. White candle sconces add height and a clean vertical rhythm, so the stage feels intentional from floor to eye level. This design suits spring and summer weddings and works in venues that already have neutral decor. It’s also a practical choice when you want “soft luxury” without a massive floral budget. For 3 day wedding stage decor, greenery is manageable, and candle sconces are quick to place.
Start by building a greenery backdrop using dense faux greenery or fresh garland strips layered behind a frame. Attach greenery in sections and smooth out the front so it forms a continuous surface. Next, mount or place white candle sconces at regular intervals — 2-3 per side — with the tallest sconce at the center. Finally, add a thin strip of white flowers or white blossoms at the top edge so the greenery has a bright highlight for photos.
Use warm bulbs in sconces so greenery stays true green instead of turning yellow under cool light.
Skip bare frame — if the greenery doesn’t cover it fully, the stage will look like a rental setup.
22. Champagne Linen + Pearl Bead Curtain Backdrop
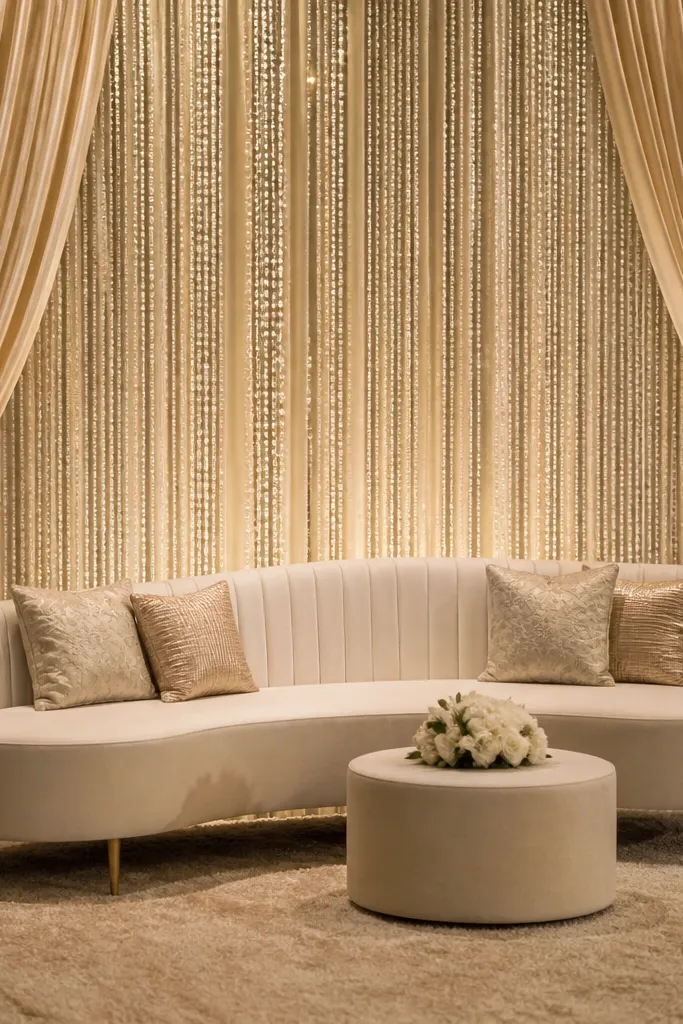
A pearl bead curtain backdrop adds shimmer without needing flowers everywhere. Champagne linen gives a soft base, and the beads catch stage lights in controlled sparkle. This setup works beautifully for evening weddings and for couples who want glam but still want romantic softness. It’s also great for indoor stages where you want a clear photo background that doesn’t compete with guests. For 3 day wedding stage decor, bead curtains hang fast, and you can style them with just a few floral accents.
Quick tipTest the curtain height with one quick photo before you add florals, since beads look different at different distances.
Start by hanging champagne linen panels first, then layer the pearl bead curtain down the center so it drapes in a smooth line. Secure the top with clips and let the beads fall naturally — don’t pull tight or it loses the drape effect. Next, place small floral clusters at the bottom edges and one larger cluster at center height. Finally, add warm backlighting behind the curtain so the beads glow instead of reflecting harshly.
Skip thisAvoid placing beads directly against glossy walls; it creates weird glare bands.
23. Dusty Blue + White Hydrangea Cloud Panels
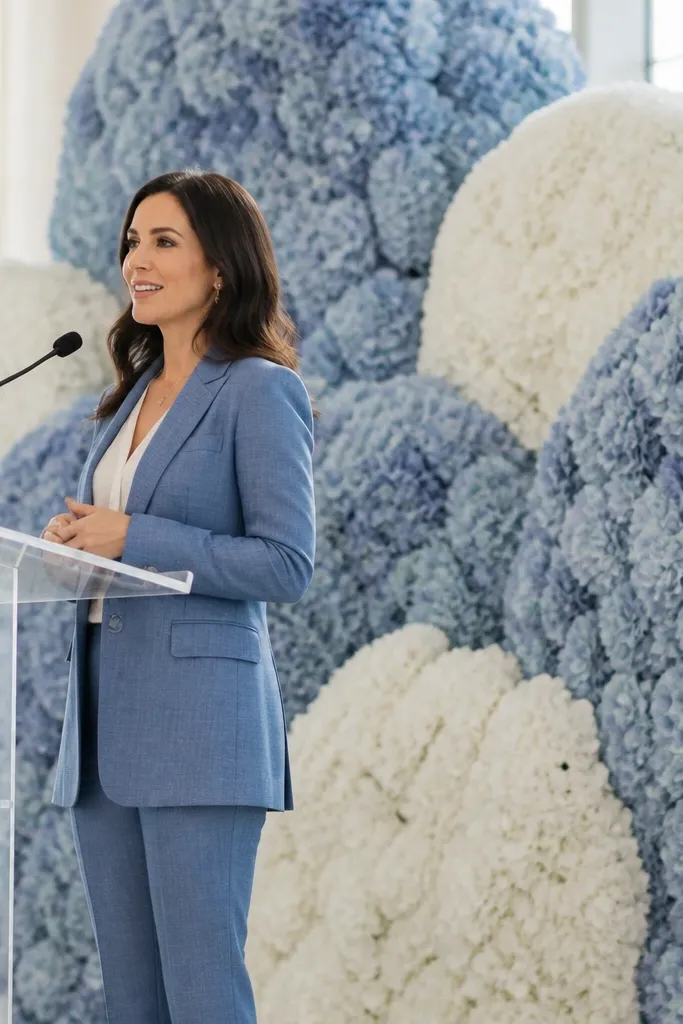
Hydrangea cloud panels look like soft, rounded clouds on camera, and dusty blue adds a gentle color story without going bold. Pairing dusty blue with white keeps the stage airy and makes skin tones look natural. This setup works well in spring and early summer, especially for venues with lots of natural light. It’s a good option for 3 day wedding stage decor because panels create a full backdrop quickly. If you want photos that look romantic and light, this is the look.
Start by dividing your backdrop width into 2-3 sections so each panel can be attached and adjusted quickly. Arrange dusty blue blooms and white blooms in a gradient or alternating blocks, aiming for the densest area at center. Next, add a thin layer of neutral greenery between blooms so the edges look finished. Finally, after lighting is on, check the backdrop from the guest seating angle and add a few extra blooms where the gradient looks uneven.
Keep the panel edges covered with small filler sprigs so you don’t see the frame lines in photos.
Don’t overdo dense foggy filler; it turns the cloud look into a flat wall.
24. Black + White Checker Ribbon Stage Border
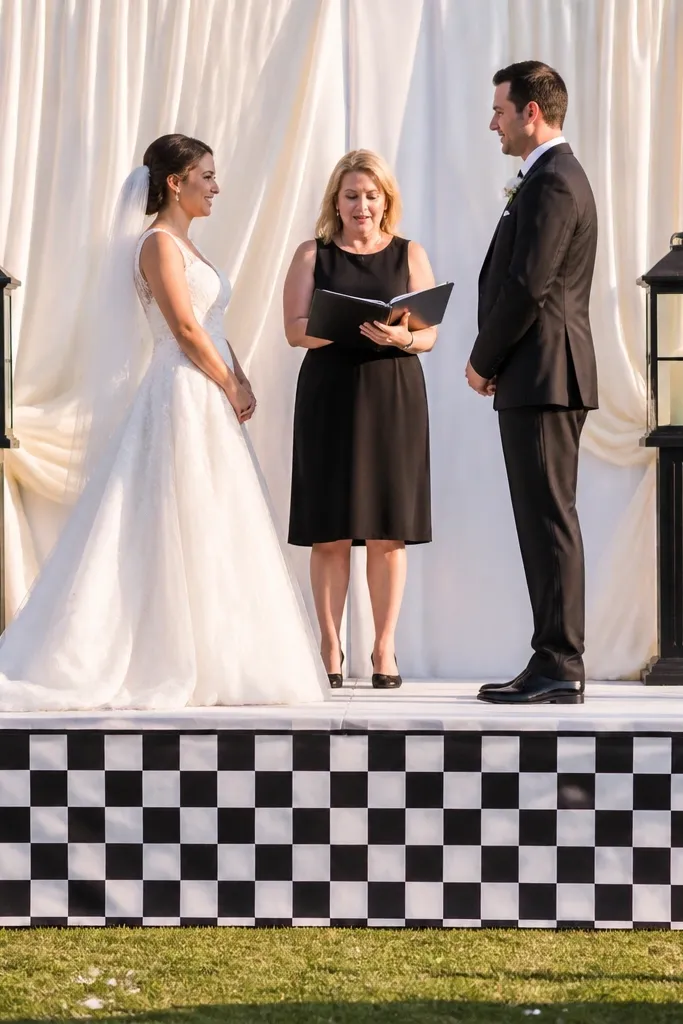
A checker ribbon border is graphic and photo-friendly, especially when your stage has a clean platform edge. It creates a bold frame around the couple and makes the whole scene look styled even if the backdrop is simple. Black and white also pairs with almost any wedding palette, so you can keep florals minimal. This works for modern weddings, courthouse-style ceremonies, and venues with a lot of neutral decor. For 3 day wedding stage decor, ribbon borders are fast to install and easy to adjust for straight lines.
Quick tipUse a ruler or chalk line to mark attachment points; crooked borders show immediately in photos.
Start by measuring the platform edge and cutting ribbon strips to match the length, then create a checker pattern using alternating black and white strips. Attach ribbon to the stage edge with hidden zip ties or Velcro strips so it stays straight and doesn’t sag. Next, add one small floral cluster at the center to soften the graphic look and connect it to the wedding theme. Finally, step back and confirm the checker lines are level from the camera side — straighten before final lighting.
Skip thisAvoid messy ribbon knots at the front edge — they look sloppy close up.
25. White Rose + Greenery Floating Shelf Backdrop
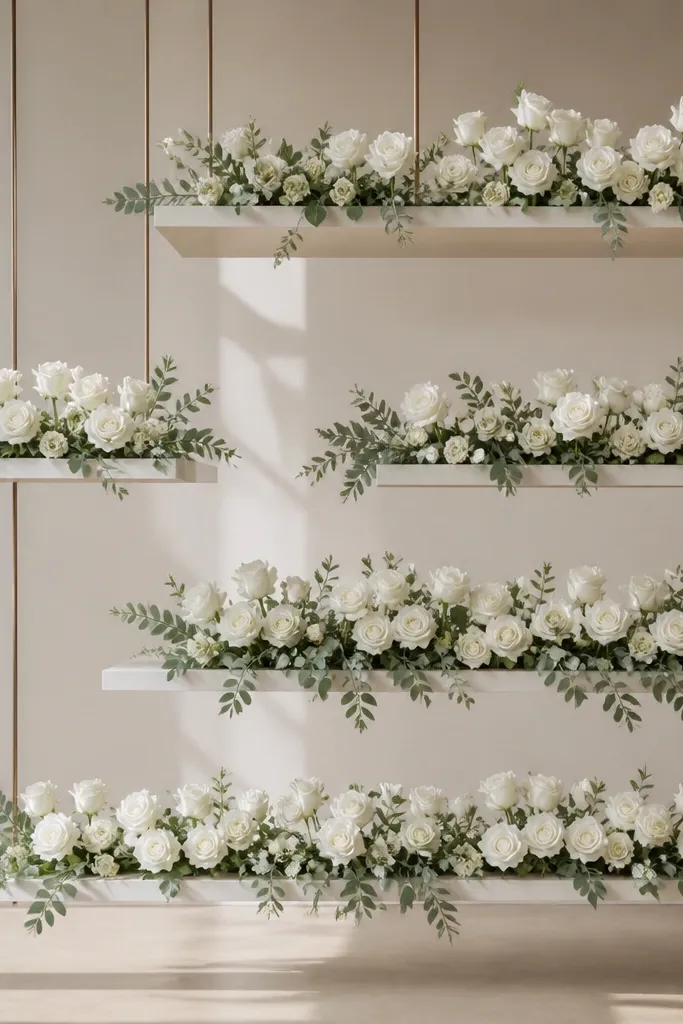
Floating shelves create height and depth without a full wall of flowers. White rose clusters on ledges look layered and intentional, and greenery keeps the shelf styling from looking staged like a showroom. This is a great choice for 3 day wedding stage decor when you want a backdrop that’s easy to build in sections. It also works well for ceremonies where the couple needs space behind them for signage or a projection. Choose this look for modern-romantic couples who want dimension and clean styling.
Quick tipUse foam-free floral blocks or removable oasis cups only inside the shelf — keep them hidden so they don’t show in close-ups.
Start by renting or building two or three floating shelf units sized to your stage width, with the lowest shelf about 30-36 inches from the floor. Place shelves centered behind the couple’s standing spot, then secure brackets to the frame or stage support. Next, style each shelf with greenery coverage first, then add white rose clusters in 2-3 groupings per shelf. Finally, adjust shelf height if needed after a camera test so the roses sit at eye level in photos.
Skip thisDon’t overload shelves — leave small negative space so the roses read as distinct clusters.