
1. Reclaimed Plank Welcome with Route Coordinates
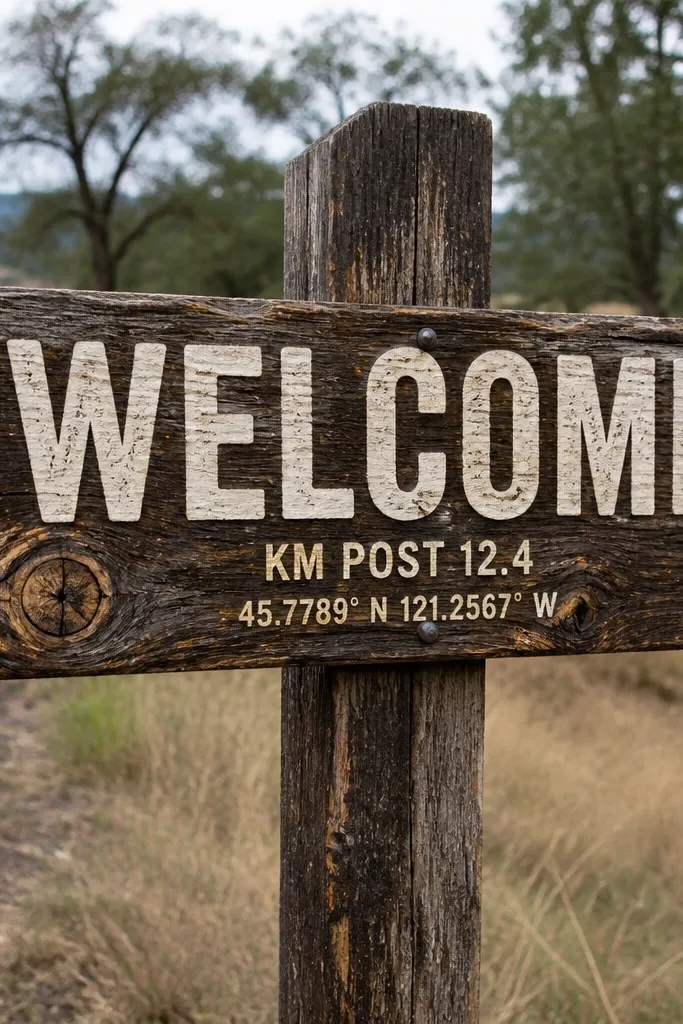
This is rustic that looks intentional because it ties the place to a real location detail. Use a wide reclaimed plank and paint “WELCOME” in bold block letters, then add your coordinates or a simple “KM POST” line in smaller type. The beauty is the wood grain — knots and splits — which show through even after staining and make the sign feel found, not printed. It’s a great fit for cabins, farms, and remote backyards where the entrance already has texture like stone walls or wooden fences.
Quick tipUse matte paint and avoid gloss clear coat; glare ruins rustic textures fast in midday photos.
Start by sanding the plank lightly just enough to knock off splinters, then wipe it clean and dry. Stain first if you want depth, then paint the letters with a matte exterior craft paint so it doesn’t glare in sun. Add coordinates or a “trail marker” line using a stencil for straight alignment. Finally, mount the plank on a simple A-frame stand or two stakes driven into the ground; keep the top edge level so photos don’t show tilt.
Skip thisDon’t use thin, light-colored paint for the coordinates — it disappears in shade.
2. Galvanized Tin Sign with Barn Red Outline
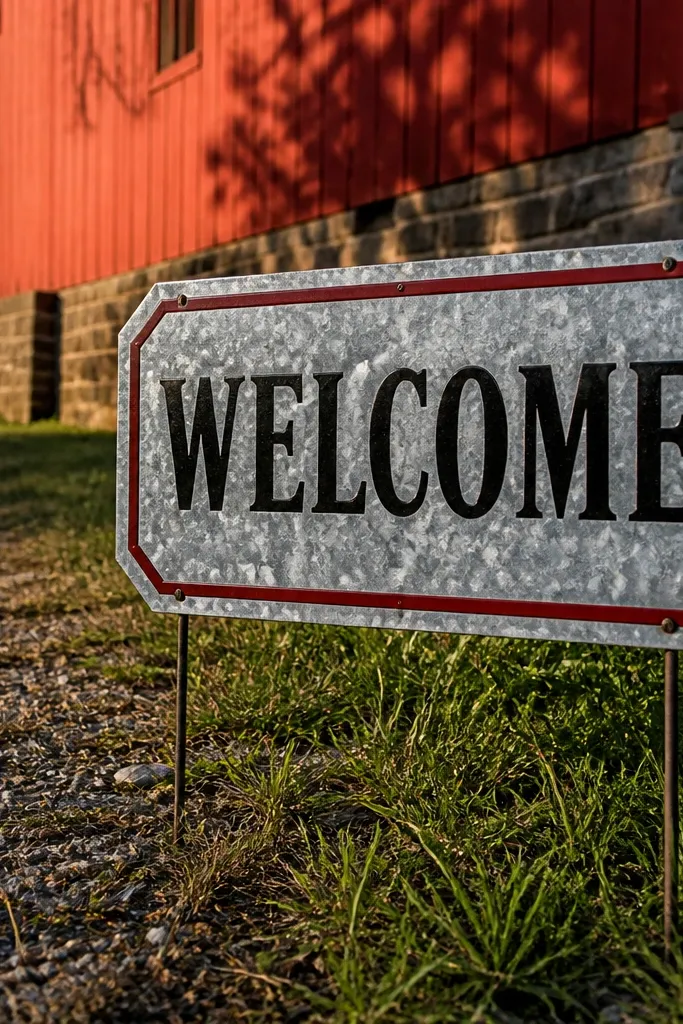
Galvanized metal reads “rustic” without looking like a craft store prop. The win here is contrast: black letters on a cool silver surface, framed with a barn red outline that pops in photos. Add small cut lines or rivet dots at the corners so it looks like an actual yard sign. This works especially well at venues with metal accents — lanterns, bar carts, or exposed beams — and it photographs cleanly even when the background is busy.
Quick tipIf the venue is windy, secure the sign with two zip ties to the stand — it keeps the edge from vibrating.
Buy a small sheet of thin galvanized metal or a pre-made blank tin sign and rough it with fine sandpaper. Spray or paint the base letters in matte black, then use painter’s tape to mask a barn red border around the outside. Finish by adding tiny rivet dots at the corners using a paint pen or a few small metal brads. Mount it at about chest height on a sturdy post or hang it from a fence rail so it doesn’t flap.
Skip thisSkip super-light gray letters; the metal reflections make them look washed out.
3. Kraft Paper Banner on Twine with Wood Tags
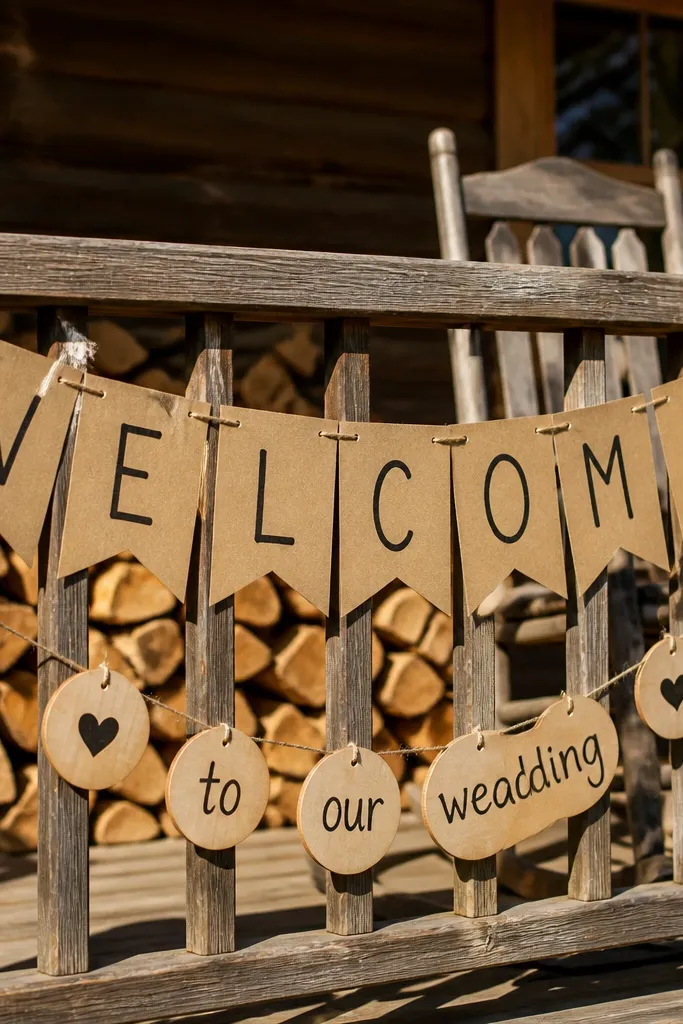
This is the “off the beaten path” look because it feels like something you’d see tied to a cabin porch. Kraft paper gives you that warm fiber texture, and wood tags add a handmade detail that still reads clearly. Write “WELCOME” in thick black marker or paint pen, then add “to our wedding” on smaller tags so the sign doesn’t look crowded. It’s best for entrances with a natural frame like a tree, fence, or wagon wheel — the banner hangs and catches light nicely.
Quick tipUse a paint pen for the letters; marker ink smears when humidity hits.
Cut kraft paper rectangles about 6x9 inches and punch two holes at the top for twine. Write the main words in the center, then add one short line per tag. Tie the pieces to twine with even spacing so the banner looks symmetrical in photos. For the wood tags, paint or stain small wooden rounds or rectangles and attach them between paper pieces using jute twine knots.
Skip thisDon’t hang it too low — guests' heads block the text in most entrance photos.
4. Trail Marker Chalkboard on a Stump Base
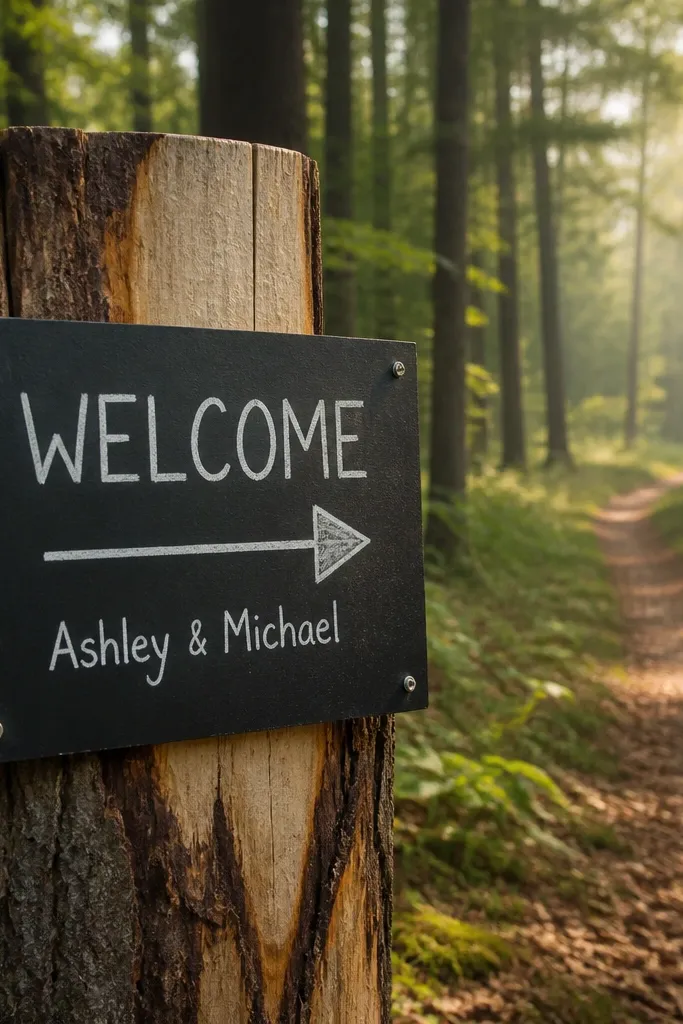
A stump base makes this feel like it belongs on a trail, not at a venue. The chalkboard surface adds a soft, matte look, and the trail marker layout gives it a clear “path” direction. Use a simple arrow pointing toward the ceremony area and place the couple’s names smaller under “WELCOME.” This works great outdoors because the chalk texture looks natural against leaves, bark, and gravel.
Quick tipSpray a light mist of chalkboard fixative (or a clear matte fixative) to reduce smudging during warm weather.
Find a stump or use a pre-cut log base, then secure a small chalkboard panel on top with screws or heavy-duty adhesive meant for outdoor use. Draw the layout lightly with chalk first, then go over it with thicker strokes for visibility. Add a faux “trail mileage” line like “0.5 mi” in a smaller font. Place the stump on level ground or on a flat paver so it doesn’t wobble.
Skip thisSkip ultra-fancy chalk script; thin lines break up in bright sun.
5. Shutter Door Welcome Sign with Hanging Flower Boxes
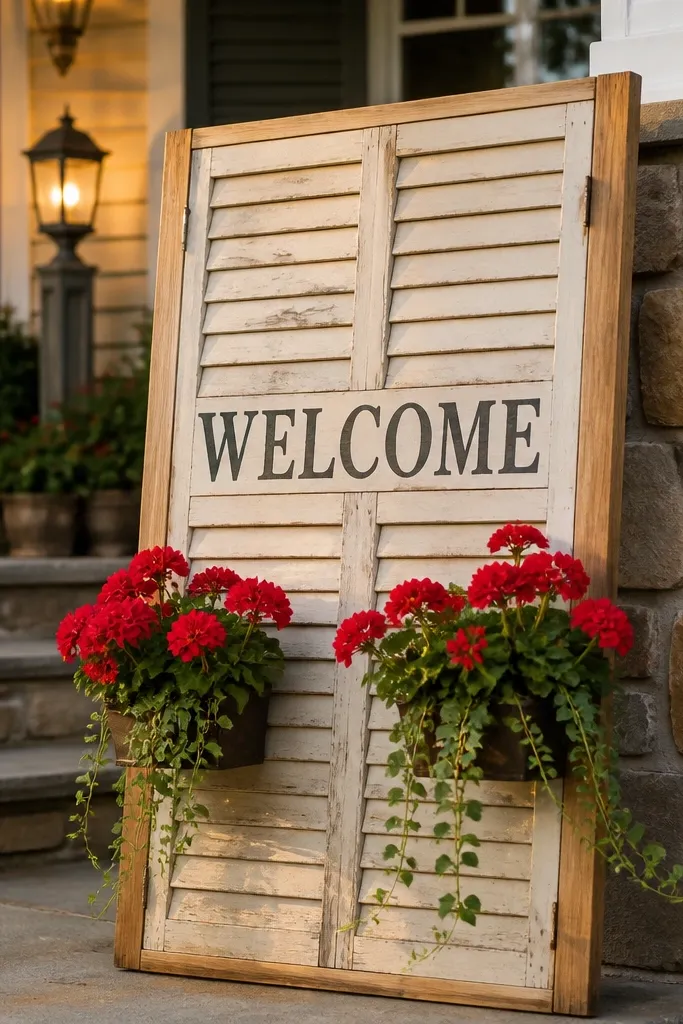
If you want an entrance that looks like a storybook porch without going formal, use an old shutter door. Paint the “WELCOME” centered across the shutter slats, then leave the natural wood edges visible for texture. Add small hanging or attached flower boxes at the bottom corners so your sign reads like part of the décor, not a standalone sign. This is perfect for venues with porches, barn doors, or antique furniture — it frames guests as they arrive.
Quick tipChoose one flower tone only (like dusty rose or terracotta) so the sign stays readable from a distance.
Sand the shutter just enough to remove grime, then apply a wood primer so your paint doesn’t soak unevenly. Use painter’s tape to mask a clean rectangle for “WELCOME,” then paint with matte white or cream. Add flower boxes with a simple bracket or twine hang, using faux greens if weather is unpredictable. Finally, place the door on an A-frame stand or lean it against a stable post with two straps to prevent shifting.
Skip thisDon’t clutter the shutter with too many lines; the slats already create visual texture.
6. Vintage Window Frame Welcome with Pressed Botanicals
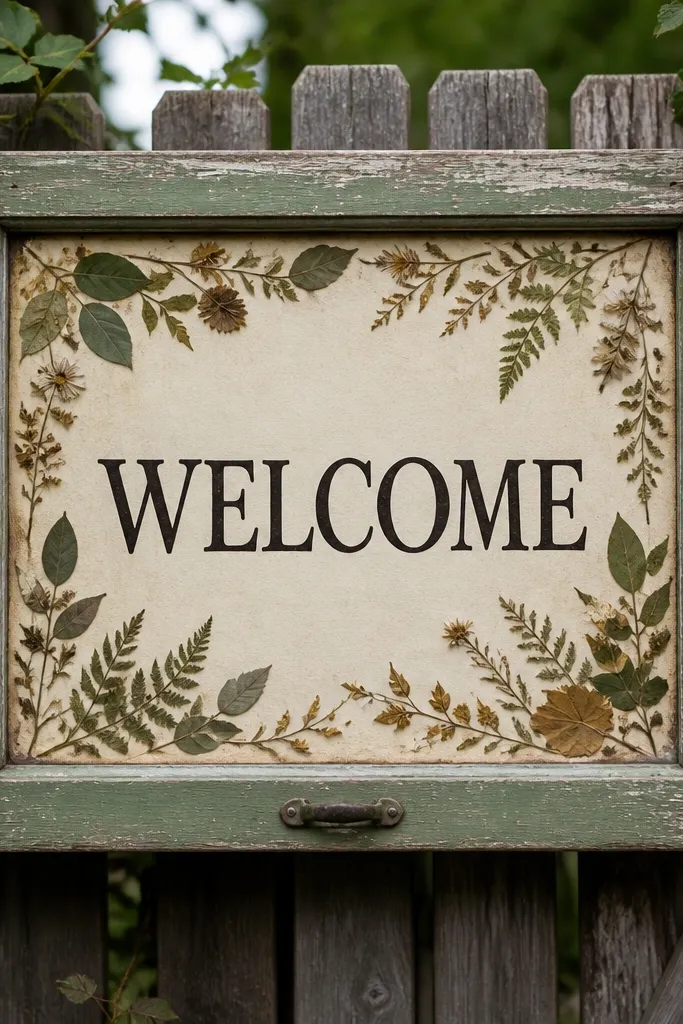
A window frame is instantly photogenic because it adds depth and a “found object” feel. Put “WELCOME” on a backing panel — cream cardstock or thin wood — then decorate the border with pressed leaves and small dried sprigs. Keep the botanicals around the edges, not across the letters, so it stays readable. This design suits garden venues, orchard settings, and rustic outdoor ceremonies where greenery already exists.
Quick tipSeal pressed botanicals with a matte spray from a distance to keep colors from dulling.
Source a small vintage window frame and clean it, then decide on a backing: thin plywood stained light or cream cardstock sealed with matte spray. Arrange pressed botanicals around the border first, then glue them lightly with archival glue. Add “WELCOME” in bold black vinyl letters or painted stencil letters for clean edges. Hang or prop the frame at a slight angle so the glass catches light without glare.
Skip thisSkip thick glue blobs; they show through backing and look messy in close photos.
7. Wood Slice Welcome with Route Lines and Small Dates
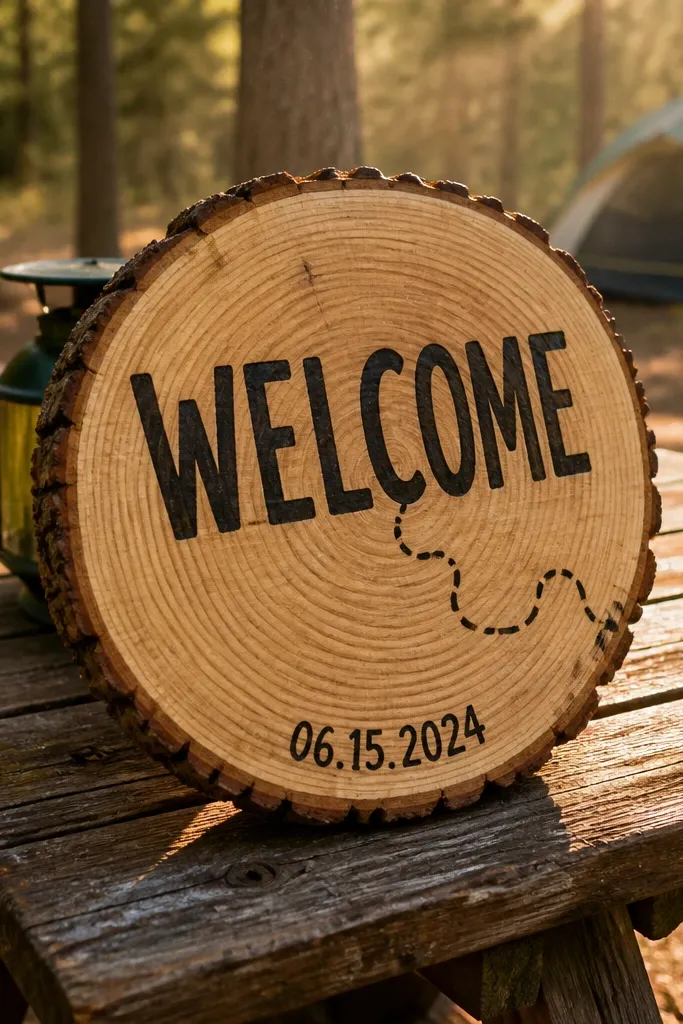
Wood slices look like they came from a campfire craft booth, but the difference is precision. Paint “WELCOME” across the center, then add a thin dashed “route” line that curves to a small date line at the bottom. The rings in the wood give you natural graphic texture, so simple typography looks high-end. This is a strong choice for rustic venues where you want the sign to feel handmade and a little playful.
Buy or cut a wood slice about 10-12 inches wide and sand the top smooth. Paint the background area lightly with a wood-burn-safe base or stain, then stencil “WELCOME” in a bold font. Add route lines with a fine paint brush and a steady hand, then write the date smaller at the bottom. Mount the slice on a short easel stand or tie it to a stake with jute so it stays upright.
Use a stencil for “WELCOME” — freehand lettering looks uneven on round surfaces.
Don’t make the letters too close to the edge; the grain chips in photos.
8. Burlap Flag Banner with Stamped Leather Labels
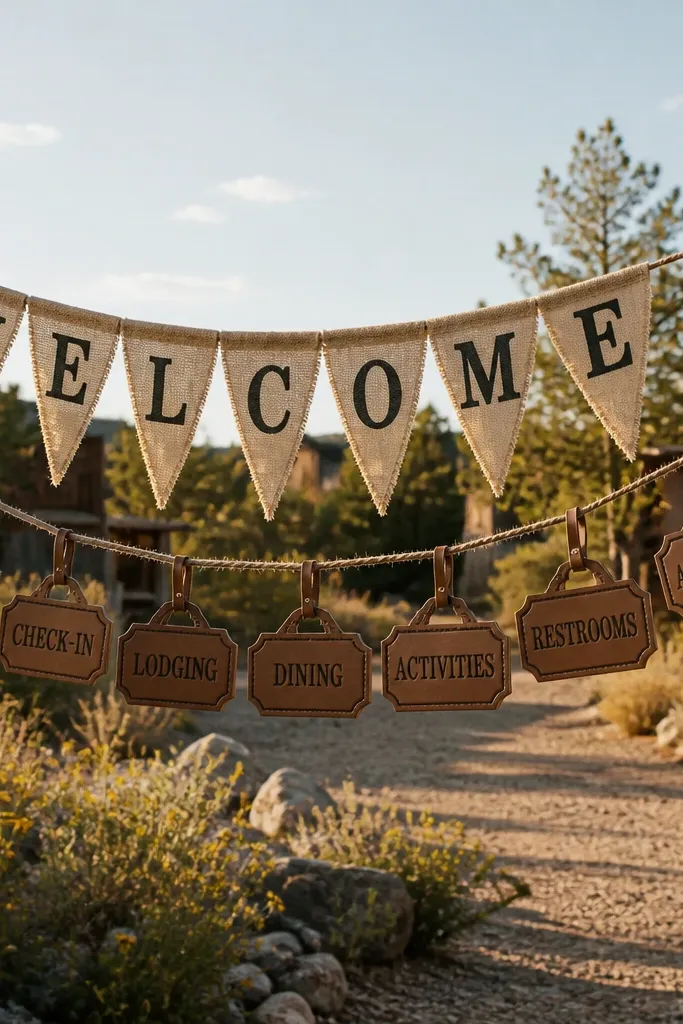
Burlap and leather labels give you that rugged welcome without going too farmhouse. Use burlap pennants in a clean triangle pattern, then add stamped leather-look tags with your main words. The texture is the star: burlap weave shows in sunlight, and leather labels make it feel more “real” than paper. This works best for outdoor entrances with lots of natural materials — wood fences, hay bales, stone paths.
Quick tipIf it rains, keep a spare piece of twine and clothespins ready; burlap sags fast in humidity.
Cut burlap into pennants about 8 inches wide, then fold and stitch or use fabric glue to keep edges from fraying. Stretch a twine line and attach pennants with clothespins or stitched loops. Make leather labels from thin faux leather or pre-cut tag blanks, then stamp or paint “WELCOME” and “DATE” on separate labels. Hang the banner so it sits above guest eye level and stays flat.
Skip thisAvoid overly light ink on burlap; it looks gray in photos.
9. Sanded Farmhouse Board with Chalk Ink and Nail Heads
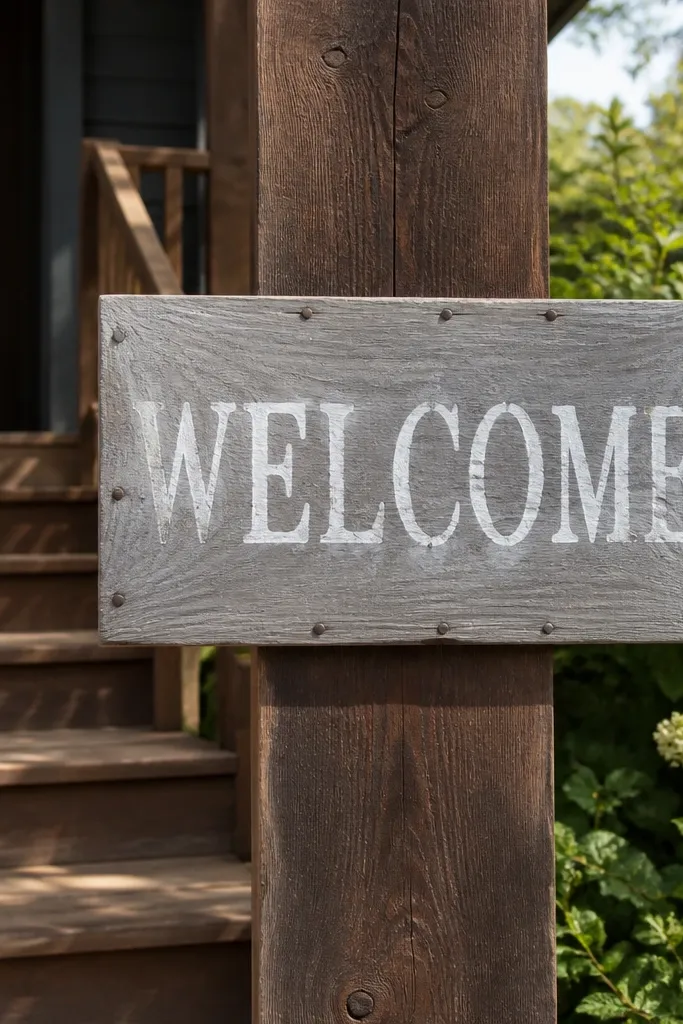
This one is clean, rustic, and photo-friendly because the board looks like it’s been sitting on a porch for years. You get that matte chalk feel without using an actual chalkboard. Use a sanded board, paint “WELCOME” with chalky finish paint or chalk ink, then add visible nail heads around the border like a frame. It’s perfect for modern rustic venues where you want texture but still want the sign to look polished.
Quick tipTest your stencil spacing on scrap wood first; chalky paint bleeds less when your stencil edges are pressed hard.
Sand a small board and wipe it with tack cloth. Paint a thin base coat in cream or warm gray, then add “WELCOME” with a chalky finish paint using a stencil. Place border nail heads by tapping small nails around the perimeter and leaving them slightly raised, then paint over the nail heads lightly if you want a uniform look. Mount on a simple stand or fence rail so it faces the path.
Skip thisSkip glossy clear coat; it turns the chalk look shiny and cheap.
10. Map Scrap Welcome Sign with Compass Rose
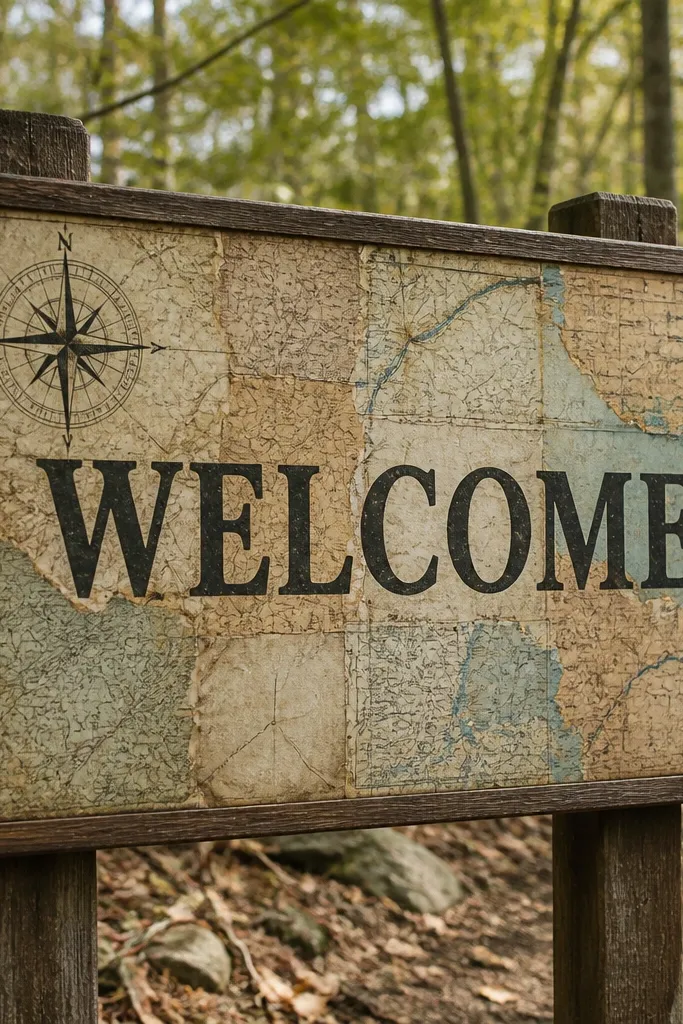
A map scrap sign is the most “off the beaten path” of the bunch because it literally tells a travel story. Tear vintage-style map paper, place it in an uneven patchwork behind your typography, and seal it so it doesn’t wrinkle. Add a simple compass rose in one corner and keep the “WELCOME” text bold and centered. It looks incredible against grass, gravel, or wood doors because the faded colors soften the whole entrance.
Quick tipChoose map paper with less readable text; busy micro-type competes with your welcome message.
Print or buy vintage-style map paper, then tear pieces and arrange them like collage on a board or thick poster board. Glue down with decoupage medium, then seal with a matte sealer. Paint “WELCOME” on top using a stencil so edges stay sharp. Add a small compass rose using a template, then attach the finished board to a stand or hang it from a hook.
Skip thisDon’t cover the entire board edge-to-edge with map — leave a small clean border for crisp photos.
11. Barn Door Welcome with Hanging Lantern Sconces
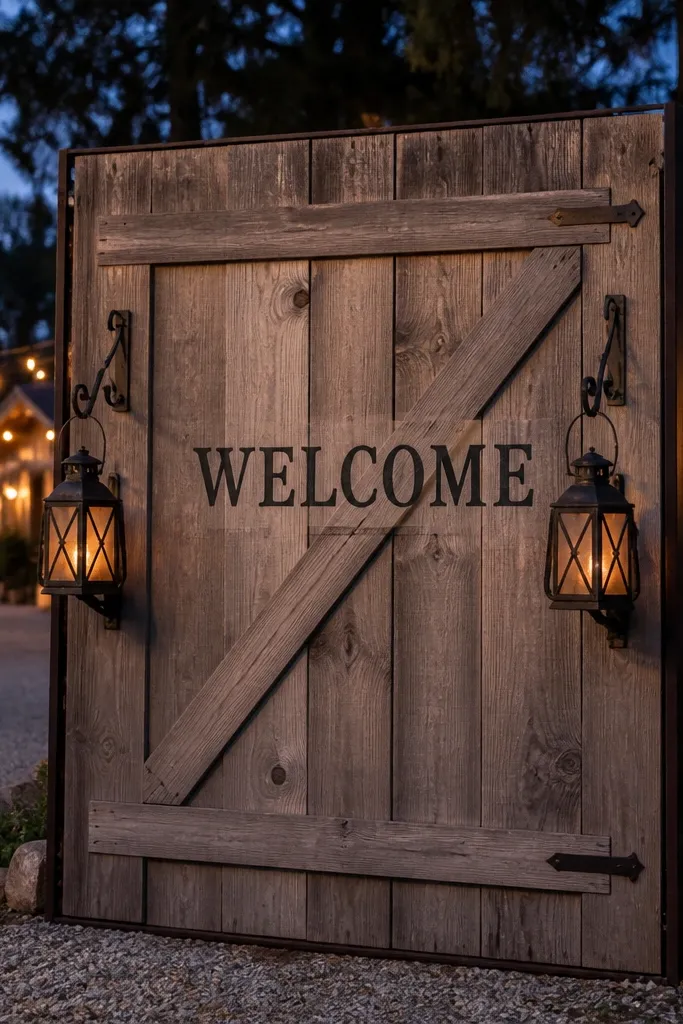
This is a statement entrance piece without being complicated. A small barn door panel gives you instant vertical lines, and “WELCOME” centered on the wood reads well from a distance. Add two hanging lantern sconces or lantern hooks beside the text so guests feel guided. It’s especially good for evening weddings because lantern light warms the wood and makes photos look rich without extra editing.
Quick tipUse warm bulb temperature if you’re using real lights — 2700K looks best on wood in photos.
Get a barn door panel or a reclaimed door section and clean it thoroughly. Sand the surface, then paint “WELCOME” in matte black or dark espresso using a stencil. Mount two lantern hooks or small brackets on the sides, keeping them symmetrical. Place the door on a stand or hang it securely; if it’s outdoors, use flameless candles inside lanterns for safer setup.
Skip thisDon’t choose a sign font that’s too thin; barn wood texture eats fine lines in low light.
12. Rustic Window Chalkboard with Burlap Bow Tie
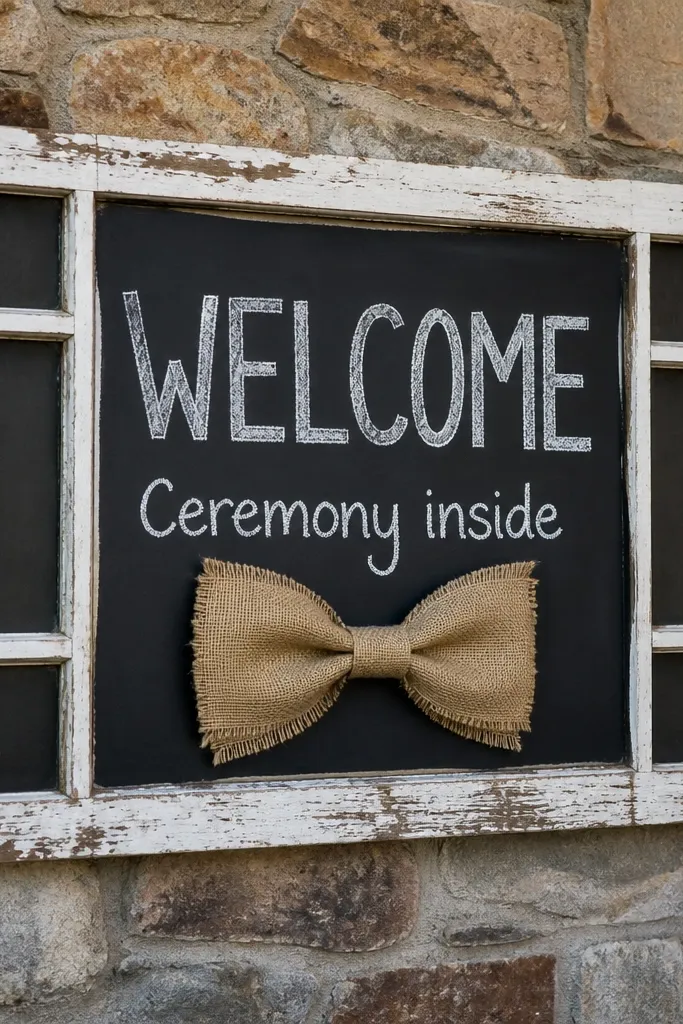
This blends two photogenic elements: a window frame and a chalkboard center. The burlap bow tie adds softness and keeps the sign from looking too stark against wood or stone. Write “WELCOME” in thick chalk-style lettering, then add a short line like “Ceremony inside” if your layout is confusing. This works well for venues where guests arrive through a courtyard, porch, or gate and need clear direction.
Use a small window frame and attach a chalkboard panel or chalkboard paint sheet inside. Paint or tape the frame edges in a light neutral so the center stays the focus. Add a burlap bow tied with jute twine at the top corner, then secure the chalkboard panel so it doesn’t rattle. Place it near the entrance gate at about waist-to-chest height, angled slightly toward the path.
If you use chalk, bring a small microfiber cloth for smudges; wind and hands happen.
Skip busy background decor around the sign; it competes with the chalk text.
13. Cedar Plank Welcome with Carved Nameplate
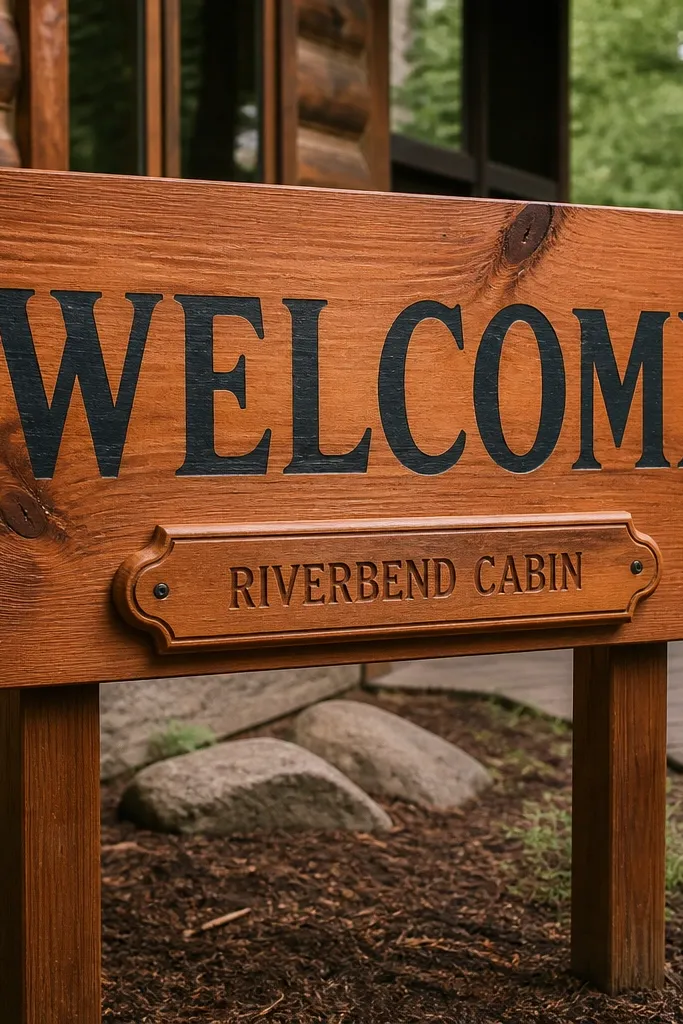
Cedar looks warm and outdoorsy, and it smells like a cabin when guests walk past. Use a cedar plank as the base, then add a small carved nameplate for the couple’s names or a simple “Home of” line. For the welcome text, go with dark paint so it’s readable in shade. This design is a great fit for weddings in cabins, mountain lodges, and any venue where wood is already the dominant material.
Quick tipKeep the nameplate smaller than you think; big plates look heavy and hide the welcome message.
Sand the cedar lightly and wipe it with a dry cloth so dust doesn’t mess up paint adhesion. Paint “WELCOME” in a stencil pattern across the plank, then add a small nameplate cut from wood or use a pre-made blank plate. Seal the nameplate with a matte finish, then attach it with screws or strong adhesive designed for wood. Stand it on a stable base like a cedar post or a weighted A-frame so it stays straight.
Skip thisDon’t add too many lines — cedar grain is already busy enough.
14. Rustic Metal Address Plate with Arrow Stakes
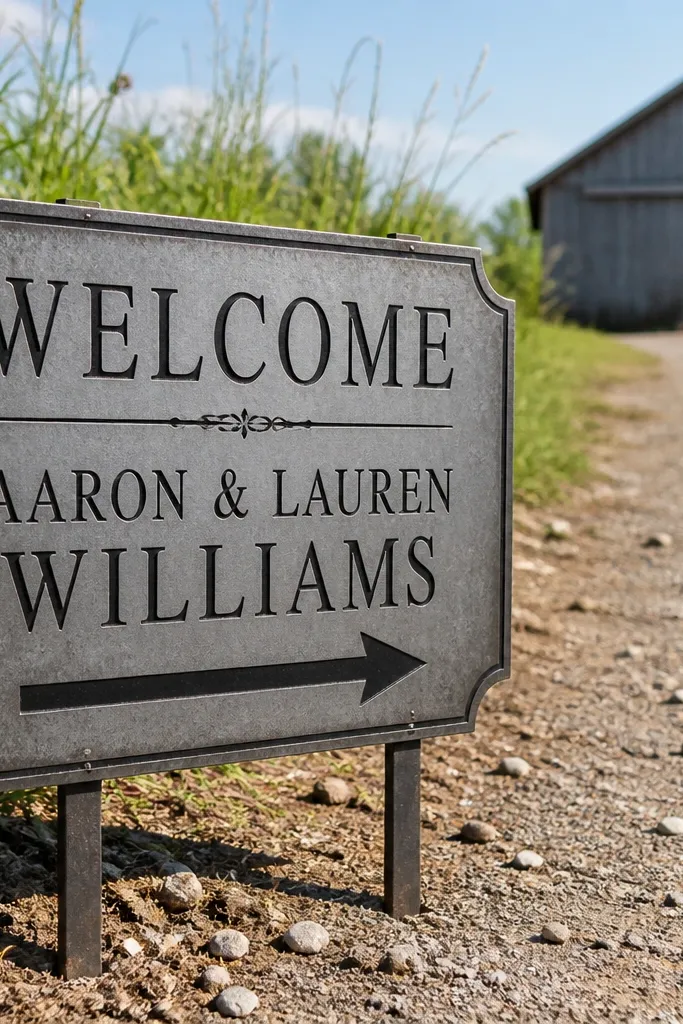
This one is off the beaten path because it looks like an old property marker. Use a metal address plate or stamped metal sheet, paint “WELCOME” and your names in high-contrast black or deep charcoal, then add a bold arrow. Stake it in at the edge of the path so it points guests toward the entrance. It’s perfect when guests might not know where to turn, and it photographs well against grass or gravel because the arrow shape stays clear.
Choose a metal plate about 8-12 inches wide and clean it with degreaser. Paint the text with matte exterior paint and add an arrow in a thicker line for readability. Drive two stakes into the ground at the same height on both sides of the plate, then secure the plate with zip ties or wire. Position it so the arrow points directly toward the ceremony — not at the parking area.
If the ground is soft, use longer stakes and push them in further than you think; leaning ruins the look.
Skip reflective metallic text; it flashes in sun and looks washed out on camera.
15. Vintage Suitcase Welcome Sign on Suitcase Stand
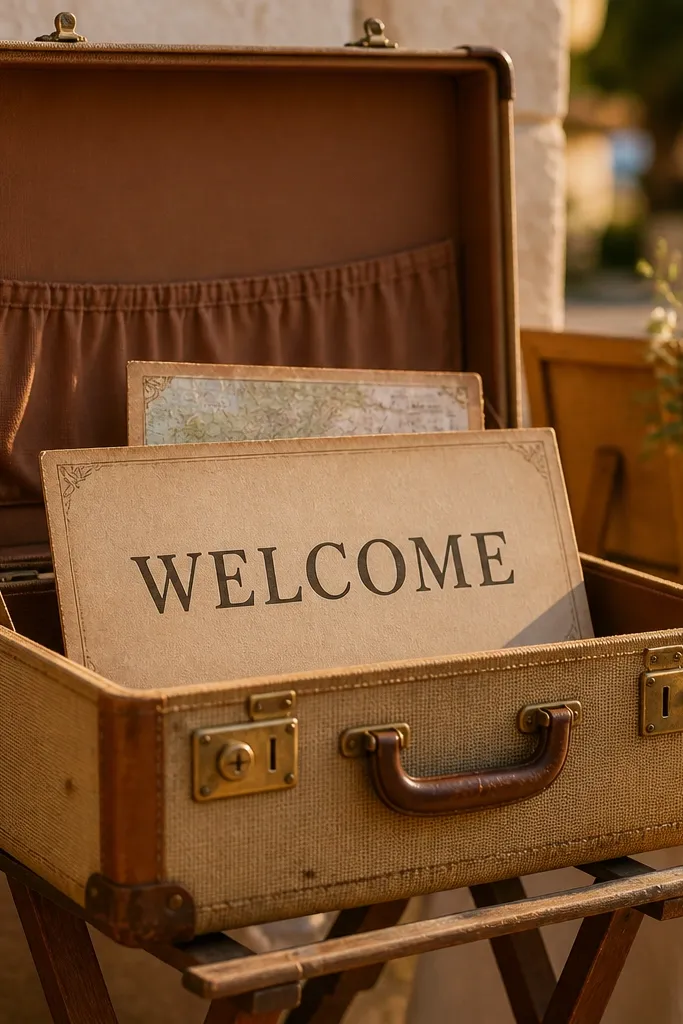
A suitcase sign gives you a travel vibe that fits the off-the-beaten-path rustic theme perfectly. Put “WELCOME” on a stiff card or thin wood panel, then prop it inside an open vintage suitcase with a map scrap or ticket edge behind it. The texture of leather and worn fabric adds warmth, and the sign looks like part of your arrival story. This works best for indoor venues, covered patios, and entrances where you can keep the suitcase dry.
Quick tipChoose a suitcase color that contrasts your sign card — tan leather with cream paper looks best.
Find a vintage suitcase with intact hinges and a clean interior. Create a sign panel about 8x12 inches and mount it to a small easel card holder or a wood strip so it stands upright. Line the suitcase interior with a torn map piece, then place the sign so it’s centered and visible from the path. Use a stable suitcase stand or set it on a flat surface under a canopy; add a small weight inside if it tips.
Skip thisDon’t use cheap plastic suitcase; it reflects light and looks off in photos.



