
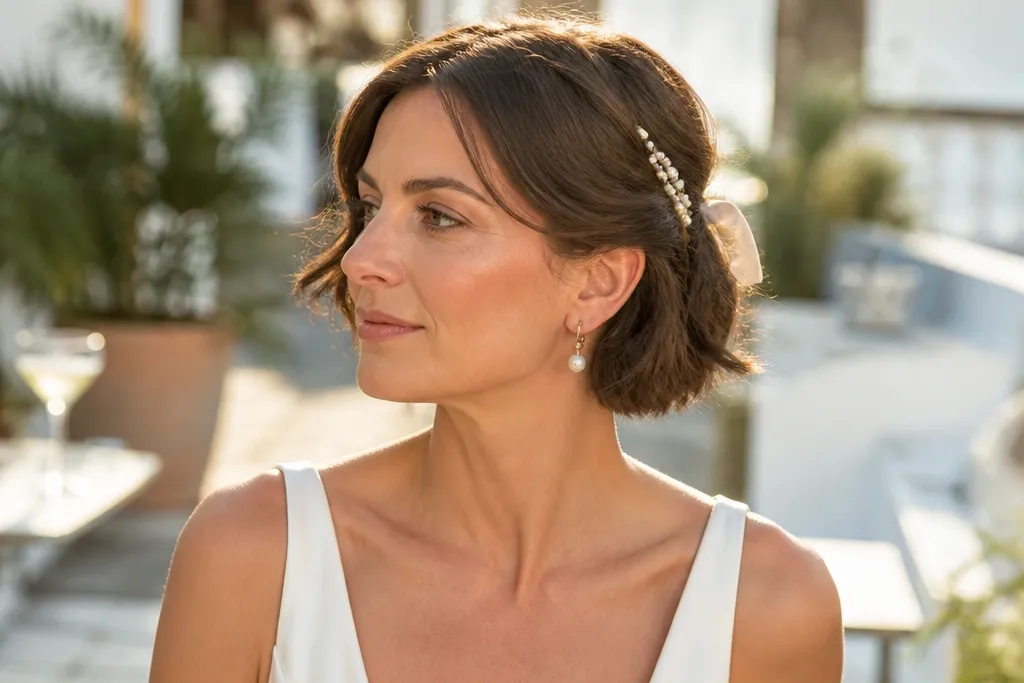
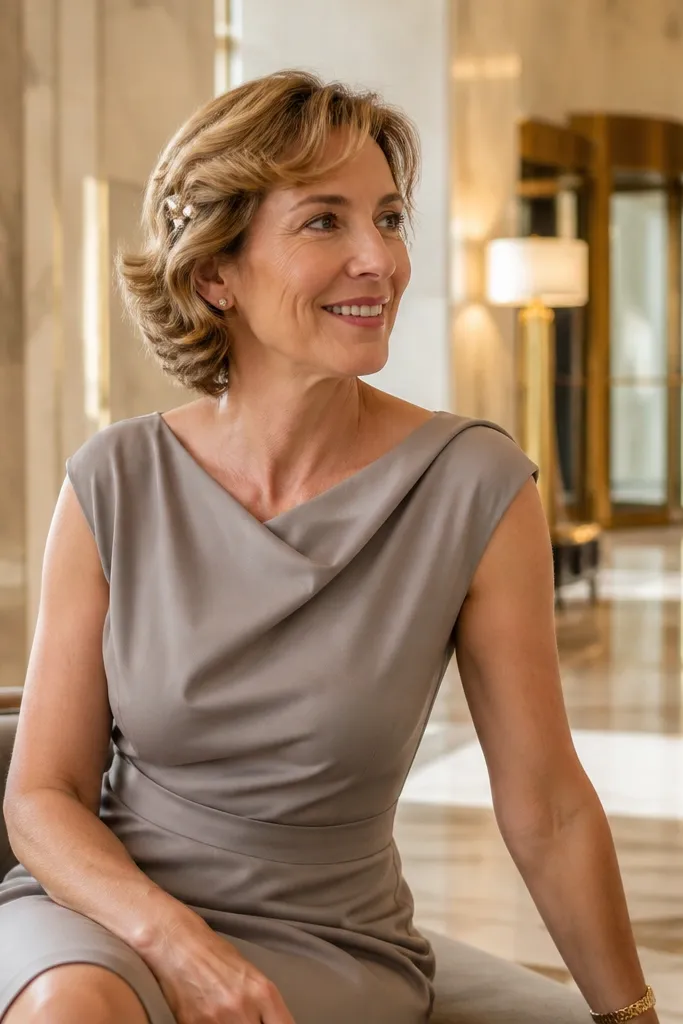
1. Side-Part Soft Waves with Crystal Mini Clip
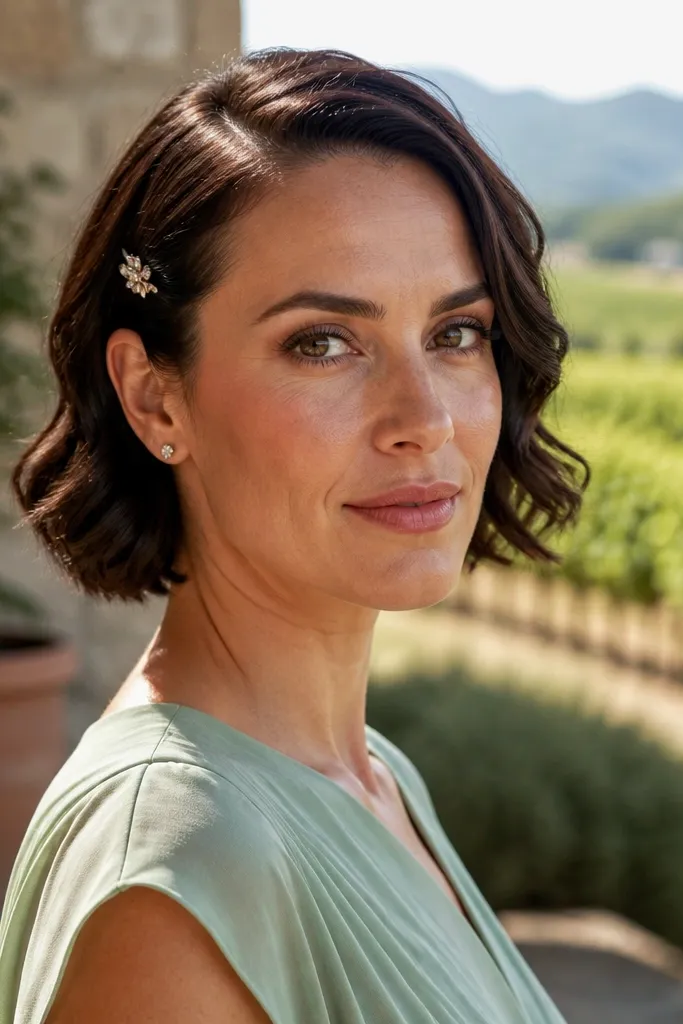
This is the “clean and pretty” option for short hair because the side part gives your face shape a clear frame while the waves add movement that shows up in ceremony photos. The mini crystal clip lands at the temple area, where cameras catch shine without weighing your hair down. It’s especially flattering if your hair is a bob or lob that holds a wave pattern with light heat. It works for garden weddings and bright indoor venues since the waves stay readable without looking heavy.
Start with damp hair and add a mousse or styling cream only to the mid-lengths and ends. Create a deep side part, then set loose waves using a 3/4-inch curling iron or wand; keep the root slightly cooler so you don’t lose volume. After cooling, sweep the front wave to one side and clip a crystal mini clip right above the ear line. Finish with a light hairspray around the clip and at the crown so the side part doesn’t shift.
Quick tipChoose a clip that matches your metal tone (silver for cool jewelry, gold for warm jewelry) so it reads cohesive in photos.
Skip thisSkip tiny clips placed too low near the ear — they disappear once you turn your head.
2. Sleek Side-Swept Pixie with Barrette Crown
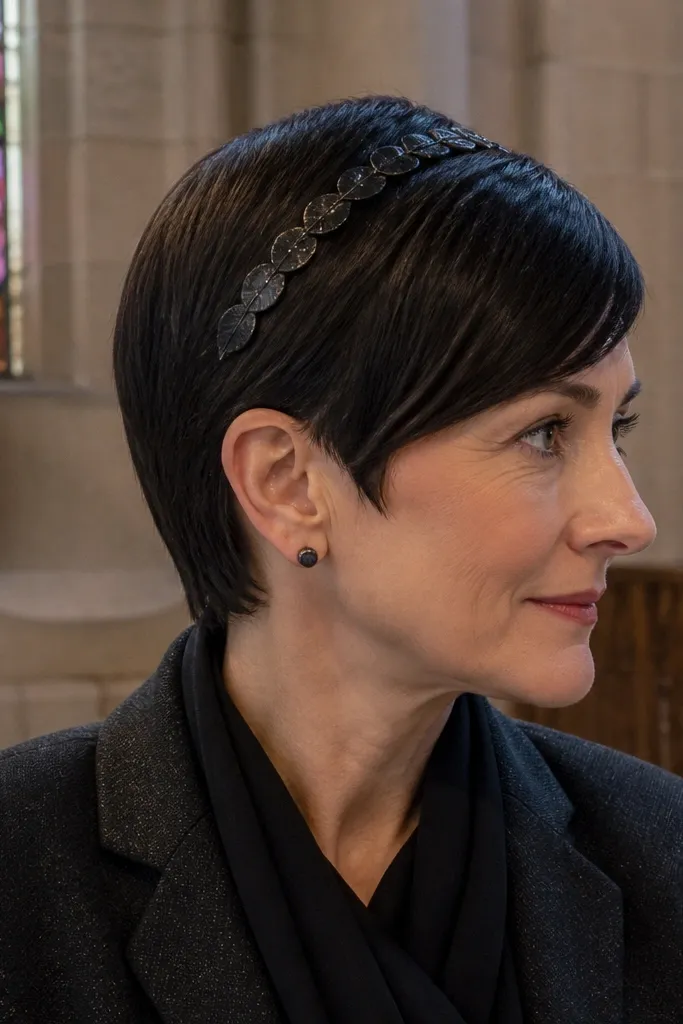
If your hair is a pixie or very short bob, this style looks intentional fast because it relies on smooth lines instead of length for weaving. The barrette across the crown creates a focal point that photographs well even when your hair can’t be pinned into a full updo. It also keeps flyaways controlled since the hair is smoothed and directed. This works best for formal indoor weddings, especially with satin or structured dresses where sleek hair matches the look.
Start by applying a smoothing cream or gel to damp hair, then blow-dry while sweeping everything to one side. Use a comb to set the side part and lightly press the sides flat so the silhouette stays crisp. Place a barrette across the crown where your hair naturally meets, then tuck any short ends under the barrette with 2 small bobby pins. Finish with a quick mist of hairspray and press the sides again with your palm.
Buy a barrette with strong teeth — cheap smooth bars slide on short hair.
Don’t use heavy oil sheen on top; it reflects flash and makes the crown look greasy.
3. Half-Up Twist with Pearl Bobby Pins
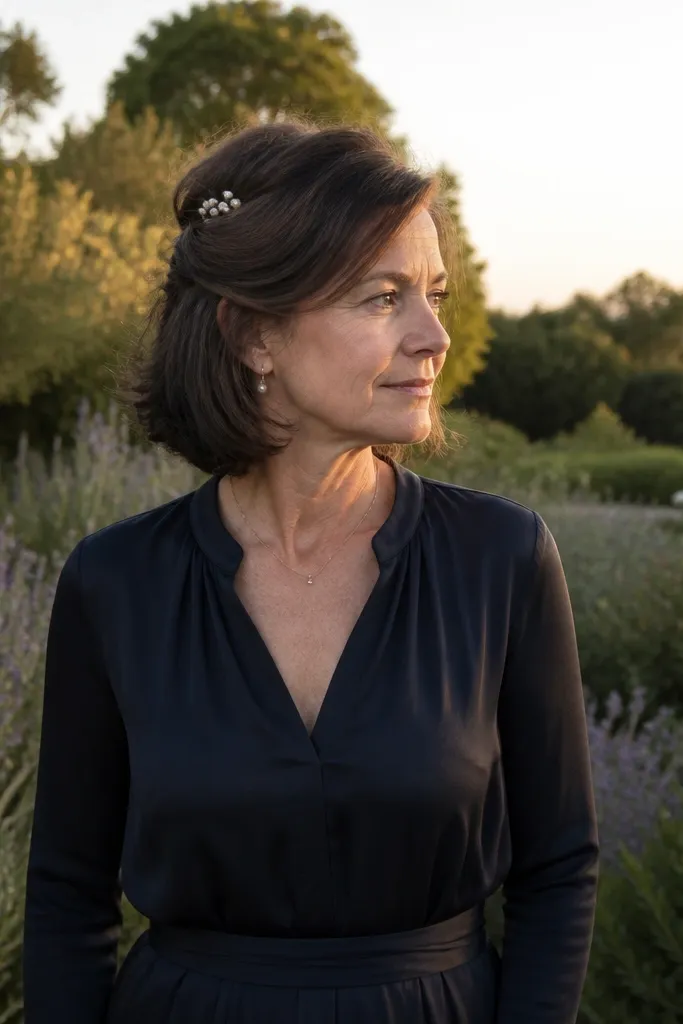
Half-up twists are the sweet spot for short hair because you get an updo look without needing extra length. The twist pulls attention upward, which balances a neckline and makes your face feel “lifted” on camera. Pearl bobby pins add wedding styling without big hardware — they look soft, not costume-y. This suits bob lengths and short shag cuts, especially when your hair has natural texture or light waves.
Start by creating a clean horizontal section from temple to temple, then clip the top aside. Twist the front sections back on both sides (like small rope twists) and secure each side with bobby pins. Bring the two twists together at the crown and pin them so the center is slightly raised. Add 3-4 pearl bobby pins along the pinned area for sparkle, then mist lightly so pearls don’t catch static.
Quick tipIf your hair is slippery, add a tiny amount of dry texture spray before twisting so the pins grip.
Skip thisSkip a flat twist — it needs a small lift at the crown to look bridal in photos.
4. Low Twisted Side Knot with Ribbon Tie
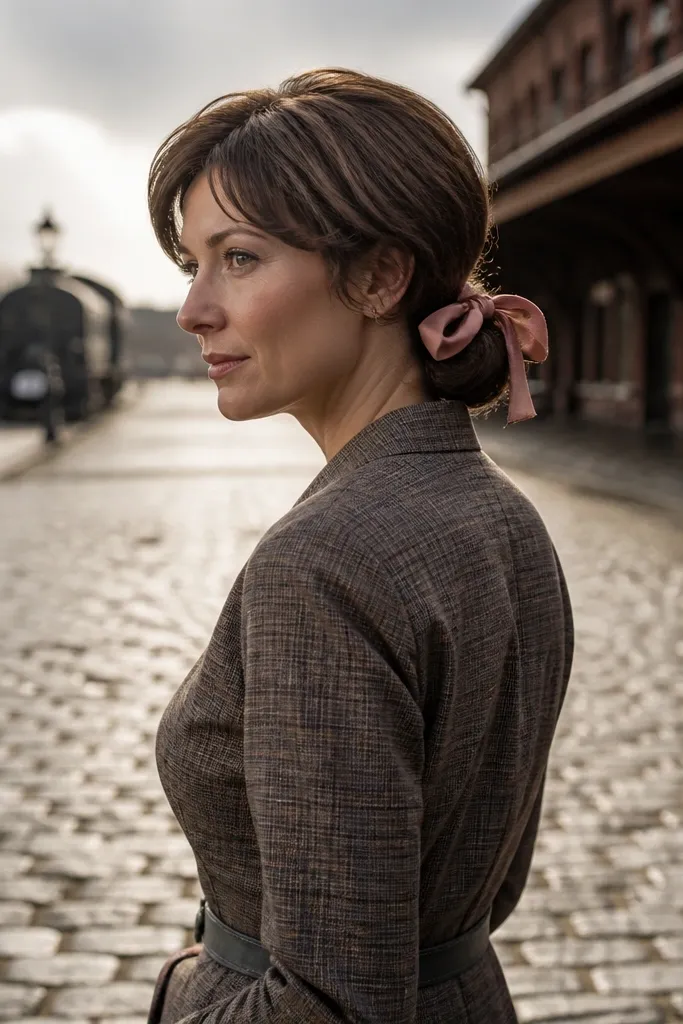
A low side knot on short hair looks polished because it creates the illusion of a fuller updo. The ribbon tie gives you a bridal detail that reads clearly even when the knot is small. This is a strong choice for vintage vibes and outdoor weddings since the knot keeps hair off your neck while still looking romantic. It’s best for jaw-length bobs where you can gather enough hair to form a visible knot.
Start by smoothing hair and adding a light hold mousse so pieces don’t pop out. Gather hair to one side at the nape and twist it toward the back, then wrap the twist into a small knot. Secure with 3 bobby pins arranged like a triangle so the knot doesn’t wobble. Tie a narrow ribbon around the knot and finish with hairspray at the pins and along the ribbon knot.
Use a ribbon width of 1/4 to 1/2 inch so it shows up in photos without swallowing the knot.
Don’t tie the ribbon too tight — it can pull the knot flat and make it look accidental.
5. Pinned Crown Waves with Open-Back Hair Comb
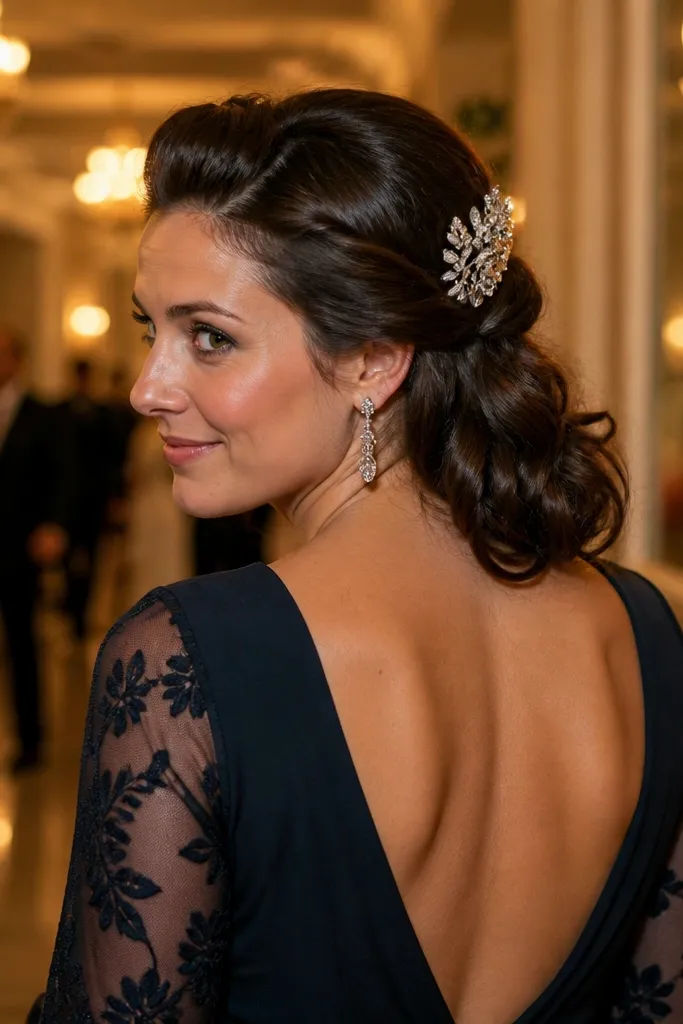
This style is made for short hair that wants to look “done” from the front and still look pretty from behind. Pinned crown waves create lift at the top, while the open-back comb adds a bridal sparkle that’s visible when you turn around. It works with bobs and shorter cuts with enough length to wave and pin. Choose it when your dress has an open back or off-shoulder neckline because the hair comb detail will show off against the skin.
Start with a wave pattern using a flat iron or 3/4-inch iron; keep the wave loose so it doesn’t look stiff. Part your hair slightly off-center, then pin the crown sections back in small increments using bobby pins. Place an open-back hair comb across the pinned area so the teeth disappear into hair. Secure any loose ends at the sides and mist hairspray around the pin line, not the entire head.
Pin in 2-3 smaller sections instead of one big pin — you’ll get cleaner control and less pulling.
Skip heavy hairspray on the comb — it can look flaky and dull under flash.
6. Messy Chic Pin-Up Pixie with Two Barrettes

This is the “softly undone but bridal” look that works when your hair is too short for classic updos. Texture gives it dimension, and two barrettes make it look styled rather than random. It flatters short hair with natural volume because you’re enhancing what’s already there. This works well for receptions with lively lighting since the textured pieces catch highlights instead of clumping.
Start with dry hair and apply a small amount of texturizing paste or cream to the roots and top. Blow-dry or finger-lift the hair to create a side swoop, then set the shape with a quick mist of hairspray. Clip one barrette on each side near the front hairline so the look has symmetry. Tuck any stray ends under the barrettes and check the silhouette from the front.
Choose barrettes with matte finish if your hair is fine — they grip better than glossy ones.
Don’t over-texturize the crown; too much paste makes the hair look dusty in photos.
7. Classic French Twist for a Bob (Mini Version)
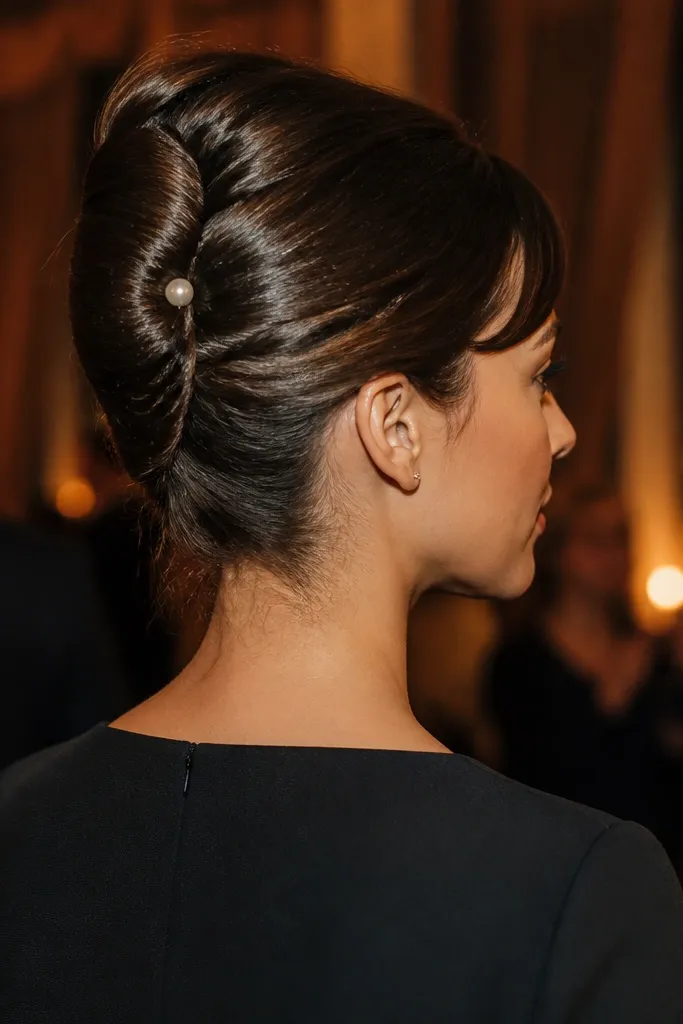
A mini French twist is one of the best ways to make a bob look formal without needing shoulder-length hair. It creates that timeless, face-framing roll and keeps hair off your neck for comfort during photos and speeches. This style shines in evening weddings and indoor ceremonies where you want a crisp, sculpted look. It also works with straight hair because the twist holds its shape with the right pins.
Start with slightly damp hair and apply smoothing cream to the lengths, then blow-dry straight. Part your hair where you like it, then gather it at the back of the head and hold it in a low ponytail shape. Twist the hair upward and inward, tucking the ends beneath as you roll; secure with bobby pins along the twist. Add 1-2 finishing pins at the sides to lock the roll, then mist hairspray over the pin line.
Quick tipUse a pin cross pattern (one pin vertical, one horizontal) for a twist that doesn’t loosen.
Skip thisSkip slippery hair products like heavy conditioner leave-ins right before pinning.
8. Braided Headband with Two Tiny Dutch Braids
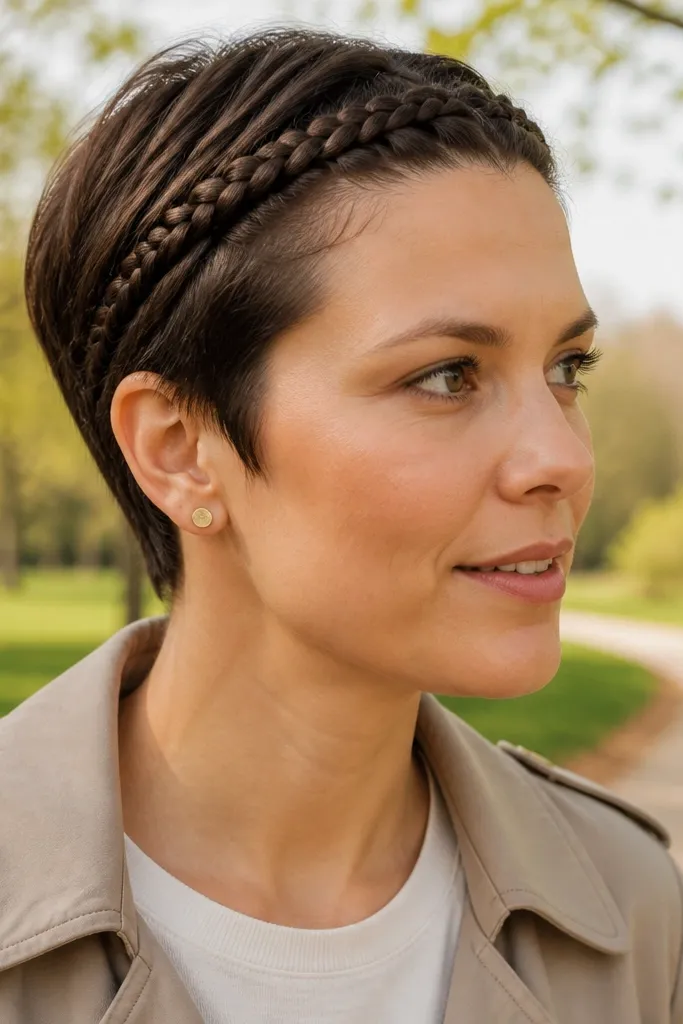
This is a wedding hairstyle trick for short hair: you get the braid look without needing long strands by braiding only the front sections. Two tiny Dutch braids act like a headband, creating a neat frame around your face and making your hairstyle look deliberate in every angle. It’s great for spring and summer weddings because it feels fresh, not heavy. It also works with hair that’s naturally wavy or straight, since the braids control the shape.
Start by parting a narrow section on each side from temple to crown, leaving the back loose. Create a Dutch braid on each side by crossing strands under instead of over; stop at the top of your head. Bring the braid ends together across the crown and secure with bobby pins so the headband sits flat. Finish by smoothing the loose hair with a light spray and tucking any small flyaways with pins.
Keep the braid thickness consistent — thin braids look more bridal on short hair than bulky ones.
Don’t braid too far down the forehead; it can make the look feel crowded.
9. Waterfall-Style Front Waves with Pin Back
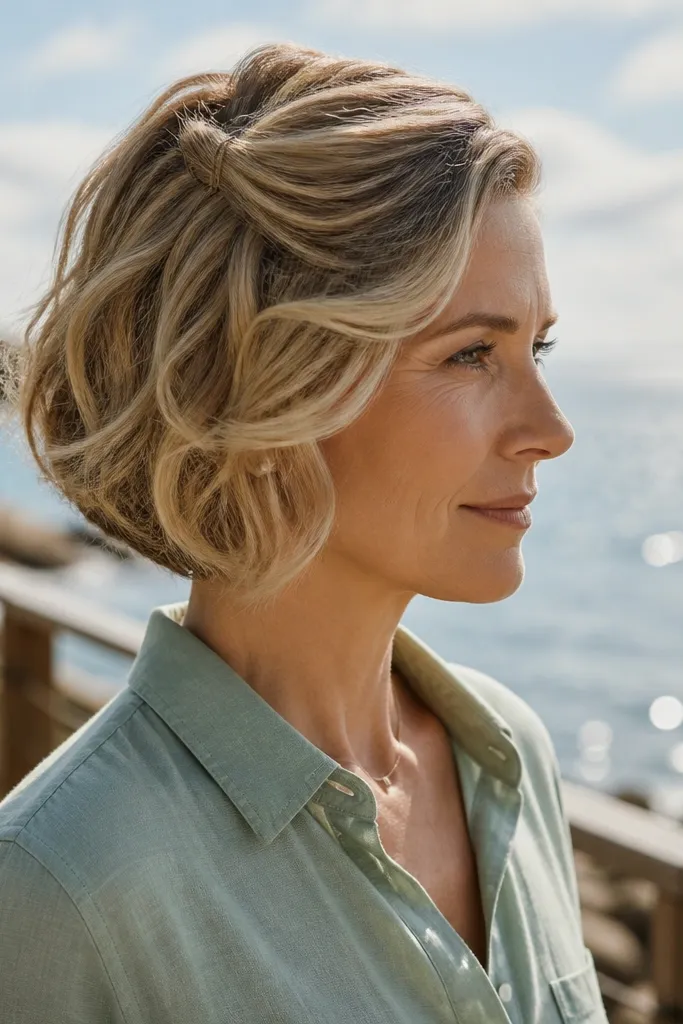
You don’t need long hair to get that waterfall effect. For short hair, you create the “waterfall” illusion using two or three pinned wave strands at the front. The result looks romantic, especially when paired with a soft neckline and minimal jewelry. This style is flattering for bobs and textured lobs, and it holds up well because the pins are doing the work, not the length. Choose it for daytime ceremonies where you want a gentle, airy vibe.
Start by curling or waving the front sections only so the rest stays smoother. Take a small top layer strand, twist it slightly, and pin it back at the crown; leave the next strand hanging to create the waterfall look. Repeat one more time with another thin strand, pinning just behind the first. Finish with hairspray on the pinned points and gently brush the front wave so it looks natural.
Use pins that match your hair color — short hair shows every contrast in bright light.
Skip big sections — waterfall effects on short hair look best when they’re delicate.
10. Sleek Center Part with "Hidden" Hair Pin Sparkle
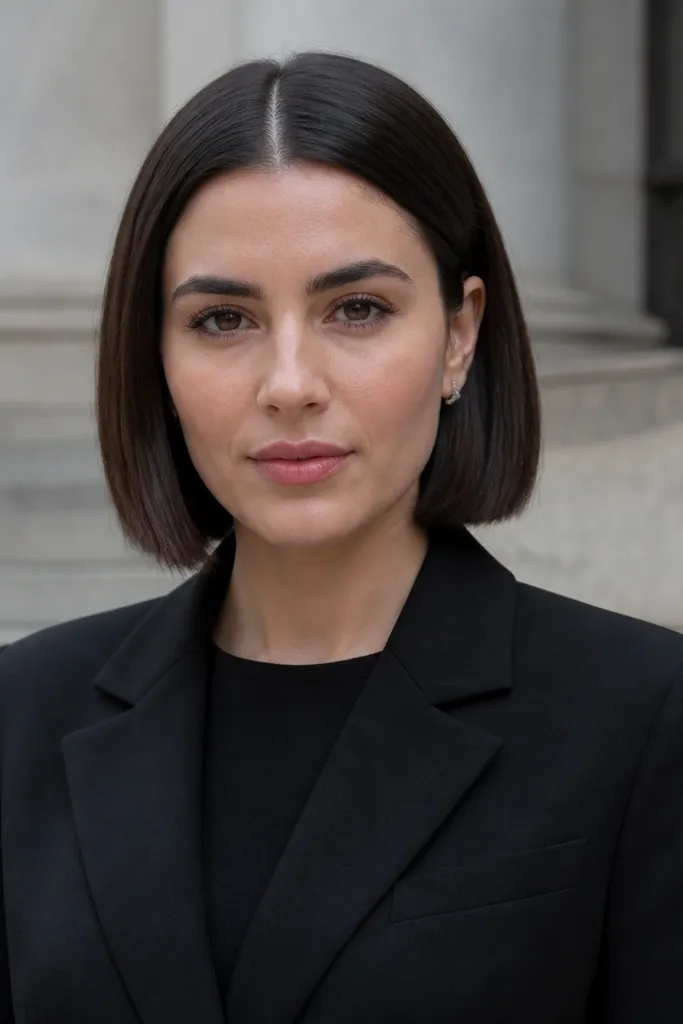
This one is simple and looks expensive because it leans on a clean center part and smooth texture. The jeweled pin is placed so it catches light only when you move, which makes it feel subtle and bridal instead of loud. It’s ideal for short hair that doesn’t hold waves well or for brides who want a modern look. This works especially well with strapless or halter dresses because the hairline stays crisp and open.
Start by blow-drying smooth with a paddle brush, then apply a tiny amount of shine-free smoothing serum to avoid greasiness. Create a sharp center part and press the hair down at the roots. Place a small jeweled pin horizontally at the crown, tucking it under a top layer so only the sparkle shows. Set with a light hairspray mist and use a comb to keep the part straight.
Quick tipIf your hair is fine, use a root-lifting spray before smoothing so the center part doesn’t fall flat.
Skip thisDon’t place the pin at the very front — it can look like a random hair accessory.
11. Side-Swept Curls with a Floral Clip at the Nape
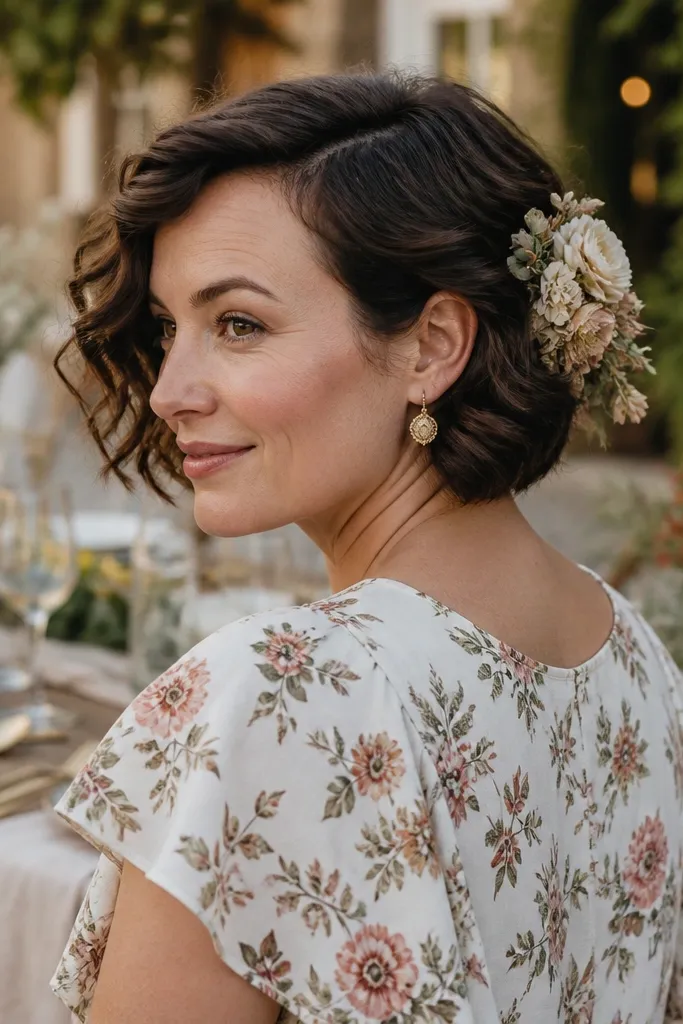
Side-swept curls add a romantic frame and create that “soft wedding” feel without needing extra length. A floral clip at the nape keeps the front view clean while still giving you a bridal moment when you turn. This style flatters short hair that’s already curly or can hold curls with heat. It’s a great match for boho dresses and outdoor photos where the hair moves in the breeze.
Start with heat protectant, then curl in small sections using a 1/2-inch barrel for tight-to-medium curls. Brush only lightly so you keep shape, then sweep all hair to one side. Pin the bulk at the nape with two bobby pins, then add a floral clip over the pins to cover them. Finish with hairspray focused on the pinned area and the sides so curls don’t frizz.
Quick tipChoose silk or preserved-looking florals for better hold in humidity.
Skip thisSkip large flower clips if your hair is very short — they can overwhelm the scale.
12. Texture Spray Waves with a Thin Velvet Headband
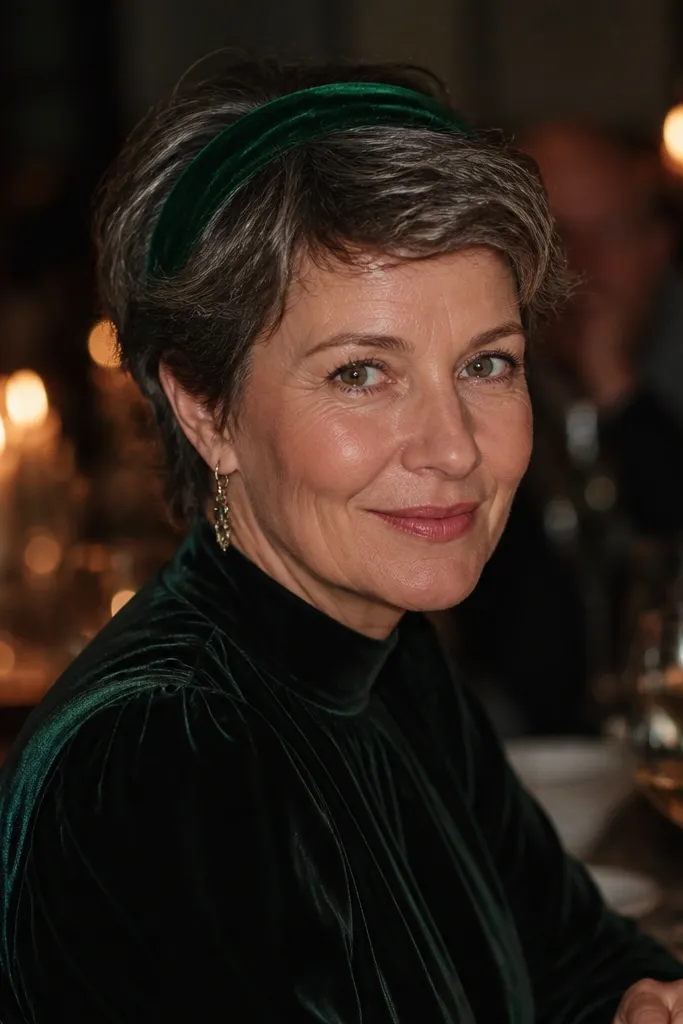
A thin velvet headband looks bridal on short hair because it adds height and softness without needing length for updos. Texture spray waves give you the photo-ready movement, and the velvet band creates a clear, styled line. This works well for winter weddings and evening receptions because velvet reads cozy and intentional. It also suits brides who want their hair to look natural but still “set” for photos.
Start by misting texture spray on damp hair and scrunch lightly. Create loose waves with a flat iron or wand, then let hair cool fully. Place a thin velvet headband on top so it sits slightly above your hairline, not on your forehead. Adjust the waves around the band and add a light hairspray around the sides to keep everything in place.
Quick tipPick a headband color that matches your bouquet ribbon or shoes so it looks coordinated, not random.
Skip thisDon’t use a wide headband on pixie cuts — it can cut your face in half visually.
13. Pinned Mini Updo with Side-Parted Bangs
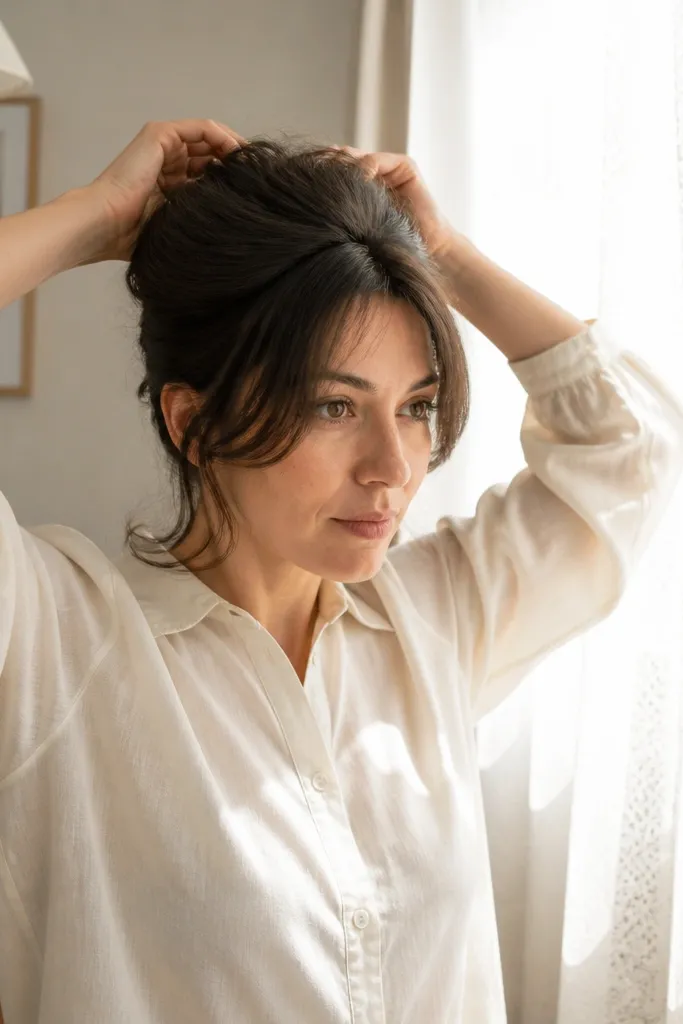
If you have short bangs or a fringe, this style makes them look intentional and bridal instead of falling into your eyes. You pin the top and sides into a mini updo, then let the bangs stay soft and face-framing. It’s a great choice for short hair that’s layered because the layers create natural volume. Choose this for ceremonies where you’ll be in front-facing photos a lot, since the pinned crown keeps everything readable.
Start by blow-drying bangs with a slight outward curve so they frame your cheekbones. Pull the top section back and twist lightly, then pin at the crown with 2 bobby pins. Use smaller pins to secure the sides behind the ears so the mini updo holds. Finish by lightly spraying only the pinned area and smoothing the bangs with a touch of hairspray.
Pin with the bobby pins angled toward the back of your head — it locks better on short lengths.
Skip pinning bangs flat — let them curve so the look stays soft.
14. Ribbon-Wrapped Low Bun for a Short Bob
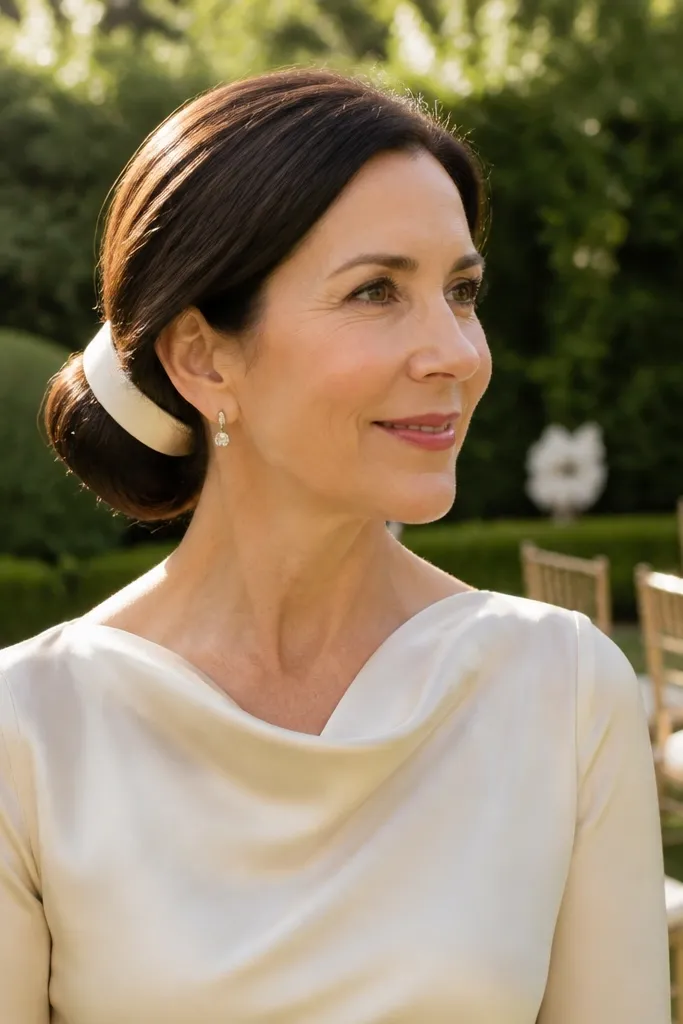
A low bun is a classic, but short hair needs a “short-bun” approach that looks smooth, not lumpy. Wrapping ribbon around the bun instantly reads bridal because it covers the pin spots and adds a romantic line. This style is great when you want your hair off your shoulders but still want a feminine detail. It’s best for bobs that reach the jaw and hold a gathered shape with pins.
Start by gathering hair at the nape and twisting into a compact bun. Secure with bobby pins, then place a second set of pins through the bun from both sides for stability. Wrap a ribbon around the bun 2-3 times, then tie it tightly enough to hold but not so tight it flattens the bun. Mist hairspray around the bun and ribbon so loose ends don’t peek out.
Use a ribbon with a slight sheen like satin but choose a matte finish if your hair is already shiny.
Skip thick lace ribbon — it tangles and makes short hair look messy.
15. Pinched Side Twists with a Pearl Bar Clip
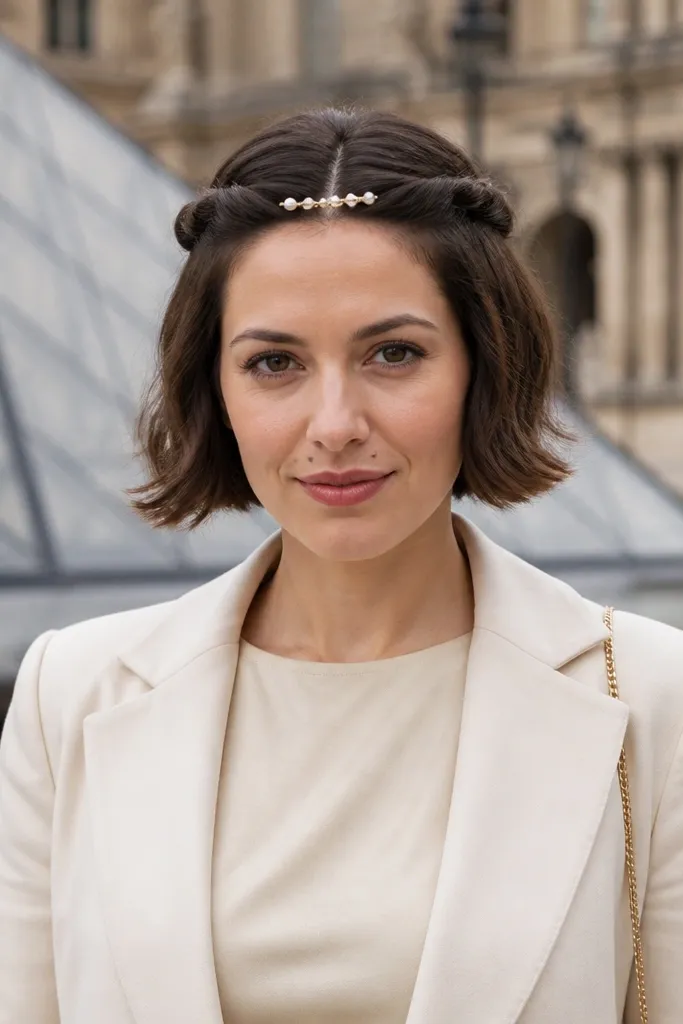
This look is for brides who want symmetry without a full updo. Two pinched side twists create shape along the temples, and the pearl bar clip ties it together at the center so it looks bridal even if your hair is barely long enough to twist. It’s flattering for short bobs and layered cuts because the pinched sections hold texture. Choose it for classic weddings where you want polished, not boho.
Start by parting slightly off-center and applying a light styling cream to the top. Take a thin section from each temple, twist it back, and pin it just behind the ear so it stays tight. Gather the pinned twists and place a pearl bar clip over the meeting point at the crown. Add 2 extra bobby pins under the clip if you see any gaps, then spray lightly over the clip base.
Quick tipIf your hair is short enough to slip, tease only the roots before twisting — it grips the pins.
Skip thisDon’t use a bar clip that’s wider than your head — scale matters on short hair.
16. Half-Up Bubble Tuck (Small Loops) for Short Hair
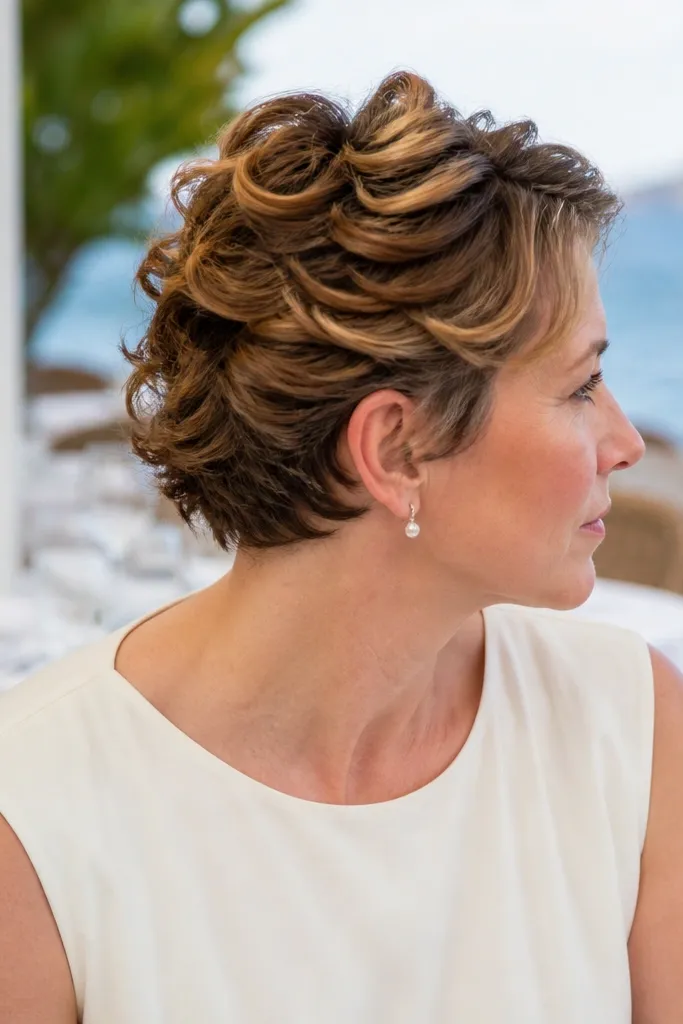
Bubble tucks look playful and bridal because they create visible “loops” even on short hair. Instead of one big ponytail, you make small half-up loops that sit near the front and crown. This style photographs well because the texture is dimensional and the loops catch light. It suits short hair that has enough length to form tight mini loops — usually around ear-to-jaw length.
Start by sectioning the top portion from temple to temple and securing the rest. Create two mini ponytails with clear elastic or small hair ties, then pull each loop outward gently to form bubbles. Tuck the bubble sections back and pin them so the loops sit flat and secure. Finish by smoothing the sides and misting hairspray around the loop pins to lock the shape.
Use clear elastics for a cleaner look since short hair shows band edges fast.
Skip loose bubbles — they should sit snug so they don’t collapse in photos.
17. Soft Upward Lift with a Bow Clip at the Crown
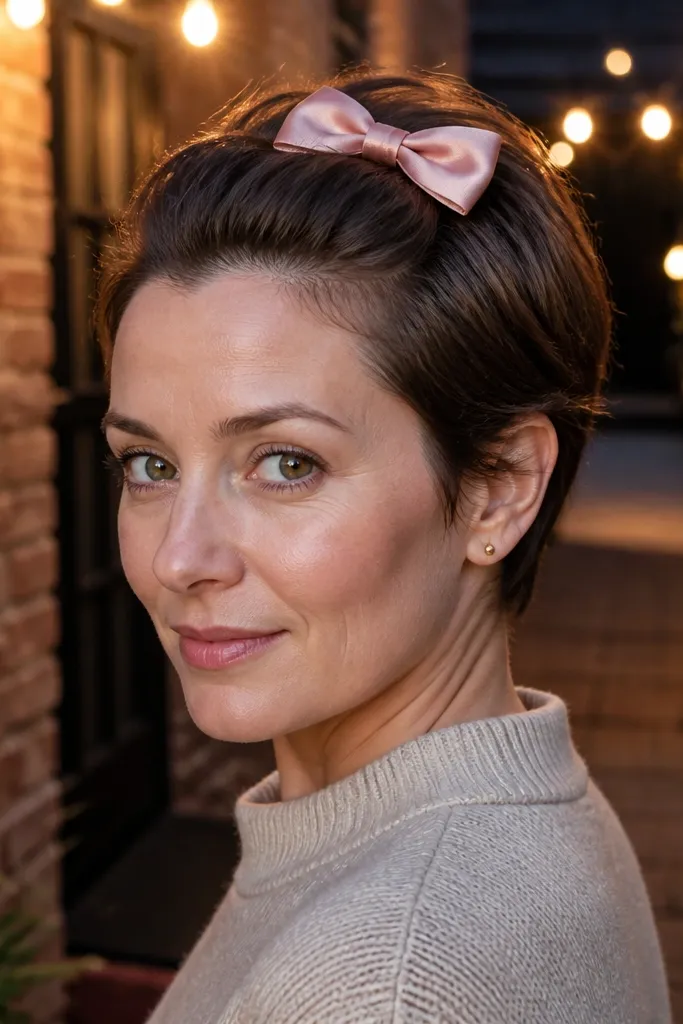
A bow clip is one of the fastest ways to make short hair look wedding-ready without complicated techniques. This style relies on upward lift at the crown, so your hair looks airy and elevated rather than flat. It works great for pixies and short bobs because the bow becomes the centerpiece. Choose it for bridal looks that lean cute, romantic, or slightly retro.
Start with dry hair and add mousse or root-lifting spray at the crown. Blow-dry lifting the roots upward, then use a comb to shape the top into a soft mound. Place the bow clip at the center crown and secure it with 1-2 bobby pins underneath. Smooth the sides so they sit clean, then spray lightly around the bow and sides.
Pick a bow clip with a neutral metal base so it doesn’t clash with earrings.
Don’t place the bow too high on the top of the head — it can look like a hat brim.
18. Twisted Side Bun with a Pearl Drop Pin
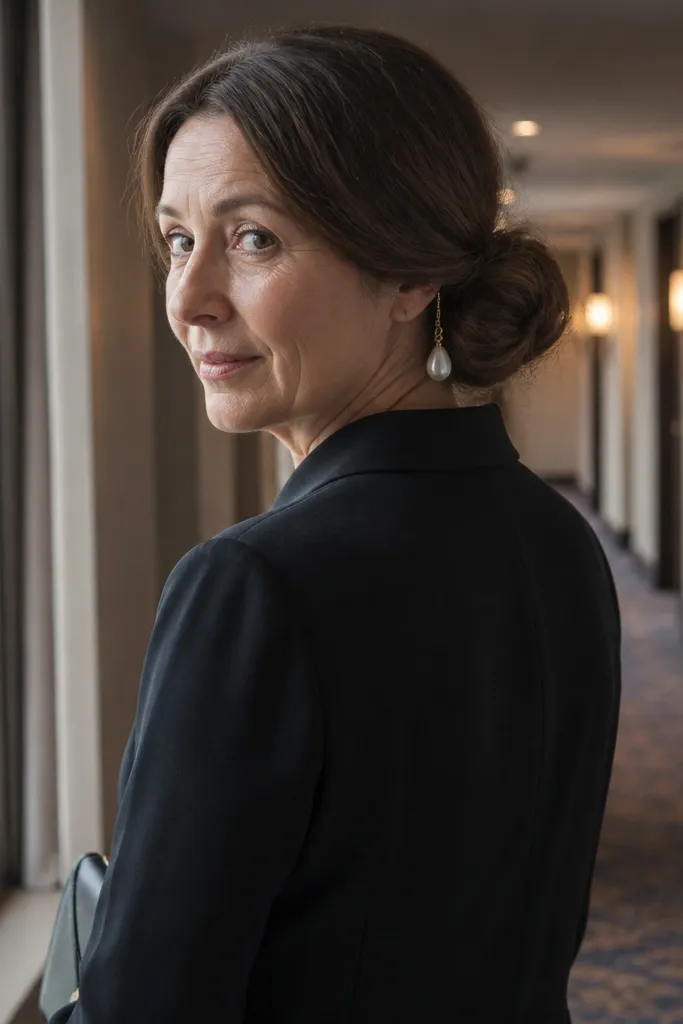
This style gives you the look of a bun while staying realistic for short hair. The twist creates structure so the bun doesn’t look like a flat pad, and the pearl drop pin adds a bridal detail that moves with you. It’s flattering on short bobs and layered cuts because the twist grabs layers and holds them. This works for evening weddings where you want a little drama without adding length.
Start by curling only the ends lightly so they tuck into the bun better. Gather hair to one side at the nape and twist toward the back, then wrap into a compact bun. Secure with bobby pins and add a pearl drop pin vertically through the front of the bun to anchor it. Finish with hairspray at the bun and around the twist so loose ends don’t show at the edges.
If your hair is very fine, backcomb the crown slightly before twisting for more grip.
Skip pinning the bun only from one side — short hair needs a two-point hold.
19. Wavy Bob with Tucked-In Underlayers Pins
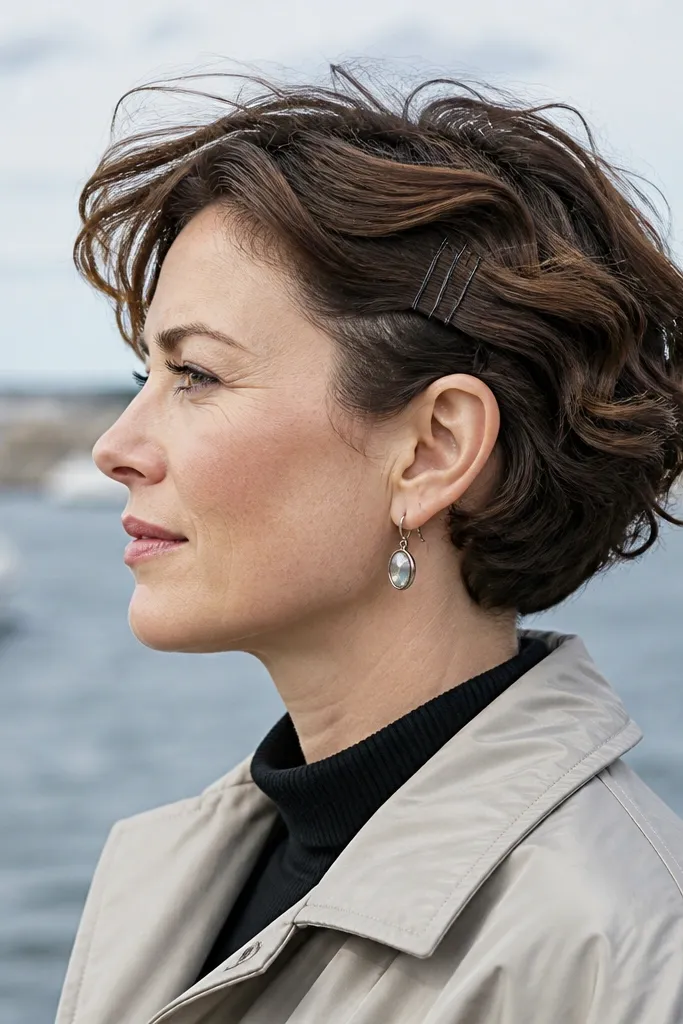
This is an underrated short-hair wedding trick: keep the top waves soft, but tuck the underlayers so the silhouette stays clean. Pins near the jawline stop the sides from flipping out in wind or movement. The result looks polished in photos without a heavy updo. It’s perfect for bob lengths and shoulder-skimming cuts that get frizzy around the ends. Choose it for outdoor ceremonies or any venue with air movement.
Start by styling waves through the top and mid-lengths, leaving the very ends slightly softer. After curling, tuck the ends of each side under toward the neck and pin with 2 bobby pins per side. Check the front hairline in a mirror so pins don’t show — adjust the tuck angle until they disappear. Mist hairspray on the tucked zones, not the entire head, so your waves stay touchable.
Use pins with flat heads so they sit flush against short layers.
Don’t pin too far forward at the cheek — it can create an obvious “pin line.”
20. Glittery Hairline Veil Clip (No Full Veil)
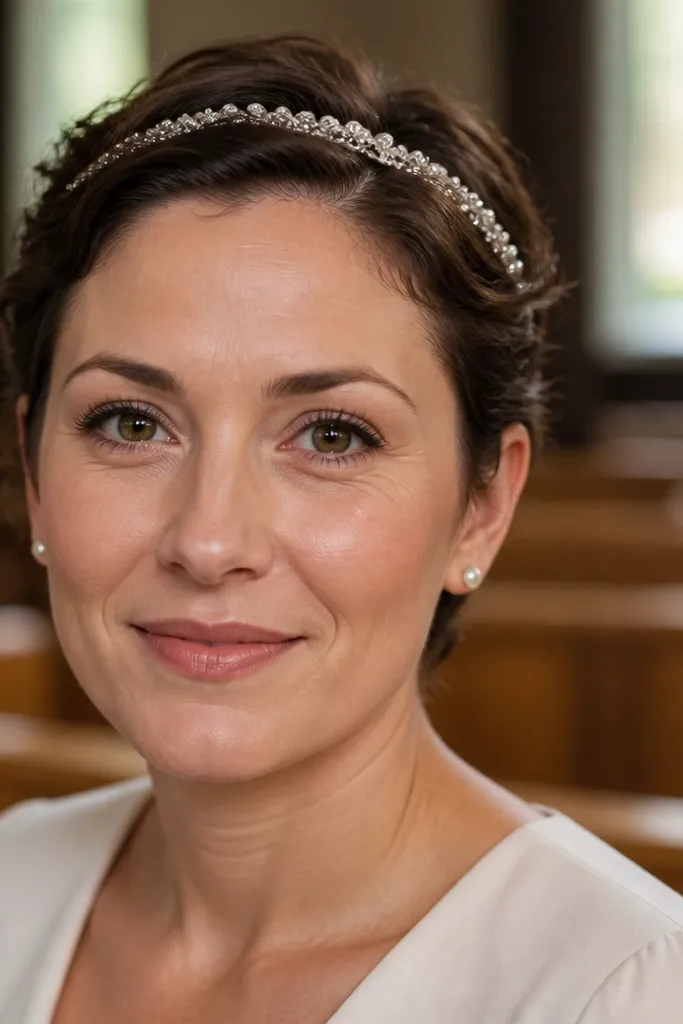
If you like the veil look but don’t want a heavy full veil, a hairline veil clip is a clean solution for short hair. It sits along the hairline, which makes your hair look bridal from the front while keeping the back light and comfortable. The glittery or beaded clip adds sparkle without pulling your hair into an updo. This style works for indoor ceremonies and photo sessions where you want a clear bridal focal point.
Start with styled hair — either smooth or lightly waved — because the clip needs a stable base. Place the veil clip along your hairline at the center or slightly off-center, then secure with the built-in comb teeth. Tuck any short flyaways behind the clip using bobby pins. Mist hairspray around the clip area so it doesn’t shift during hugs and photos.
Choose a clip length that matches your part width so it doesn’t look like a headband.
Skip clips that are too tall — they can look like a party accessory on short hair.
21. Rose-Gold Twist Crown for Ear-Length Hair
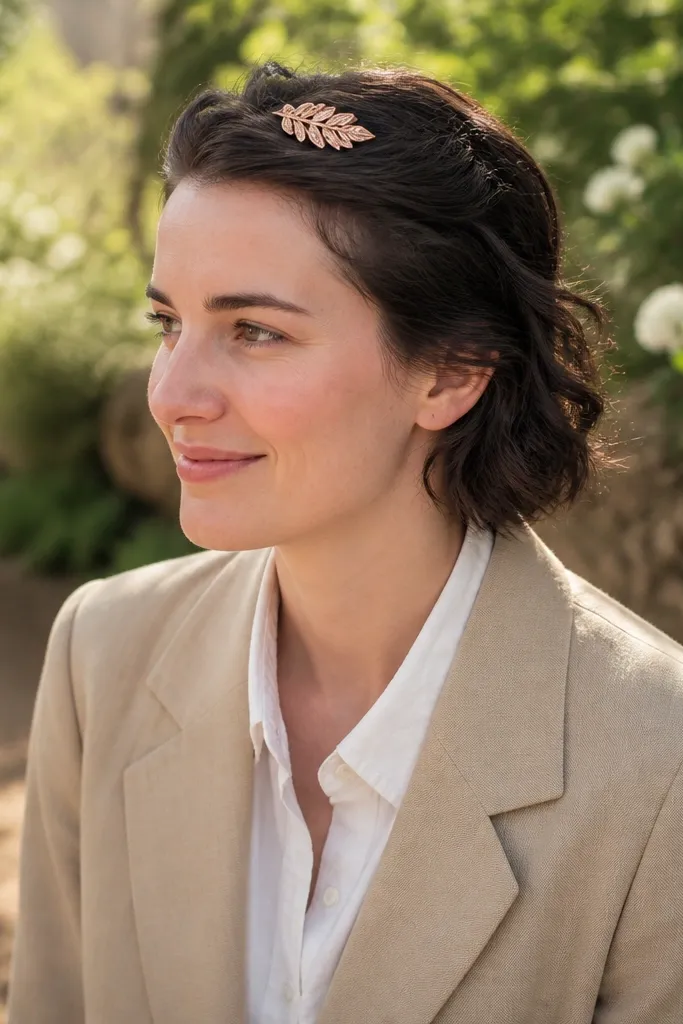
Ear-length hair needs an approach that anchors at the crown, not at the back of the head. A twist crown uses small twisted front sections that meet at the top, creating a bridal silhouette even with limited length. A rose-gold comb at the meeting point hides pins and adds a warm glow in photos. This style is great for formal weddings and for brides wearing earrings that draw attention to the face. It also works well when you want hair to stay off your neck.
Start by applying a light mousse so the twists hold. Take small front sections from each side, twist them back, and pin at the crown in a symmetrical position. Add a rose-gold comb across the pinned meeting point to conceal bobby pins. Finish by smoothing the front and lightly spraying the crown so the twist crown stays tight.
Quick tipPin the twists first, then place the comb — it’s easier to hide imperfections that way.
Skip thisDon’t twist too thick — thick twists on ear-length hair create bulky lumps.
22. Satin Scrunchie Half-Up for Short Hair
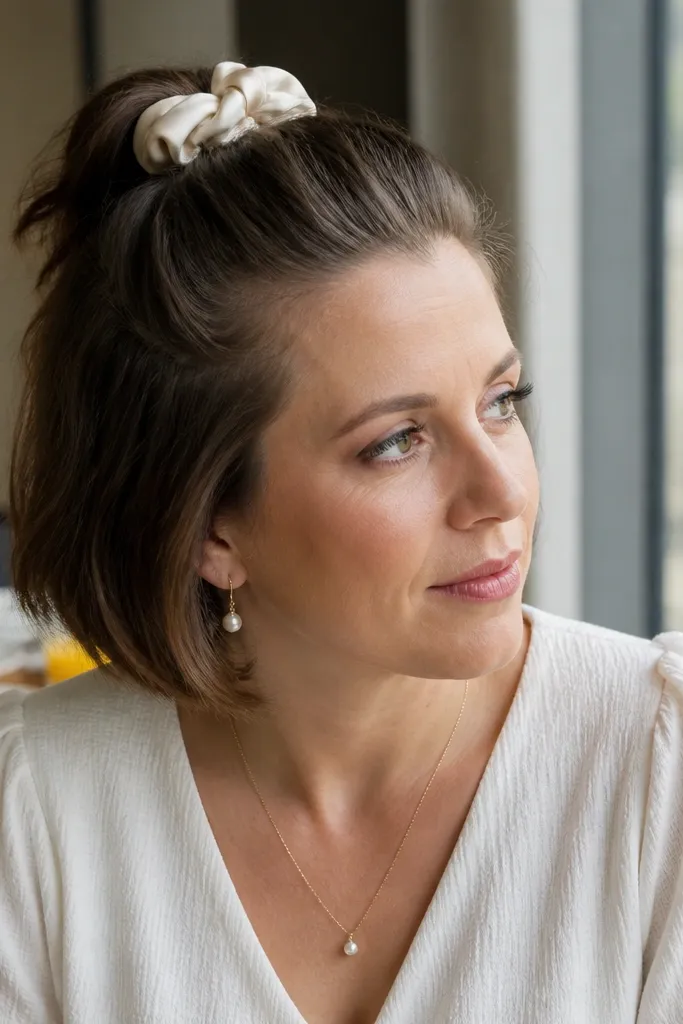
A satin scrunchie looks soft and bridal, and it’s one of the easiest ways to create a half-up style on short hair. The gather at the crown gives lift, while the scrunchie hides the exact pinning mechanics. This is great for casual ceremonies, brunchy receptions, and brides who want comfort without sacrificing photos. It also works when your hair is too short for a clean ponytail loop.
Start with slightly damp hair and use a small amount of styling cream to help hold the shape. Gather a small top section from temple to crown and secure it with a satin scrunchie. Adjust the scrunchie so it sits centered and slightly raised, then tuck any side flyaways under the gather with 2 bobby pins. Finish with hairspray around the scrunchie base so it doesn’t slip.
Quick tipPick scrunchies with a matte satin finish if you’re worried about flash glare.
Skip thisSkip thin elastic under the scrunchie if it’s visible — short hair makes elastic edges easy to spot.
23. Pinwheel Side Clip with Textured Waves
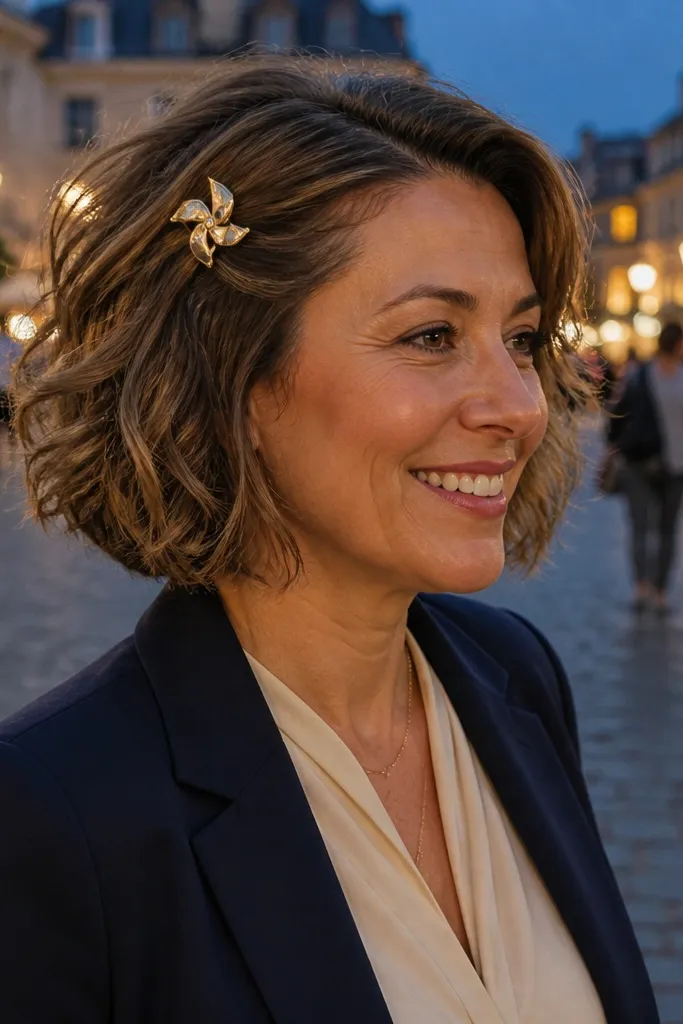
Pinwheel-style side clips look like jewelry for your hair, and they make short hairstyles feel special instantly. Pair them with textured waves so the clip sits on top of movement, not flat hair. This style is ideal for short bobs that hold a wave and for brides who want a playful but polished finish. It works for both indoor and outdoor weddings because the waves move while the clip keeps the front controlled.
Start by creating texture with a mousse or sea-salt spray, then wave hair with a 1/2 to 3/4-inch iron. Part slightly off-center, then sweep the front section toward your preferred side. Place the pinwheel clip at the temple, then tuck any stray hair behind it with one bobby pin. Mist hairspray lightly over the clip and the side part to lock the shape.
Quick tipMatch clip color to your bouquet accents — rose gold with pink florals looks intentional in photos.
Skip thisDon’t hide the clip — it should be visible enough to read as styling, not a random pin.
24. Clean Bob Flip with Pearl Hairpins at the Part
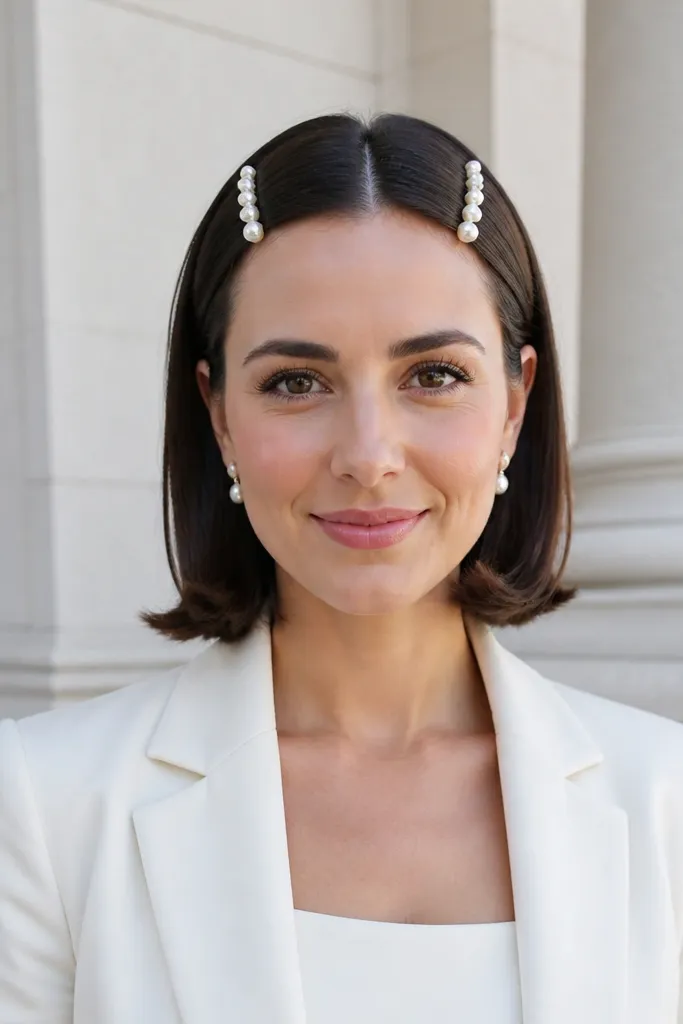
A clean bob flip is modern and bridal because it keeps the hairline sharp and the ends styled. Pearl hairpins at the part add a classic touch without needing length for braids or knots. This look is flattering on straight bobs and short cuts that can be blow-dried with a bend at the ends. It’s a strong choice for courthouse weddings, city venues, and any ceremony where you want the hair to look crisp and camera-ready.
Start by blow-drying straight and flipping the ends slightly with a round brush or flat iron technique. Create a center part or a very slight side part so the hair looks symmetrical. Place 3-4 pearl hairpins spaced along the part line at the crown and mid-scalp, using bobby pins under them for grip. Finish with a light spray to hold the part and keep the ends smooth.
Quick tipUse pearl pins with a thin base — bulky pins can create dents in short bobs.
Skip thisSkip over-flipping the ends — too much curl makes the bob look like a haircut, not a hairstyle.
25. Twist-and-Tuck Crown with a Skinny Gold Chain Clip
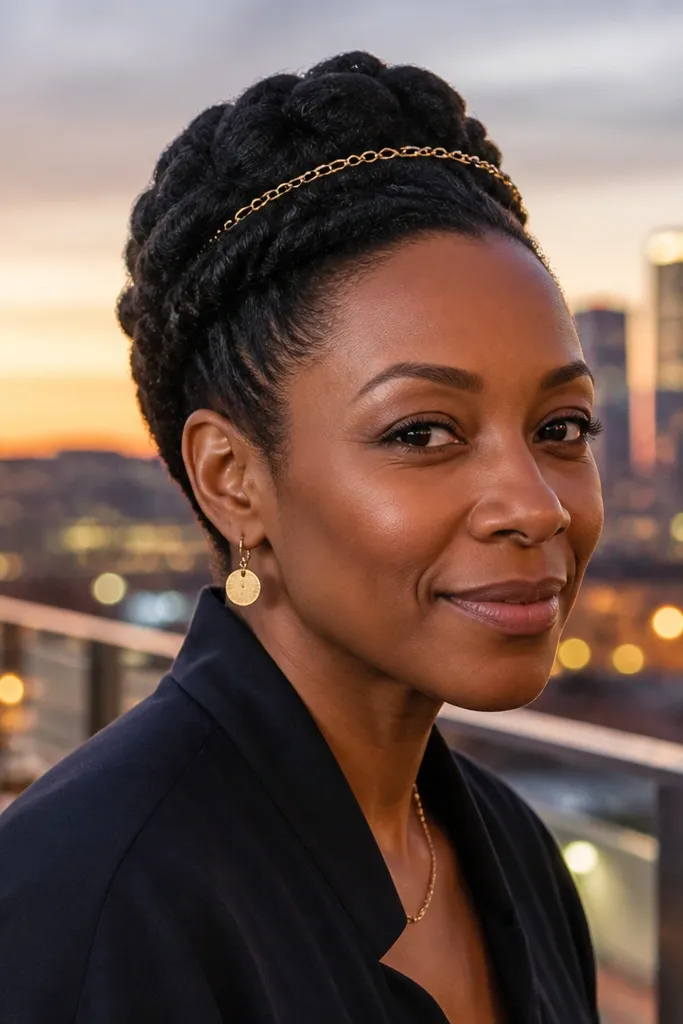
This is a sleek bridal look that still has movement. The twist-and-tuck crown creates a subtle raised pattern at the top, and the skinny gold chain clip adds that “jewelry hair” effect. It’s perfect for short hair that can’t do full braids but can handle small pinning sections. Choose it for modern weddings, especially if your earrings are minimal and you want the hair to do the talking.
Start by applying a light hold styling cream and blow-drying the top with lift. Take two small sections from each side, twist them back, and tuck under at the crown using bobby pins. Place the skinny gold chain clip over the pinned area so it hides the pins and holds everything in place. Smooth the top layer so the chain sits flat and the crown pattern stays clean.
Quick tipIf your hair is fine, add a tiny bit of dry shampoo at the roots for grip before pinning.
Skip thisDon’t use a thick chain clip — it can snag short layers and pull the crown out of shape.



